
Input系统之APP建立联系
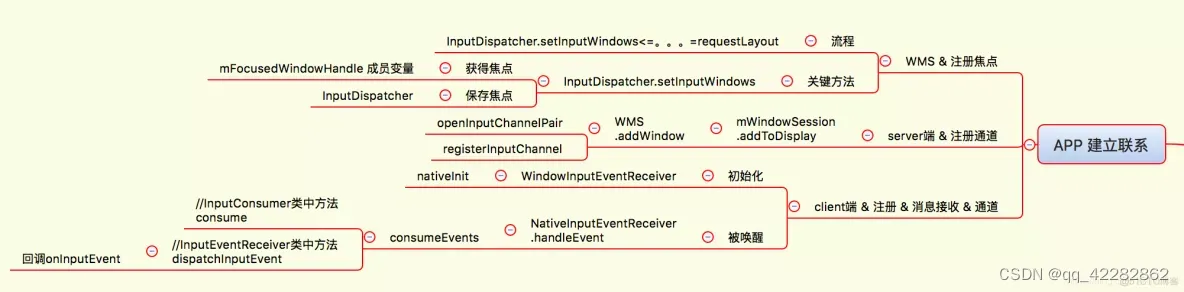
这里主要从三个角度对InputDispatcher与APP之间建立联系的过程 进行分析说明。
这里首先用一张框架图来表示InputReader,InputDispatcher,WindowManagerService,与应用层之间的关系,如下所示:
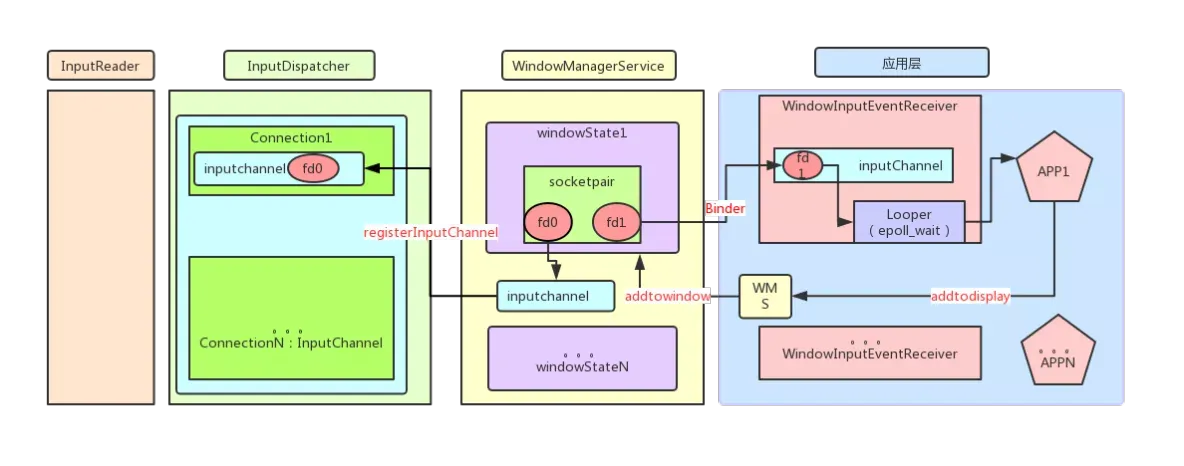
核心是socketpair机制,在系统层留下一个fd0,在通过binder进程间通信机制在应用层传递一个fd1,这样系统层的inputDispatcher和应用层的App间建立了一个联系。系统层服务端有事件的时候通过socketpair机制把事件从系统层上报到上层。
架构图的流程简单说明下:
在InputDispatcher内部,sockpair被封装成inputChannel,inputchannel被封装成Connection进而和应用层之间进行联系
在WindowManagerService内部,WindowState通过创建socketpair来得到fd0和放到,将f0封装成inputChannel注册到InputDispatcher中,将fd1它通过binder通信机制传递到应用端。
应用端将fd1封装成InputChannel,通过WindowInputEventReceiver最后将fd1放入到应用层这边的loop中进行监听。这就是整个事件传输的宏观流程,接下来从3个方面对输入事件与APP间建立联系,做个分析:
在android系统中一个activity对应一个ViewRootImpl对象,在Activity启动时会执行handleResumeActivity,这里会创建一个ViewRootImpl对象,并调用其setView函数把Activity的DecorView设置到ViewRootImpl中,而Activity正式setview函数中注册键盘消息的接受通道的。对于应用程序一定会调用到viewRootImpl,因此分析ViewRootImpl代码如下:
public void setView(View view, WindowManager.LayoutParams attrs, View panelParentView) { //关键点1:调用requestLayout来通知InputManagerService当前的窗口是激活的窗口requestLayout();if ((mWindowAttributes.inputFeatures& WindowManager.LayoutParams.INPUT_FEATURE_NO_INPUT_CHANNEL) == 0) {mInputChannel = new InputChannel();}try {//关键点2,bindr通信,后面会创建一对InputChannel(server/client)//函数调用结束后,mInputChannel就变成了client端的对象。res = mWindowSession.addToDisplay(mWindow, mSeq, mWindowAttributes,getHostVisibility(), mDisplay.getDisplayId(),mAttachInfo.mContentInsets, mAttachInfo.mStableInsets,mAttachInfo.mOutsets, mInputChannel);} catch (Exception e) {...}if (mInputChannel != null) {if (mInputQueueCallback != null) {mInputQueue = new InputQueue();mInputQueueCallback.onInputQueueCreated(mInputQueue);//关键点3 创建并初始化WindowInputEventReceiver,按键消息会从native层传到该对象的onInputEvent函数//说明:onInputEvent函数是按键在应用端java层分发的起始端mInputEventReceiver = new WindowInputEventReceiver(mInputChannel,Looper.myLooper());}}
}
requestLayout是通知IMS这个Activity窗口是当前被激活的窗口,同时将所有的窗口注册到InputDispatcher中。
mWindowSession.addToDisplay是把键盘消息接受通道的server端注册到cpp层IMS中,client端注册到本应用程序的消息循环Looper中,当IMS监控到有键盘消息的时候,就会找到当前被激活的窗口,进而找到其在IMS中对应的键盘消息接收通道inputChannel,通过这个通道在IMS的server端来通知应用程序消息循环的client端,这样就把键盘消息分发给当前的激活的Activity窗口了。
WindowManager注册窗口焦点流程
继续分析requestLayout,代码实现如下:
@Overridepublic void requestLayout() {if (!mHandlingLayoutInLayoutRequest) {checkThread();mLayoutRequested = true;scheduleTraversals();}}
scheduleTraversals函数来做进一步的操作,代码如下:
void scheduleTraversals() {if (!mTraversalScheduled) {mTraversalScheduled = true;mTraversalBarrier = mHandler.getLooper().postSyncBarrier();mChoreographer.postCallback(Choreographer.CALLBACK_TRAVERSAL, mTraversalRunnable, null);if (!mUnbufferedInputDispatch) {scheduleConsumeBatchedInput();}notifyRendererOfFramePending();}}
该函数调用mChoreographer来post一个Runnable到Looper中,之后会执行mTraversalRunnable中的run方法,即调用doTraversal函数,代码实现如下:
void doTraversal() {if (mTraversalScheduled) {mTraversalScheduled = false;mHandler.getLooper().removeSyncBarrier(mTraversalBarrier);//...performTraversals();//...}}
执行performTraversals()函数,代码实现如下:
private void performTraversals() {//...relayoutResult = relayoutWindow(params, viewVisibility, insetsPending);//...
}
这里关键调用relayoutWindow函数,在该函数中又会调用mWindowSession的relayout,实现如下:
private int relayoutWindow(WindowManager.LayoutParams params, int viewVisibility,boolean insetsPending) throws RemoteException {
//...
int relayoutResult = mWindowSession.relayout(mWindow, mSeq, params,(int) (mView.getMeasuredWidth() * appScale + 0.5f),(int) (mView.getMeasuredHeight() * appScale + 0.5f),viewVisibility, insetsPending ? WindowManagerGlobal.RELAYOUT_INSETS_PENDING : 0,mWinFrame, mPendingOverscanInsets, mPendingContentInsets, mPendingVisibleInsets,mPendingStableInsets, mPendingConfiguration, mSurface);
//...
}
进而进入到WMS的relayoutWindow函数,这里关注mInputMonitor.updateInputWindowsLw(true ),代码如下:
public int relayoutWindow(Session session, IWindow client, int seq,WindowManager.LayoutParams attrs, int requestedWidth,int requestedHeight, int viewVisibility, int flags,Rect outFrame, Rect outOverscanInsets, Rect outContentInsets,Rect outVisibleInsets, Rect outStableInsets, Configuration outConfig,Surface outSurface) {//...mInputMonitor.updateInputWindowsLw(true /*force*/);//...
}
这里的mInputMonitor是InputMonitor对象。,这里关注mInputMonitor.updateInputWindowsLw的实现,代码如下:
public void updateInputWindowsLw(boolean force) {//...// Add all windows on the default display.final int numDisplays = mService.mDisplayContents.size();for (int displayNdx = 0; displayNdx < numDisplays; ++displayNdx) {WindowList windows = mService.mDisplayContents.valueAt(displayNdx).getWindowList();for (int winNdx = windows.size() - 1; winNdx >= 0; --winNdx) {final WindowState child = windows.get(winNdx);final InputChannel inputChannel = child.mInputChannel;final InputWindowHandle inputWindowHandle = child.mInputWindowHandle;if (inputChannel == null || inputWindowHandle == null || child.mRemoved) {// Skip this window because it cannot possibly receive input.continue;}final int flags = child.mAttrs.flags;final int privateFlags = child.mAttrs.privateFlags;final int type = child.mAttrs.type;final boolean hasFocus = (child == mInputFocus);final boolean isVisible = child.isVisibleLw();if ((privateFlags& WindowManager.LayoutParams.PRIVATE_FLAG_DISABLE_WALLPAPER_TOUCH_EVENTS)!= 0) {disableWallpaperTouchEvents = true;}final boolean hasWallpaper = (child == mService.mWallpaperTarget)&& (privateFlags & WindowManager.LayoutParams.PRIVATE_FLAG_KEYGUARD) == 0&& !disableWallpaperTouchEvents;final boolean onDefaultDisplay = (child.getDisplayId() == Display.DEFAULT_DISPLAY);if (inDrag && isVisible && onDefaultDisplay) {mService.mDragState.sendDragStartedIfNeededLw(child);}if (universeBackground != null && !addedUniverse&& child.mBaseLayer < aboveUniverseLayer && onDefaultDisplay) {final WindowState u = universeBackground.mWin;if (u.mInputChannel != null && u.mInputWindowHandle != null) {addInputWindowHandleLw(u.mInputWindowHandle, u, u.mAttrs.flags,u.mAttrs.type, true, u == mInputFocus, false);}addedUniverse = true;}if (child.mWinAnimator != universeBackground) {addInputWindowHandleLw(inputWindowHandle, child, flags, type, isVisible,hasFocus, hasWallpaper);}}}// Send windows to native code.mService.mInputManager.setInputWindows(mInputWindowHandles);// Clear the list in preparation for the next round.clearInputWindowHandlesLw();}
这里将带有InputChannel的Activity窗口都设置为IMS的输入窗口,最后执行mService.mInputManager.setInputWindows,代码如下:
public void setInputWindows(InputWindowHandle[] windowHandles) {nativeSetInputWindows(mPtr, windowHandles);}
该navtive函数定义在 frameworks/base/services/core/jni/com_android_server_input_InputManagerService.cpp中,实现如下:
static void nativeSetInputWindows(JNIEnv* env, jclass clazz,jlong ptr, jobjectArray windowHandleObjArray) {NativeInputManager* im = reinterpret_cast(ptr);im->setInputWindows(env, windowHandleObjArray);
}
这里继续分析im->setInputWindows,代码实现如下:
void NativeInputManager::setInputWindows(JNIEnv* env, jobjectArray windowHandleObjArray) {Vector > windowHandles;if (windowHandleObjArray) {jsize length = env->GetArrayLength(windowHandleObjArray);for (jsize i = 0; i < length; i++) {jobject windowHandleObj = env->GetObjectArrayElement(windowHandleObjArray, i);if (! windowHandleObj) {break; // found null element indicating end of used portion of the array}sp windowHandle =android_server_InputWindowHandle_getHandle(env, windowHandleObj);if (windowHandle != NULL) {windowHandles.push(windowHandle);}env->DeleteLocalRef(windowHandleObj);}}mInputManager->getDispatcher()->setInputWindows(windowHandles);//...
}
这个函数首先将Java层的InputWindowHandle转换成C++层的NativeInputWindowHandle,然后放在windowHandles向量中,最后将这些输入窗口设置到InputDispatcher中去。最后关注InputDispatcher的setInputWindows,代码实现如下:
void InputDispatcher::setInputWindows(const Vector >& inputWindowHandles) {{ // acquire lockAutoMutex _l(mLock);Vector > oldWindowHandles = mWindowHandles;mWindowHandles = inputWindowHandles;sp newFocusedWindowHandle;bool foundHoveredWindow = false;for (size_t i = 0; i < mWindowHandles.size(); i++) {const sp& windowHandle = mWindowHandles.itemAt(i);if (!windowHandle->updateInfo() || windowHandle->getInputChannel() == NULL) {mWindowHandles.removeAt(i--);continue;}if (windowHandle->getInfo()->hasFocus) {newFocusedWindowHandle = windowHandle;}if (windowHandle == mLastHoverWindowHandle) {foundHoveredWindow = true;}}if (!foundHoveredWindow) {mLastHoverWindowHandle = NULL;}if (mFocusedWindowHandle != newFocusedWindowHandle) {if (mFocusedWindowHandle != NULL) {sp focusedInputChannel = mFocusedWindowHandle->getInputChannel();if (focusedInputChannel != NULL) {CancelationOptions options(CancelationOptions::CANCEL_NON_POINTER_EVENTS,"focus left window");synthesizeCancelationEventsForInputChannelLocked(focusedInputChannel, options);}}if (newFocusedWindowHandle != NULL) {}mFocusedWindowHandle = newFocusedWindowHandle;}//...} // release lock// Wake up poll loop since it may need to make new input dispatching choices.mLooper->wake();
}
这里InputDispatcher的成员变量mFocusedWindowHandle 就代表当前激活的窗口。这个函数遍历inputWindowHandles,获取获得焦点的窗口,并赋值给mFocusedWindowHandle 。这样,IMS就把当前激活的窗口保存在InputDispatcher中,后面就可以把键盘消息分发给它来处理。
server端消息注册通道流程
这里从关注mWindowSession.addToDisplay开始,最终会调用到WMS的addWindow接口,代码实现如下:
public int addWindow(Session session, IWindow client, int seq,WindowManager.LayoutParams attrs, int viewVisibility, int displayId,Rect outContentInsets, Rect outStableInsets, InputChannel outInputChannel) {//...synchronized(mWindowMap) {//...win = new WindowState(this, session, client, token,attachedWindow, appOp[0], seq, attrs, viewVisibility, displayContent);//...mPolicy.adjustWindowParamsLw(win.mAttrs);win.setShowToOwnerOnlyLocked(mPolicy.checkShowToOwnerOnly(attrs));res = mPolicy.prepareAddWindowLw(win, attrs);if (res != WindowManagerGlobal.ADD_OKAY) {return res;}if (outInputChannel != null && (attrs.inputFeatures& WindowManager.LayoutParams.INPUT_FEATURE_NO_INPUT_CHANNEL) == 0) {String name = win.makeInputChannelName();//关键点1InputChannel[] inputChannels = InputChannel.openInputChannelPair(name);win.setInputChannel(inputChannels[0]);inputChannels[1].transferTo(outInputChannel);//关键点2mInputManager.registerInputChannel(win.mInputChannel, win.mInputWindowHandle);}//...}//...return res;}
这里会通过InputChannel.openInputChannelPair函数来创建一对输入通道,一个位于WMS中,另外一个通过outInputChannel参数返回到APP中。WMS会为每个窗口创建一个WindowState对象,然后将该InputChannel对的service端保存到WindowState中。
openInputChannelPair代码如下:
public static InputChannel[] openInputChannelPair(String name) {if (name == null) {throw new IllegalArgumentException("name must not be null");}if (DEBUG) {Slog.d(TAG, "Opening input channel pair '" + name + "'");}return nativeOpenInputChannelPair(name);}
继续分析nativeOpenInputChannelPair,代码实现如下:
static jobjectArray android_view_InputChannel_nativeOpenInputChannelPair(JNIEnv* env,jclass clazz, jstring nameObj) {const char* nameChars = env->GetStringUTFChars(nameObj, NULL);String8 name(nameChars);env->ReleaseStringUTFChars(nameObj, nameChars);sp serverChannel;sp clientChannel;status_t result = InputChannel::openInputChannelPair(name, serverChannel, clientChannel);//...return channelPair;
}
这里InputChannel的openInputChannelPair函数创建一对InputChannel,该对象是Native层的InputChannel,跟java层对应。
status_t InputChannel::openInputChannelPair(const String8& name,sp& outServerChannel, sp& outClientChannel) {int sockets[2];if (socketpair(AF_UNIX, SOCK_SEQPACKET, 0, sockets)) {status_t result = -errno;ALOGE("channel '%s' ~ Could not create socket pair.  errno=%d",name.string(), errno);outServerChannel.clear();outClientChannel.clear();return result;}int bufferSize = SOCKET_BUFFER_SIZE;setsockopt(sockets[0], SOL_SOCKET, SO_SNDBUF, &bufferSize, sizeof(bufferSize));setsockopt(sockets[0], SOL_SOCKET, SO_RCVBUF, &bufferSize, sizeof(bufferSize));setsockopt(sockets[1], SOL_SOCKET, SO_SNDBUF, &bufferSize, sizeof(bufferSize));setsockopt(sockets[1], SOL_SOCKET, SO_RCVBUF, &bufferSize, sizeof(bufferSize));String8 serverChannelName = name;serverChannelName.append(" (server)");outServerChannel = new InputChannel(serverChannelName, sockets[0]);String8 clientChannelName = name;clientChannelName.append(" (client)");outClientChannel = new InputChannel(clientChannelName, sockets[1]);return OK;
}
创建好了server和client端后,在WMS的addWindow函数中,把刚创建的Client端的输入通道通过outInputChannel参数返回到应用程序中,如下:
inputChannels[1].transferTo(outInputChannel);
另外还把server端的InputChannel注册到IMS中,也就是接下来要分析的部分。
分析registerInputChannel,代码实现如下:
public void registerInputChannel(InputChannel inputChannel,InputWindowHandle inputWindowHandle) {if (inputChannel == null) {throw new IllegalArgumentException("inputChannel must not be null.");}nativeRegisterInputChannel(mPtr, inputChannel, inputWindowHandle, false);}
继续分析nativeRegisterInputChannel,代码实现如下:
static void nativeRegisterInputChannel(JNIEnv* env, jclass clazz,jlong ptr, jobject inputChannelObj, jobject inputWindowHandleObj, jboolean monitor) {NativeInputManager* im = reinterpret_cast(ptr);sp inputChannel = android_view_InputChannel_getInputChannel(env,inputChannelObj);//...sp inputWindowHandle =android_server_InputWindowHandle_getHandle(env, inputWindowHandleObj);status_t status = im->registerInputChannel(env, inputChannel, inputWindowHandle, monitor);//...if (! monitor) {android_view_InputChannel_setDisposeCallback(env, inputChannelObj,handleInputChannelDisposed, im);}
}
这里根据java层的InputWindowHandle获得native层的InputWindowHandle对象,根据java层InputChannel获得native层InputChannel对象,最后调用NativeInputManager的resgiterInputChannel,进而调用InputDispatcher的registerInputChannel,代码实现如下:
status_t InputDispatcher::registerInputChannel(const sp& inputChannel,const sp& inputWindowHandle, bool monitor) {{ // acquire lockAutoMutex _l(mLock);if (getConnectionIndexLocked(inputChannel) >= 0) {ALOGW("Attempted to register already registered input channel '%s'",inputChannel->getName().string());return BAD_VALUE;}sp connection = new Connection(inputChannel, inputWindowHandle, monitor);int fd = inputChannel->getFd();mConnectionsByFd.add(fd, connection);if (monitor) {mMonitoringChannels.push(inputChannel);}mLooper->addFd(fd, 0, ALOOPER_EVENT_INPUT, handleReceiveCallback, this);} // release lock// Wake the looper because some connections have changed.mLooper->wake();return OK;
}
这里将InputWindowHandle, InputChanel封装成Connection对象,然后fd作为key,Connection作为Value,保存在mConnectionsByFd中,同时把fd加入到mLooper的监听中,并指定当该fd有内容可读时,Looper就会调用handleReceiveCallback函数。InputDispatcher睡在监听的fds上,当有按键事件发生时,InputDispatcher就会往这些fd写入InputMessage对象,进而回调handleReceiveCallback函数。
client端注册消息接收通道流程
前面的WindowManagerService.addWindow上的第二步:inputChannels[1].transferTo(outInputChannel);这是将创建的一对InputChannel的client端复制到传入的参数InputChannel上,当addWindow返回时,就回到ViewRootImpl.setView函数中,执行应用程序这一侧的键盘消息接收通道。接下来分析代码:
if (mInputChannel != null) {mInputEventReceiver = new WindowInputEventReceiver(mInputChannel,Looper.myLooper());
}
WindowInputEventReceiver是继承InputEventReceiver的,看InputEventReceiver的构造器,代码如下:
public InputEventReceiver(InputChannel inputChannel, Looper looper) {//...mInputChannel = inputChannel;mMessageQueue = looper.getQueue();mReceiverPtr = nativeInit(new WeakReference(this),inputChannel, mMessageQueue);mCloseGuard.open("dispose");
}
这里继续分析nativeInit,代码如下:
static jlong nativeInit(JNIEnv* env, jclass clazz, jobject receiverWeak,jobject inputChannelObj, jobject messageQueueObj) {sp inputChannel = android_view_InputChannel_getInputChannel(env,inputChannelObj);sp messageQueue = android_os_MessageQueue_getMessageQueue(env, messageQueueObj);sp receiver = new NativeInputEventReceiver(env,receiverWeak, inputChannel, messageQueue);status_t status = receiver->initialize();receiver->incStrong(gInputEventReceiverClassInfo.clazz); // retain a reference for the objectreturn reinterpret_cast(receiver.get());
}
这里创建NativeInputEventReceiver对象,调用其initialize函数,代码如下:
status_t NativeInputEventReceiver::initialize() {setFdEvents(ALOOPER_EVENT_INPUT);return OK;
}
接续分析setFdEvents,代码如下:
void NativeInputEventReceiver::setFdEvents(int events) {if (mFdEvents != events) {mFdEvents = events;int fd = mInputConsumer.getChannel()->getFd();if (events) {mMessageQueue->getLooper()->addFd(fd, 0, events, this, NULL);} else {mMessageQueue->getLooper()->removeFd(fd);}}
}
这里 如果events是0,则表示要移除监听fd,如果events不为0,表示要监听fd,这个fd是前面WMS创建的一对InputChannel的client端,当Server端写入事件时,client端的looper就能被唤醒,并调用handleEvent函数(当fd可读时,会调用LooperCallback的handleEvent,而NativeInputEventReceiver继承自LooperCallback,所以这里会调用NativeInputEventReceiver的handleEvent函数),这里分析NativeInputEventReceiver.handleEvent,代码实现如下:
int NativeInputEventReceiver::handleEvent(int receiveFd, int events, void* data) {if (events & (ALOOPER_EVENT_ERROR | ALOOPER_EVENT_HANGUP)) {return 0; // remove the callback}if (events & ALOOPER_EVENT_INPUT) {JNIEnv* env = AndroidRuntime::getJNIEnv();status_t status = consumeEvents(env, false /*consumeBatches*/, -1, NULL);mMessageQueue->raiseAndClearException(env, "handleReceiveCallback");return status == OK || status == NO_MEMORY ? 1 : 0;}//...
}
这里关注 consumeEvents函数,它是用来处理接收一个按键事件,代码如下:
status_t NativeInputEventReceiver::consumeEvents(JNIEnv* env,bool consumeBatches, nsecs_t frameTime, bool* outConsumedBatch) {if (consumeBatches) {mBatchedInputEventPending = false;}if (outConsumedBatch) {*outConsumedBatch = false;}ScopedLocalRef receiverObj(env, NULL);bool skipCallbacks = false;for (;;) {uint32_t seq;InputEvent* inputEvent;//关键点1status_t status = mInputConsumer.consume(&mInputEventFactory,consumeBatches, frameTime, &seq, &inputEvent);if (status) {if (status == WOULD_BLOCK) {if (!skipCallbacks && !mBatchedInputEventPending&& mInputConsumer.hasPendingBatch()) {// There is a pending batch.  Come back later.if (!receiverObj.get()) {receiverObj.reset(jniGetReferent(env, mReceiverWeakGlobal));if (!receiverObj.get()) {return DEAD_OBJECT;}}mBatchedInputEventPending = true;//关键点2env->CallVoidMethod(receiverObj.get(),gInputEventReceiverClassInfo.dispatchBatchedInputEventPending);if (env->ExceptionCheck()) {mBatchedInputEventPending = false; // try again later}}return OK;}return status;}//...if (skipCallbacks) {mInputConsumer.sendFinishedSignal(seq, false);}}
}
InputConsumer.consume的实现如下所示:
status_t InputConsumer::consume(InputEventFactoryInterface* factory,bool consumeBatches, nsecs_t frameTime, uint32_t* outSeq, InputEvent** outEvent) {*outSeq = 0;*outEvent = NULL;// Loop until an event can be returned or no additional events are received.while (!*outEvent) {if (mMsgDeferred) {mMsgDeferred = false;} else {// Receive a fresh message.status_t result = mChannel->receiveMessage(&mMsg);if (result) {// Consume the next batched event unless batches are being held for later.if (consumeBatches || result != WOULD_BLOCK) {result = consumeBatch(factory, frameTime, outSeq, outEvent);if (*outEvent) {break;}}return result;}}switch (mMsg.header.type) {case InputMessage::TYPE_KEY: {KeyEvent* keyEvent = factory->createKeyEvent();if (!keyEvent) return NO_MEMORY;initializeKeyEvent(keyEvent, &mMsg);*outSeq = mMsg.body.key.seq;*outEvent = keyEvent;break;}//...}}return OK;
}
忽略motion的处理,先通过InputChannel的receiveMessage函数接收InputMessage,根据InputMessage对象调用initializeKeyEvent来构造KeyEvent对象。这里便拿到了KeyEvent对象
调用dispatchInputEvent的关键代码,如下所示:
env->CallVoidMethod(receiverObj.get(),gInputEventReceiverClassInfo.dispatchInputEvent, seq, inputEventObj);
拿到keyEvent对象后,再consumeEvents中调用java层的InputEventReceiver.java的dispatchInputEvent函数来派发事件,代码实现如下:
// Called from native code.@SuppressWarnings("unused")private void dispatchInputEvent(int seq, InputEvent event) {mSeqMap.put(event.getSequenceNumber(), seq);onInputEvent(event);}
这里调用到onInputEvent函数。接下来输入事件就到了java层的分发。
frameworks/base/core/java/android/view/InputEventReceiver.java
public abstract class InputEventReceiver {private void dispatchInputEvent(int seq, InputEvent event) {mSeqMap.put(event.getSequenceNumber(), seq);onInputEvent(event);}
}
dispatchInputEvent()方法内部主要是调用了onInputEvent(event)方法。
而这里InputEventReceiver的实现类就是ViewRootImpl的内部类WindowInputEventReceiver。
frameworks/base/core/java/android/view/ViewRootImpl.java
final class WindowInputEventReceiver extends InputEventReceiver {@Overridepublic void onInputEvent(InputEvent event) {...enqueueInputEvent(event, this, 0, true);}
}
在子类WindowInputEventReceiver.onInputEvent()方法内调用了ViewRootImpl.enqueueInputEvent()
void enqueueInputEvent(InputEvent event,InputEventReceiver receiver, int flags, boolean processImmediately) {adjustInputEventForCompatibility(event);//构建一个QueuedInputEventQueuedInputEvent q = obtainQueuedInputEvent(event, receiver, flags);//将构建的QueuedInputEvent添加到pending队列末尾QueuedInputEvent last = mPendingInputEventTail;if (last == null) {mPendingInputEventHead = q;mPendingInputEventTail = q;} else {last.mNext = q;mPendingInputEventTail = q;}//队列计数mPendingInputEventCount += 1;Trace.traceCounter(Trace.TRACE_TAG_INPUT, mPendingInputEventQueueLengthCounterName,mPendingInputEventCount);//处理pending队列内的事件if (processImmediately) {//注1doProcessInputEvents(); // 立即同步执行} else {scheduleProcessInputEvents();//通过handler分发执行}
}
enqueueInputEvent()方法内将输入事件封装成QueuedInputEvent后加入队列末尾,之后再进行事件处理。
@1.processImmediately表示是否立即同步执行,在WindowInputEventReceiver回调内传入的是true,执行doProcessInputEvents()。而当false异步时,则调用到scheduleProcessInputEvents()
private void scheduleProcessInputEvents() {if (!mProcessInputEventsScheduled) {mProcessInputEventsScheduled = true;Message msg = mHandler.obtainMessage(MSG_PROCESS_INPUT_EVENTS);msg.setAsynchronous(true);mHandler.sendMessage(msg);}
}
final ViewRootHandler mHandler = new ViewRootHandler();
final class ViewRootHandler extends Handler {...@Overridepublic void handleMessage(Message msg) {switch (msg.what) {...case MSG_PROCESS_INPUT_EVENTS:mProcessInputEventsScheduled = false;doProcessInputEvents();break;...}}
可以看到最后还是调用到了doProcessInputEvents()方法。
 void doProcessInputEvents() {// Deliver all pending input events in the queue.while (mPendingInputEventHead != null) {QueuedInputEvent q = mPendingInputEventHead;mPendingInputEventHead = q.mNext;if (mPendingInputEventHead == null) {mPendingInputEventTail = null;}q.mNext = null;mPendingInputEventCount -= 1;...deliverInputEvent(q);}// 处理完所有输入事件后,清除标志位if (mProcessInputEventsScheduled) {mProcessInputEventsScheduled = false;mHandler.removeMessages(MSG_PROCESS_INPUT_EVENTS);}
}
doProcessInputEvents()方法内就是通过一个while循环遍历链表中的输入事件,调用deliverInputEvent()进行事件分发处理。最后处理完所有输入事件后,清除标志位。
private void deliverInputEvent(QueuedInputEvent q) {Trace.asyncTraceBegin(Trace.TRACE_TAG_VIEW, "deliverInputEvent",q.mEvent.getSequenceNumber());...InputStage stage;if (q.shouldSendToSynthesizer()) {stage = mSyntheticInputStage;} else {stage = q.shouldSkipIme() ? mFirstPostImeInputStage : mFirstInputStage;}if (stage != null) {handleWindowFocusChanged();stage.deliver(q);} else {finishInputEvent(q); //结束事件分发}
}
deliverInputEvent()方法从方法名就可以知道它的作用是分发事件。
方法内最主要的就是InputStage,最终要么是调用了stage.deliver(q),要么就是stage为空直接结束事件分发。
************************************扩展 ***************************
而stage赋值处的几个InputStage子类是在ViewRootImpl.setView()方法内实例化的。所以在View绘制之后所触发的事件,这里的7个InputStage子类都是不为空的。
而从这7个InputStage子类的构造器来看,就是典型的责任链模式,即自己能处理就自己处理,若不能处理则交给下一个处理,从下面InputStage的源码也能证实责任链模式。
public void setView(View view, WindowManager.LayoutParams attrs, View panelParentView,int userId) {...mSyntheticInputStage = new SyntheticInputStage();InputStage viewPostImeStage = new ViewPostImeInputStage(mSyntheticInputStage);InputStage nativePostImeStage = new NativePostImeInputStage(viewPostImeStage,"aq:native-post-ime:" + counterSuffix);InputStage earlyPostImeStage = new EarlyPostImeInputStage(nativePostImeStage);InputStage imeStage = new ImeInputStage(earlyPostImeStage,"aq:ime:" + counterSuffix);InputStage viewPreImeStage = new ViewPreImeInputStage(imeStage);InputStage nativePreImeStage = new NativePreImeInputStage(viewPreImeStage,"aq:native-pre-ime:" + counterSuffix);mFirstInputStage = nativePreImeStage;mFirstPostImeInputStage = earlyPostImeStage;...}
- NativePreImeInputStage: 主要是为了将消息放到NativeActivity中去处理, NativeActivity和普通Acitivty的功能区别不大,只是很多代码都在native层去实现,这样执行效率更高,并且NativeActivity在游戏开发中很实用。
- ViewPreImeInputStage: 从名字中就可得知,最后会调用Acitivity的所有view的onkeyPreIme方法,这样就给View在输入法处理key事件之前先得到消息并处理的机会。
- ImeInputStage: ImeInputStage的onProcess方法会调用InputMethodManager的dispatchInputEvent方法处理消息。
- EarlyPostImeInputStage: 屏幕上有焦点的View会高亮显示,用来提示用户焦点所在。
- NativePostImeInputStage: 为了让IME处理完消息后能先于普通的Activity处理消息
- ViewPostImeInputStage: Acitivity和view处理各种消息。
那么Activity和View的事件处理主要对应的InputStage是ViewPostImeInputStage。
InputStage执行流程图
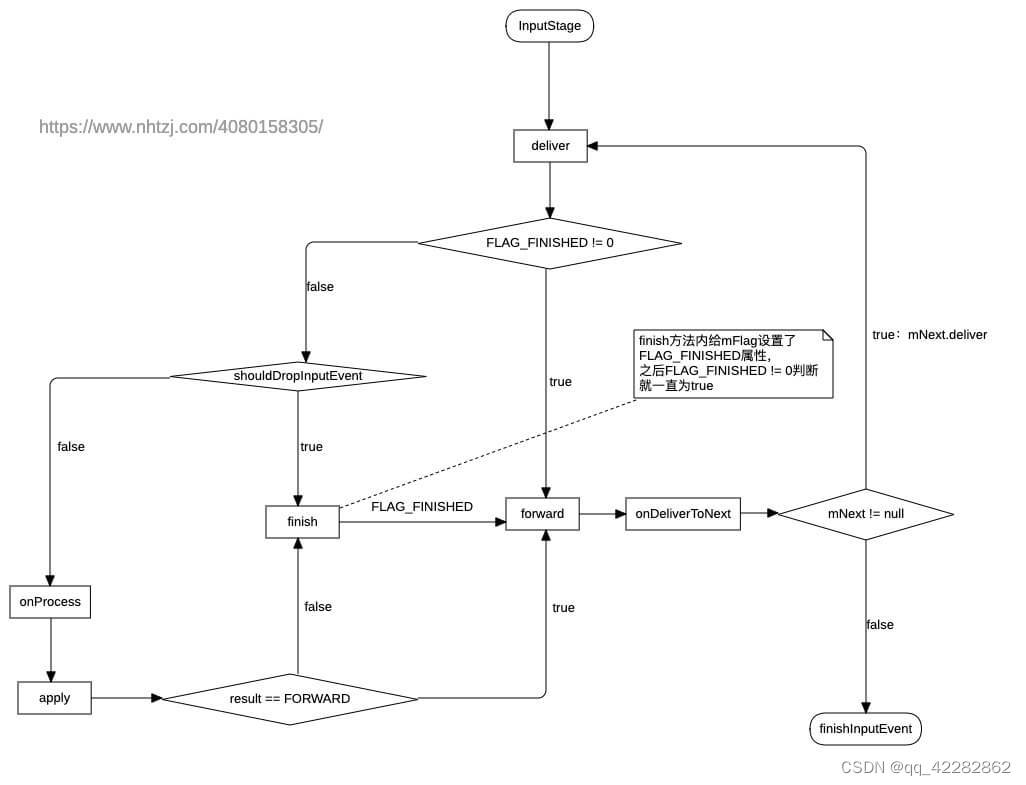
InputStage内的具体执行流程分析完了,接下来就可以去看看ViewPostImeInputStage.onProcess()具体执行了什么。
final class ViewPostImeInputStage extends InputStage {public ViewPostImeInputStage(InputStage next) {super(next);}@Overrideprotected int onProcess(QueuedInputEvent q) {if (q.mEvent instanceof KeyEvent) {return processKeyEvent(q);//处理键盘事件} else {final int source = q.mEvent.getSource();if ((source & InputDevice.SOURCE_CLASS_POINTER) != 0) {return processPointerEvent(q);//处理触摸事件} else if ((source & InputDevice.SOURCE_CLASS_TRACKBALL) != 0) {return processTrackballEvent(q);//处理轨迹球事件} else {return processGenericMotionEvent(q);}}}}
ViewPostImeInputStage.onProcess()内有判断当前事件类型,我们这边分析触摸事件,所以直接看processPointerEvent(q)。
	private int processPointerEvent(QueuedInputEvent q) {final MotionEvent event = (MotionEvent)q.mEvent;...boolean handled = mView.dispatchPointerEvent(event);...return handled ? FINISH_HANDLED : FORWARD;
}
这里就可以看到ViewPostImeInputStage.onProgress()返回的具体值handled ? FINISH_HANDLED : FORWARD。FINISH_HANDLED:当前触摸事件由ViewPostImeInputStage处理;FORWARD:ViewPostImeInputStage未处理,继续传给SyntheticInputStage处理。
当然,processPointerEvent内的主角是mView.dispatchPointerEvent(event)。mView是ViewRootImpl的成员变量,该变量是在ViewRootImpl.setView()内赋值的,此处的mView就是DecorView。
在确认了view的类型是DecorView后,在DecorView源码内搜索时确没有找到dispatchPointerEvent方法,那就从父类中查找(DecorView -> FrameLayout -> ViewGroup -> View),直到在View内才找到该方法。
frameworks/base/core/java/android/view/View.java
public final boolean dispatchPointerEvent(MotionEvent event) {if (event.isTouchEvent()) {return dispatchTouchEvent(event);} else {return dispatchGenericMotionEvent(event);}}
可以看到,这里会判断当前是否为触摸事件,如果是则调用dispatchTouchEvent(event)。
public boolean dispatchTouchEvent(MotionEvent ev) {final Window.Callback cb = mWindow.getCallback();return cb != null && !mWindow.isDestroyed() && mFeatureId < 0? cb.dispatchTouchEvent(ev) : super.dispatchTouchEvent(ev);
}
回到DecorView.dispatchTouchEvent(),这里会调用cb.dispatchTouchEvent(ev),cb为Window.Callback类型。
frameworks/base/core/java/android/view/Window.java
public interface Callback {/*** Called to process key events.  At the very least your* implementation must call* {@link android.view.Window#superDispatchKeyEvent} to do the* standard key processing.** @param event The key event.** @return boolean Return true if this event was consumed.*/public boolean dispatchKeyEvent(KeyEvent event);/*** Called to process touch screen events.  At the very least your* implementation must call* {@link android.view.Window#superDispatchTouchEvent} to do the* standard touch screen processing.** @param event The touch screen event.** @return boolean Return true if this event was consumed.*/public boolean dispatchTouchEvent(MotionEvent event);...
}
而Activity类实现了这个回调,并且在Activity.attach()方法内给PhoneWindow设置CallBack回调。
frameworks/base/core/java/android/app/Activity.java
public class Activity extends ContextThemeWrapperimplements LayoutInflater.Factory2,Window.Callback, KeyEvent.Callback,OnCreateContextMenuListener, ComponentCallbacks2,Window.OnWindowDismissedCallback,AutofillManager.AutofillClient, ContentCaptureManager.ContentCaptureClient {
-------------------------------------------------------
final void attach(Context context, ActivityThread aThread,Instrumentation instr, IBinder token, int ident,Application application, Intent intent, ActivityInfo info,CharSequence title, Activity parent, String id,NonConfigurationInstances lastNonConfigurationInstances,Configuration config, String referrer, IVoiceInteractor voiceInteractor,Window window, ActivityConfigCallback activityConfigCallback, IBinder assistToken) {attachBaseContext(context);mFragments.attachHost(null /*parent*/);mWindow = new PhoneWindow(this, window, activityConfigCallback);mWindow.setWindowControllerCallback(mWindowControllerCallback);mWindow.setCallback(this);//设置回调mWindow.setOnWindowDismissedCallback(this);mWindow.getLayoutInflater().setPrivateFactory(this);...
}
------------------------------------------------------------------------------
public boolean dispatchTouchEvent(MotionEvent ev) {//这里就是activity的dispatchTouchEvent方法了if (ev.getAction() == MotionEvent.ACTION_DOWN) {onUserInteraction();}if (getWindow().superDispatchTouchEvent(ev)) {return true;}return onTouchEvent(ev);
}
上一篇:Docker离线安装部署