
ES安装避坑-Windows成功安装ES实战
创始人
2025-06-01 03:14:48
0次
一、下载地址
https://www.elastic.co/cn/elasticsearch
选择对应版本即可
二、配置操作
# ======================== Elasticsearch Configuration =========================
#
# NOTE: Elasticsearch comes with reasonable defaults for most settings.
#       Before you set out to tweak and tune the configuration, make sure you
#       understand what are you trying to accomplish and the consequences.
#
# The primary way of configuring a node is via this file. This template lists
# the most important settings you may want to configure for a production cluster.
#
# Please consult the documentation for further information on configuration options:
# https://www.elastic.co/guide/en/elasticsearch/reference/index.html
#
# ---------------------------------- Cluster -----------------------------------
#
# Use a descriptive name for your cluster:
#
#cluster.name: my-application
#
# ------------------------------------ Node ------------------------------------
#
# Use a descriptive name for the node:
#
#node.name: node-1
#
# Add custom attributes to the node:
#
#node.attr.rack: r1
#
# ----------------------------------- Paths ------------------------------------
#
# Path to directory where to store the data (separate multiple locations by comma):
#
#path.data: /path/to/data
#
# Path to log files:
#
#path.logs: /path/to/logs
#
# ----------------------------------- Memory -----------------------------------
#
# Lock the memory on startup:
#
#bootstrap.memory_lock: true
#
# Make sure that the heap size is set to about half the memory available
# on the system and that the owner of the process is allowed to use this
# limit.
#
# Elasticsearch performs poorly when the system is swapping the memory.
#
# ---------------------------------- Network -----------------------------------
#
# By default Elasticsearch is only accessible on localhost. Set a different
# address here to expose this node on the network:
#
#network.host: 192.168.0.1
#
# By default Elasticsearch listens for HTTP traffic on the first free port it
# finds starting at 9200. Set a specific HTTP port here:
#
http.port: 9200
#
# For more information, consult the network module documentation.
#
# --------------------------------- Discovery ----------------------------------
#
# Pass an initial list of hosts to perform discovery when this node is started:
# The default list of hosts is ["127.0.0.1", "[::1]"]
#
#discovery.seed_hosts: ["host1", "host2"]
#
# Bootstrap the cluster using an initial set of master-eligible nodes:
#
#cluster.initial_master_nodes: ["node-1", "node-2"]
#
# For more information, consult the discovery and cluster formation module documentation.
#
# --------------------------------- Readiness ----------------------------------
#
# Enable an unauthenticated TCP readiness endpoint on localhost
#
#readiness.port: 9399
#
# ---------------------------------- Various -----------------------------------
#
# Allow wildcard deletion of indices:
#
#action.destructive_requires_name: false#----------------------- BEGIN SECURITY AUTO CONFIGURATION -----------------------
#
# The following settings, TLS certificates, and keys have been automatically
# generated to configure Elasticsearch security features on 21-03-2023 07:44:21
#
# --------------------------------------------------------------------------------# Enable security features
xpack.security.enabled: false xpack.security.enrollment.enabled: true# Enable encryption for HTTP API client connections, such as Kibana, Logstash, and Agents
xpack.security.http.ssl:enabled: falsekeystore.path: certs/http.p12# Enable encryption and mutual authentication between cluster nodes
xpack.security.transport.ssl:enabled: trueverification_mode: certificatekeystore.path: certs/transport.p12truststore.path: certs/transport.p12
# Create a new cluster with the current node only
# Additional nodes can still join the cluster later
cluster.initial_master_nodes: ["ZB-PF2G5QX1"]# Allow HTTP API connections from anywhere
# Connections are encrypted and require user authentication
http.host: 0.0.0.0# Allow other nodes to join the cluster from anywhere
# Connections are encrypted and mutually authenticated
#transport.host: 0.0.0.0#----------------------- END SECURITY AUTO CONFIGURATION -------------------------
其中注意点:
关闭密码验证:xpack.security.enabled: false
关闭SSL验证:
xpack.security.http.ssl:
enabled: false
keystore.path: certs/http.p12
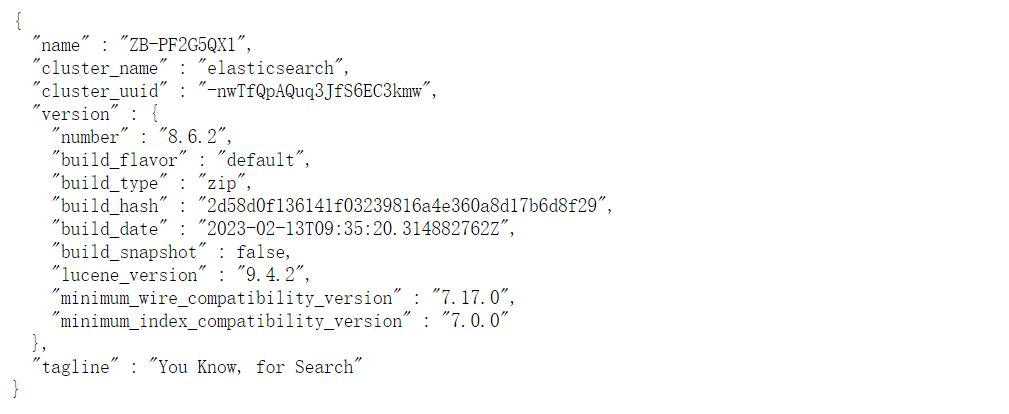
三、验证
http://127.0.0.1:9200/
出现如下界面即可:
四、Python ES Demo示例
遍历Dataframe:
import pandas as pd
persons={'number':['小花','狗蛋','二狗','小草'],'crmFinalTag':[17,20,30,20],'crmFinalTagDesc':['女','男','男','女']}
df=pd.DataFrame(persons)
存入ES:
es.indices.create(index="tmp_crm_grade", ignore=400)
for index,row in df.iterrows():
data = {
"number": row['number'],
"crmFinalTag": row['crmFinalTag'],
"crmFinalTagDesc": row['crmFinalTagDesc']
} # 构建插入数据的结构
上一篇:计算机图形学 | 可编程渲染管线
相关内容
热门资讯
电视安卓系统哪个品牌好,哪家品...
你有没有想过,家里的电视是不是该升级换代了呢?现在市面上电视品牌琳琅满目,各种操作系统也是让人眼花缭...
安卓会员管理系统怎么用,提升服...
你有没有想过,手机里那些你爱不释手的APP,背后其实有个强大的会员管理系统在默默支持呢?没错,就是那...
安卓系统软件使用技巧,解锁软件...
你有没有发现,用安卓手机的时候,总有一些小技巧能让你玩得更溜?别小看了这些小细节,它们可是能让你的手...
安卓系统提示音替换
你知道吗?手机里那个时不时响起的提示音,有时候真的能让人心情大好,有时候又让人抓狂不已。今天,就让我...
安卓开机不了系统更新
手机突然开不了机,系统更新还卡在那里,这可真是让人头疼的问题啊!你是不是也遇到了这种情况?别急,今天...
安卓系统中微信视频,安卓系统下...
你有没有发现,现在用手机聊天,视频通话简直成了标配!尤其是咱们安卓系统的小伙伴们,微信视频功能更是用...
安卓系统是服务器,服务器端的智...
你知道吗?在科技的世界里,安卓系统可是个超级明星呢!它不仅仅是个手机操作系统,竟然还能成为服务器的得...
pc电脑安卓系统下载软件,轻松...
你有没有想过,你的PC电脑上安装了安卓系统,是不是瞬间觉得世界都大不一样了呢?没错,就是那种“一机在...
电影院购票系统安卓,便捷观影新...
你有没有想过,在繁忙的生活中,一部好电影就像是一剂强心针,能瞬间让你放松心情?而我今天要和你分享的,...
安卓系统可以写程序?
你有没有想过,安卓系统竟然也能写程序呢?没错,你没听错!这个我们日常使用的智能手机操作系统,竟然有着...
安卓系统架构书籍推荐,权威书籍...
你有没有想过,想要深入了解安卓系统架构,却不知道从何下手?别急,今天我就要给你推荐几本超级实用的书籍...
安卓系统看到的炸弹,技术解析与...
安卓系统看到的炸弹——揭秘手机中的隐形威胁在数字化时代,智能手机已经成为我们生活中不可或缺的一部分。...
鸿蒙系统有安卓文件,畅享多平台...
你知道吗?最近在科技圈里,有个大新闻可是闹得沸沸扬扬的,那就是鸿蒙系统竟然有了安卓文件!是不是觉得有...
宝马安卓车机系统切换,驾驭未来...
你有没有发现,现在的汽车越来越智能了?尤其是那些豪华品牌,比如宝马,它们的内饰里那个大屏幕,简直就像...
p30退回安卓系统
你有没有听说最近P30的用户们都在忙活一件大事?没错,就是他们的手机要退回安卓系统啦!这可不是一个简...
oppoa57安卓原生系统,原...
你有没有发现,最近OPPO A57这款手机在安卓原生系统上的表现真是让人眼前一亮呢?今天,就让我带你...
安卓系统输入法联想,安卓系统输...
你有没有发现,手机上的输入法真的是个神奇的小助手呢?尤其是安卓系统的输入法,简直就是智能生活的点睛之...
怎么进入安卓刷机系统,安卓刷机...
亲爱的手机控们,你是否曾对安卓手机的刷机系统充满好奇?想要解锁手机潜能,体验全新的系统魅力?别急,今...
安卓系统程序有病毒
你知道吗?在这个数字化时代,手机已经成了我们生活中不可或缺的好伙伴。但是,你知道吗?即使是安卓系统,...
奥迪中控安卓系统下载,畅享智能...
你有没有发现,现在汽车的中控系统越来越智能了?尤其是奥迪这种豪华品牌,他们的中控系统简直就是科技与艺...