
APT最佳学习案例:写个简易版 ButterKnife
前言
目的:写个简易版 ButterKnife,借手写 ButterKnife 去了解如何实现注解、annotationProcessor 的等使用。
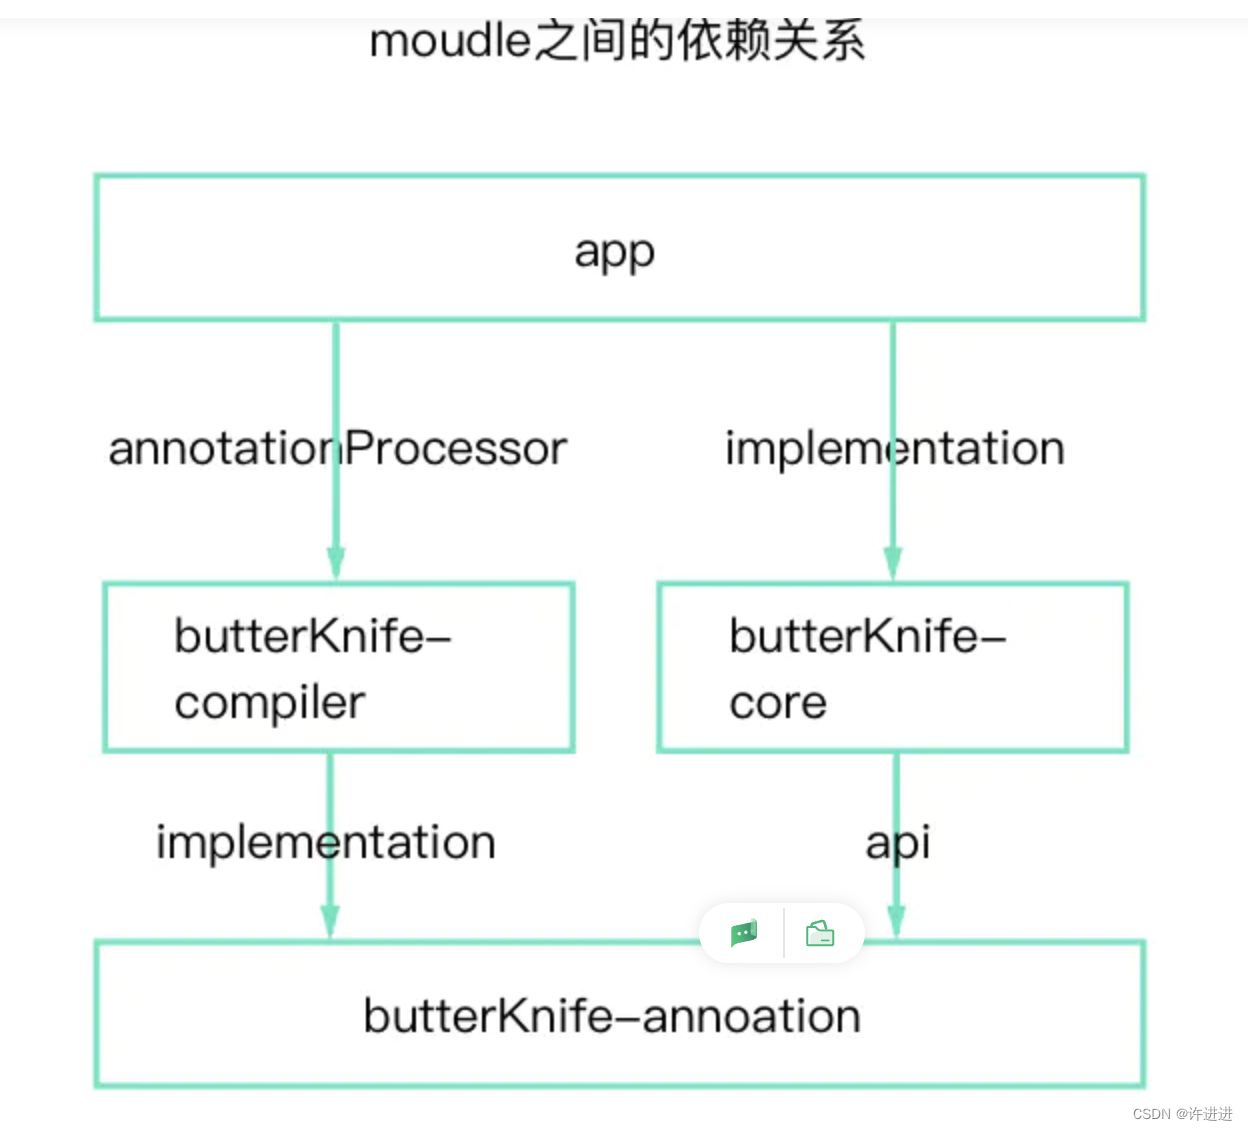
先看下butterknife的结构:
源码地址
https://github.com/LucasXu01/MyButterKnife
ButterKnife的使用
在build.gradle添加依赖:
android {...// Butterknife requires Java 8.compileOptions {sourceCompatibility JavaVersion.VERSION_1_8targetCompatibility JavaVersion.VERSION_1_8}
}
dependencies {implementation 'com.jakewharton:butterknife:10.2.3'annotationProcessor 'com.jakewharton:butterknife-compiler:10.2.3'
}
在MainActivity中书写:
public class MainActivity extends AppCompatActivity {@BindView(R.id.tv_content)TextView tvContent;@Overrideprotected void onCreate(Bundle savedInstanceState) {···ButterKnife.bind(this);tvContent.setText("修改成功!");}
}
分析可得,手写一个简易的ButterKnife主要分为两步:注解定义;注解解析;
手写简易ButterKnife
注解定义
新建注解MyBindView.java:
@Target(ElementType.FIELD)
@Retention(RetentionPolicy.SOURCE)
public @interface MyBindView {int viewId();
}
`int viewId();用于绑定哪个view的 id,我们要在注解上加上变量,这样赋值过去,我们就知道为哪个 id 绑定了:
@MyBindView(viewId = R.id.tv_content)TextView tvContent;
改进:
viewId 改为 value,假如名称为 value 的话,编译器会自动帮我们赋值,所以我们要稍微改下:
@Target(ElementType.FIELD)
@Retention(RetentionPolicy.SOURCE)
public @interface MyBindView {int value();
}
@MyBindView(R.id.tv_content)
TextView tvContent;
注解解析
ButterKnife 是通过以下代码开始解析的:
ButterKnife.bind(this);
我们也新建个类,要在 bind() 方法里面写控件的绑定代码:
- 获取该 Activity 的全部成员变量
- 判断这个成员变量是否被 MyBindView 进行注解
- 注解符合的话,就对该成员变量进行 findViewById 赋值
public class MyButterKnife {public static void bind(Activity activity){//获取该 Activity 的全部成员变量for (Field field : activity.getClass().getDeclaredFields()) {//判断这个成员变量是否被 MyBindView 进行注解MyBindView myBindView = field.getAnnotation(MyBindView.class);if (myBindView != null) {try {//注解符合的话,就对该成员变量进行 findViewById 赋值//相当于 field = activity.findViewById(myBindView.value())field.set(activity, activity.findViewById(myBindView.value()));} catch (IllegalAccessException e) {e.printStackTrace();}}}}
}
上面的功能实现上是没有问题的,但是,每个控件的绑定都要依靠反射,这太耗性能,一个还好,但是正常的 Activity 都不止一个 View,随着 View 的增加,执行的时间越长,所以,我们必须寻找新的出路,那就是AnnotationProcessor。
最不消耗性能的方式,不就是直接使用 findViewById 去绑定 View 吗?既然如此,那么有没有什么方式能够做到在编译阶段就生成好 findViewById 这些代码,到时使用时,直接调用就行了。
我们要创建新类,这个类名有固定的形式,那就是原Activity名字+Binding:
模拟自动生成的文件:
public class MainActivityBinding {public MainActivityBinding(MainActivity activity) {activity.tvContent = activity.findViewById(R.id.tv_content);}
}
修改后的 MyButterKnife:
public class MyButterKnife {public static void bind(Activity activity) {try {//获取"当前的activity类名+Binding"的class对象Class bindingClass = Class.forName(activity.getClass().getCanonicalName() + "Binding");//获取class对象的构造方法,该构造方法的参数为当前的activity对象Constructor constructor = bindingClass.getDeclaredConstructor(activity.getClass());//调用构造方法constructor.newInstance(activity);} catch (Exception e) {e.printStackTrace();}}
}
所以,我们现在只剩下一个问题了,那就是如何动态生成 MainActivityBinding 这个类了。
这时,就是真正需要用到 AnnotationProcessor。
AnnotationProcessor 是一种处理注解的工具,能够在源代码中查找出注解,并且根据注解自动生成代码。
AnnotationProcessor使用
新建一个 module。
Android Studio --> File --> New Module --> Java or Kotlin Library --> Next --> Finish 。
在新建的module中创建MyBindingProcessor 继承 AbstractProcessor,
process():里面存放着自动生成代码的代码。getSupportedAnnotationTypes():返回所支持注解类型。
@AutoService(Processor.class)
public class MyBindingProcessor extends AbstractProcessor {@Overridepublic boolean process(Set set, RoundEnvironment roundEnvironment) {//测试输出System.out.println("配置成功!");  return false;}@Overridepublic Set getSupportedAnnotationTypes() {return super.getSupportedAnnotationTypes();}
}
注意该模块添加auto-service依赖,可自动配置执行,省去传统配置META-INF文件夹的麻烦:
implementation 'com.squareup:javapoet:1.12.1'// AS 4.3.1 -> 4.0.1 没有问题// As-3.4.1 + gradle-5.1.1-all + auto-service:1.0-rc4compileOnly 'com.google.auto.service:auto-service:1.0-rc4'annotationProcessor 'com.google.auto.service:auto-service:1.0-rc4'
到这一步,配置好各个module依赖,打开 Terminal,输入./gradlew :app:compileDebugJava,查看输出有没有配置成功!,有的话,就是配置成功了!
接下来就是在MyBindingProcessor的process方法里添加具体的生成代码了:
@Overridepublic boolean process(Set set, RoundEnvironment roundEnvironment) {//获取全部的类for (Element element : roundEnvironment.getRootElements()) {//获取类的包名String packageStr = element.getEnclosingElement().toString();//获取类的名字String classStr = element.getSimpleName().toString();//构建新的类的名字:原类名 + BindingClassName className = ClassName.get(packageStr, classStr + "Binding");//构建新的类的构造方法MethodSpec.Builder constructorBuilder = MethodSpec.constructorBuilder().addModifiers(Modifier.PUBLIC).addParameter(ClassName.get(packageStr, classStr), "activity");//判断是否要生成新的类,假如该类里面 MyBindView 注解,那么就不需要新生成boolean hasBuild = false;//获取类的元素,例如类的成员变量、方法、内部类等for (Element enclosedElement : element.getEnclosedElements()) {//仅获取成员变量if (enclosedElement.getKind() == ElementKind.FIELD) {//判断是否被 MyBindView 注解MyBindView bindView = enclosedElement.getAnnotation(MyBindView.class);if (bindView != null) {//设置需要生成类hasBuild = true;//在构造方法中加入代码constructorBuilder.addStatement("activity.$N = activity.findViewById($L)",enclosedElement.getSimpleName(), bindView.value());}}}//是否需要生成if (hasBuild) {try {//构建新的类TypeSpec builtClass = TypeSpec.classBuilder(className).addModifiers(Modifier.PUBLIC).addMethod(constructorBuilder.build()).build();//生成 Java 文件JavaFile.builder(packageStr, builtClass).build().writeTo(filer);} catch (IOException e) {e.printStackTrace();}}}return false;}
运行看看 build 目录有没有文件生成:

上一篇:C语言必背18个经典程序
下一篇:外包四年太差劲,幡然醒悟要跳槽