大数据技术——Flume实战案例
实战案例目录
- 1. 复制和多路复用
- 1.1 案例需求
- 1.2 需求分析
- 1.3 实现操作
- 2. 负载均衡和故障转移
- 2.1 案例需求
- 2.2 需求分析
- 2.3 实现操作
- 3. 聚合操作
- 3.1 案例需求
- 3.2 需求分析
- 3.3 实现操作
1. 复制和多路复用
1.1 案例需求
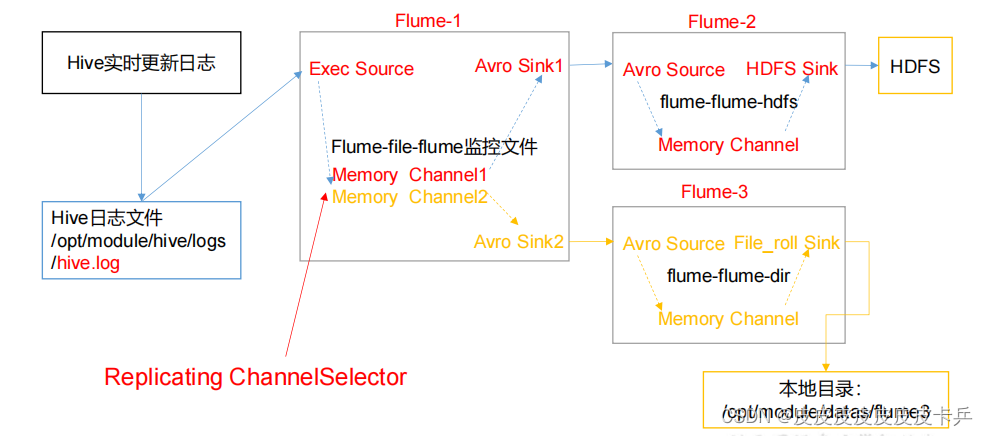
使用 Flume-1 监控文件变动,Flume-1 将变动内容传递给 Flume-2,Flume-2 负责存储到 HDFS。同时 Flume-1 将变动内容传递给 Flume-3,Flume-3 负责输出到 Local FileSystem。
1.2 需求分析
通过使用exec source实时监控Hive日志,将日志以avro为中转站发送给Flume-2,3分别存储到不同的地方,需要注意:保存到本地的目录必须存在,如下图所示:

1.3 实现操作
首先在虚拟机对应目录下创建文件:mkdir flume3
创建配置信息文件vim flume-file-flume.conf
# Name the components on this agent
a1.sources = r1
a1.sinks = k1 k2
a1.channels = c1 c2
# 将数据流复制给所有 channel
a1.sources.r1.selector.type = replicating
# Describe/configure the source
a1.sources.r1.type = exec
a1.sources.r1.command = tail -F /opt/module/hive/logs/hive.log
a1.sources.r1.shell = /bin/bash -c
# Describe the sink
# sink 端的 avro 是一个数据发送者
a1.sinks.k1.type = avro
a1.sinks.k1.hostname = hadoop102
a1.sinks.k1.port = 4141
a1.sinks.k2.type = avro
a1.sinks.k2.hostname = hadoop102
a1.sinks.k2.port = 4142
# Describe the channel
a1.channels.c1.type = memory
a1.channels.c1.capacity = 1000
a1.channels.c1.transactionCapacity = 100
a1.channels.c2.type = memory
a1.channels.c2.capacity = 1000
a1.channels.c2.transactionCapacity = 100
# Bind the source and sink to the channel
a1.sources.r1.channels = c1 c2
a1.sinks.k1.channel = c1
a1.sinks.k2.channel = c2
vim flume-flume-hdfs.conf
 # Name the components on this agent
a2.sources = r1
a2.sinks = k1
a2.channels = c1
# Describe/configure the source
# source 端的 avro 是一个数据接收服务
a2.sources.r1.type = avro
a2.sources.r1.bind = hadoop102
a2.sources.r1.port = 4141
# Describe the sink
a2.sinks.k1.type = hdfs
a2.sinks.k1.hdfs.path = hdfs://hadoop102:9820/flume2/%Y%m%d/%H
#上传文件的前缀
a2.sinks.k1.hdfs.filePrefix = flume2-
#是否按照时间滚动文件夹
a2.sinks.k1.hdfs.round = true
#多少时间单位创建一个新的文件夹
a2.sinks.k1.hdfs.roundValue = 1
#重新定义时间单位
a2.sinks.k1.hdfs.roundUnit = hour
#是否使用本地时间戳
a2.sinks.k1.hdfs.useLocalTimeStamp = true
#积攒多少个 Event 才 flush 到 HDFS 一次
a2.sinks.k1.hdfs.batchSize = 100
#设置文件类型,可支持压缩
a2.sinks.k1.hdfs.fileType = DataStream
#多久生成一个新的文件
a2.sinks.k1.hdfs.rollInterval = 30
#设置每个文件的滚动大小大概是 128M
a2.sinks.k1.hdfs.rollSize = 134217700
#文件的滚动与 Event 数量无关
a2.sinks.k1.hdfs.rollCount = 0
# Describe the channel
a2.channels.c1.type = memory
a2.channels.c1.capacity = 1000
a2.channels.c1.transactionCapacity = 100
# Bind the source and sink to the channel
a2.sources.r1.channels = c1
a2.sinks.k1.channel = c1
vim flume-flume-dir.conf
 # Name the components on this agent
a3.sources = r1
a3.sinks = k1
a3.channels = c2
# Describe/configure the source
a3.sources.r1.type = avro
a3.sources.r1.bind = hadoop102
a3.sources.r1.port = 4142
# Describe the sink
a3.sinks.k1.type = file_roll
a3.sinks.k1.sink.directory = /opt/module/data/flume3
# Describe the channel
a3.channels.c2.type = memory
a3.channels.c2.capacity = 1000
a3.channels.c2.transactionCapacity = 100
# Bind the source and sink to the channel
a3.sources.r1.channels = c2
a3.sinks.k1.channel = c2
结果查看:

总用量 8
-rw-rw-r–. 1 lcl lcl 5942 5 月 22 00:09 1526918887550-3
2. 负载均衡和故障转移
2.1 案例需求
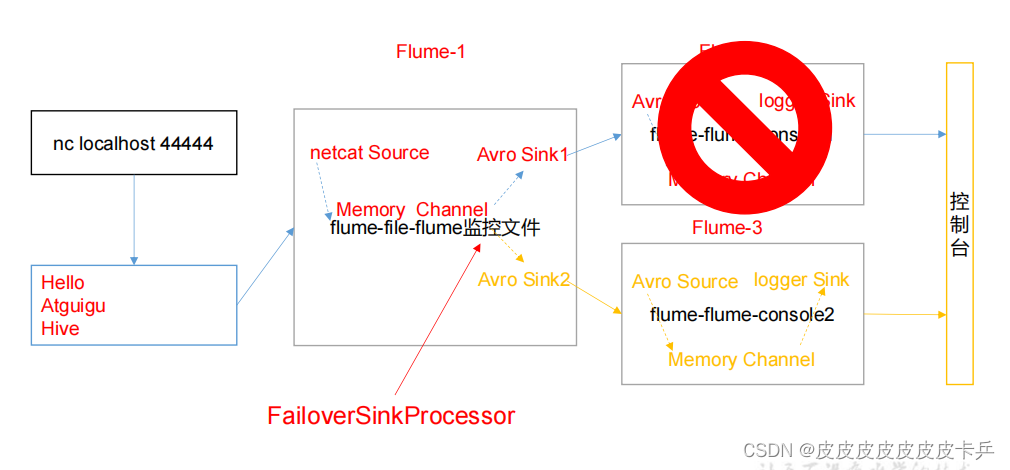
使用 Flume1 监控一个端口,其 sink 组中的 sink 分别对接 Flume2 和 Flume3,采用
FailoverSinkProcessor,实现故障转移的功能。
2.2 需求分析
通过netcat source监听4444端口,由于这里只有一个channel所以在这里使用了Sink组的形式接收同一个source(这个是可以一个channel对应多个sink,但是不能一个sink对应多个channel),然后通过kill 命令把Flume2破坏,查看Flume3
2.3 实现操作
编辑以下三个配置文件
vim flume-netcat-flume.conf
# Name the components on this agent
a1.sources = r1
a1.channels = c1
a1.sinkgroups = g1
a1.sinks = k1 k2
# Describe/configure the source
a1.sources.r1.type = netcat
a1.sources.r1.bind = localhost
a1.sources.r1.port = 44444
a1.sinkgroups.g1.processor.type = failover
a1.sinkgroups.g1.processor.priority.k1 = 5
a1.sinkgroups.g1.processor.priority.k2 = 10
a1.sinkgroups.g1.processor.maxpenalty = 10000
# Describe the sink
a1.sinks.k1.type = avro
a1.sinks.k1.hostname = hadoop102
a1.sinks.k1.port = 4141
a1.sinks.k2.type = avro
a1.sinks.k2.hostname = hadoop102
a1.sinks.k2.port = 4142
# Describe the channel
a1.channels.c1.type = memory
a1.channels.c1.capacity = 1000
a1.channels.c1.transactionCapacity = 100
# Bind the source and sink to the channel
a1.sources.r1.channels = c1
a1.sinkgroups.g1.sinks = k1 k2
a1.sinks.k1.channel = c1
a1.sinks.k2.channel = c1
vim flume-flume-console1.conf
# Name the components on this agent
a2.sources = r1
a2.sinks = k1
a2.channels = c1
# Describe/configure the source
a2.sources.r1.type = avro
a2.sources.r1.bind = hadoop102
a2.sources.r1.port = 4141
# Describe the sink
a2.sinks.k1.type = logger
# Describe the channel
a2.channels.c1.type = memory
a2.channels.c1.capacity = 1000
a2.channels.c1.transactionCapacity = 100
# Bind the source and sink to the channel
a2.sources.r1.channels = c1
a2.sinks.k1.channel = c1
vim flume-flume-console2.conf
# Name the components on this agent
a3.sources = r1
a3.sinks = k1
a3.channels = c2
# Describe/configure the source
a3.sources.r1.type = avro
a3.sources.r1.bind = hadoop102
a3.sources.r1.port = 4142
# Describe the sink
a3.sinks.k1.type = logger
# Describe the channel
a3.channels.c2.type = memory
a3.channels.c2.capacity = 1000
a3.channels.c2.transactionCapacity = 100
# Bind the source and sink to the channel
a3.sources.r1.channels = c2
a3.sinks.k1.channel = c2
执行命令,启动配置文件:【最后启动属于服务器地一端】
bin/flume-ng agent -n a3 -c conf/  -f job/group2/flume-flume-console2.conf -Dflume.root.logger=INFO,console
bin/flume-ng agent -n a3 -c conf/  -f job/group2/flume-flume-console1.conf -
Dflume.root.logger=INFO,console
bin/flume-ng agent -n a3 -c conf/  -f  job/group2/flume-netcat-flume.conf
使用netcat工具向本机的 44444 端口发送内容: nc localhost 44444
查看两个控制台打印日志情况,之后把Flume2 kill掉
查看Flume3打印日志情况
3. 聚合操作
3.1 案例需求
- hadoop102 上的 Flume-1 监控文件/opt/module/group.log,
- hadoop103 上的 Flume-2 监控某一个端口的数据流,
- Flume-1 与 Flume-2 将数据发送给 hadoop104 上的 Flume-3,Flume-3 将最终数据打印到控制台。
3.2 需求分析

由于需要多个虚拟机工作完成任务,所以这里需要分发flume
3.3 实现操作
创建工作目录:mkdir /opt/module/flume/job/group3
hadoop102: vim flume1-logger-flume.conf
# Name the components on this agent
a1.sources = r1
a1.sinks = k1
a1.channels = c1
# Describe/configure the source
a1.sources.r1.type = exec
a1.sources.r1.command = tail -F /opt/module/group.log
a1.sources.r1.shell = /bin/bash -c
# Describe the sink
a1.sinks.k1.type = avro
a1.sinks.k1.hostname = hadoop104
a1.sinks.k1.port = 4141
# Describe the channel
a1.channels.c1.type = memory
a1.channels.c1.capacity = 1000
a1.channels.c1.transactionCapacity = 100
# Bind the source and sink to the channel
a1.sources.r1.channels = c1
a1.sinks.k1.channel = c1
hadoop 103: vim flume2-netcat-flume.conf
# Name the components on this agent
a2.sources = r1
a2.sinks = k1
a2.channels = c1
# Describe/configure the source
a2.sources.r1.type = netcat
a2.sources.r1.bind = hadoop103
a2.sources.r1.port = 44444
# Describe the sink
a2.sinks.k1.type = avro
a2.sinks.k1.hostname = hadoop104
a2.sinks.k1.port = 4141
# Use a channel which buffers events in memory
a2.channels.c1.type = memory
a2.channels.c1.capacity = 1000
a2.channels.c1.transactionCapacity = 100
# Bind the source and sink to the channel
a2.sources.r1.channels = c1
a2.sinks.k1.channel = c1
hadoop104: vim flume3-flume-logger.conf
# Name the components on this agent
a3.sources = r1
a3.sinks = k1
a3.channels = c1
# Describe/configure the source
a3.sources.r1.type = avro
a3.sources.r1.bind = hadoop104
a3.sources.r1.port = 4141
# Describe the sink
a3.sinks.k1.type = logger
# Describe the channel
a3.channels.c1.type = memory
a3.channels.c1.capacity = 1000
a3.channels.c1.transactionCapacity = 100
# Bind the source and sink to the channel
a3.sources.r1.channels = c1
a3.sinks.k1.channel = c1
执行命令,启动配置文件
 bin/flume-ng agent -n a3 -c conf/ -f job/group3/flume3-flume-logger.conf -
Dflume.root.logger=INFO,consolebin/flume-ng agent -n a3 -c conf/ -f job/group3/flume1-logger-flume.confbin/flume-ng agent -n a3 -c conf/ -f job/group3/flume2-netcat-flume.conf
使用以下命令在hadoop102上向/opt/module 目录下的 group.log 追加内容
echo 'hello' > group.log
在 hadoop103 上向 44444 端口发送数据
telnet hadoop103 44444
之后在hadoop104上查看接受的数据
