
Qt中用thrift验证flume
一.flume简介
flume是Cloudera提供的一个高可用的,高可靠的,分布式的海量日志采集、聚合和传输的系统。
在flume中分为了3个组件,分别为source,channel和sink。
Source是负责接收数据到Flume Agent的组件。Source组件可以处理各种类型、各种格式的日志数据。
Sink不断地轮询Channel中的事件且批量地移除它们,并将这些事件批量写入到存储或索引系统、或者被发送到另一个Flume Agent。
Channel是位于Source和Sink之间的缓冲区。因此,Channel允许Source和Sink运作在不同的速率上。Channel是线程安全的,可以同时处理几个Source的写入操作和几个Sink的读取操作。
flume支持的Source、Sink和Channel如下所示
Flume sources
☆Avro Source(常用于agent之间传递消息)
☆Exec Source(tail -f 文件,会重复消费)
☆Spooling Directory Source(文件夹变更)
☆Taildir Source(实时更新一组文件,不会重复消费)
☆Kafka Source
☆HTTP Source
☆Thrift Source
☆JMS Source
☆NetCat TCP Source
☆NetCat UDP Source
☆Sequence Generator Source
☆Custom Source 自定义
Flume Sinks
☆Avro Sink
☆HDFS Sink
☆Hive Sink
☆Logger Sink (测试用)
☆File Roll Sink
☆Thrift Sink
☆IRC Sink
☆Null Sink
☆HBaseSinks
☆ElasticSearchSink
☆Kafka Sink
☆HTTP Sink
☆Custom Sink 自定义
Flume Channels
☆Memory Channel
☆JDBC Channel 当前Flume Channel内置支持Derby
☆Kafka Channel
☆File Channel
☆Spillable Memory Channel (当前试验性的,不建议生产环境使用)
☆Custom Channel 自定义
从这可以看出,Source和Sink都是支持Thrift的,可以理解为flume内置了Thrift服务器和客户端。
二.windows部署flume
下载最新的jdk 19
安装完成后,将jdk添加到环境变量
①新建系统变量JAVA_HOME,值为D:\Program Files\Java\jdk-19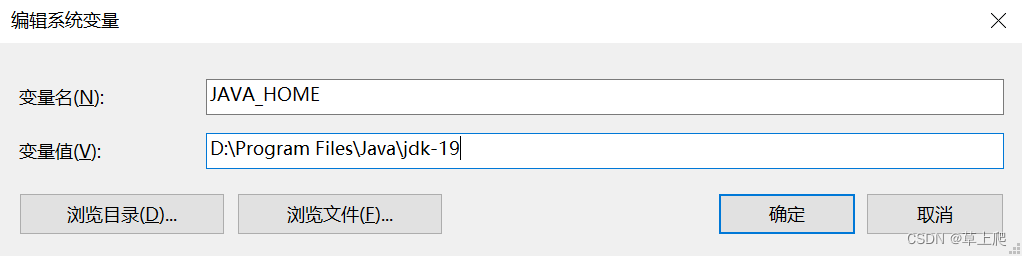
②将%JAVA_HOME%\bin添加到环境变量Path中
测试一下java是否配置好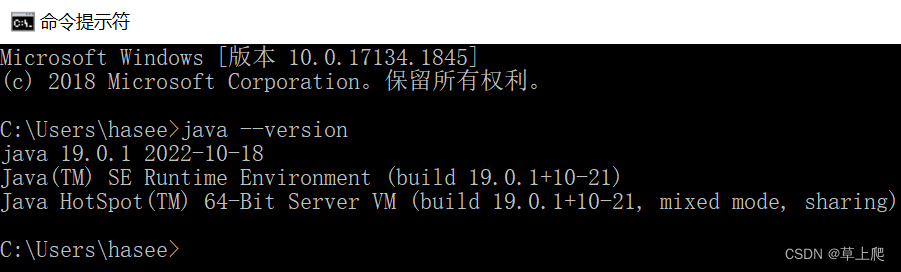
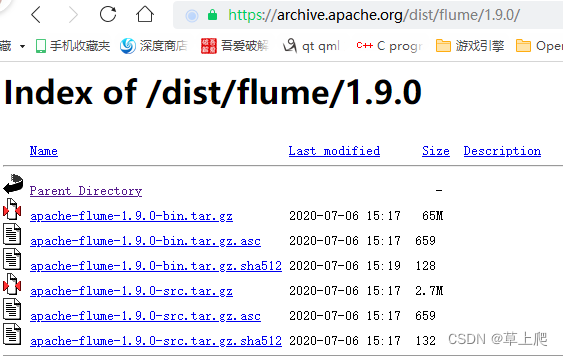
下载flume-1.9.0,bin和src都要下载
将bin解压到D盘,然后将D:\flume-1.9.0\conf中的三个template文件复制一份并去掉".template",如下图所示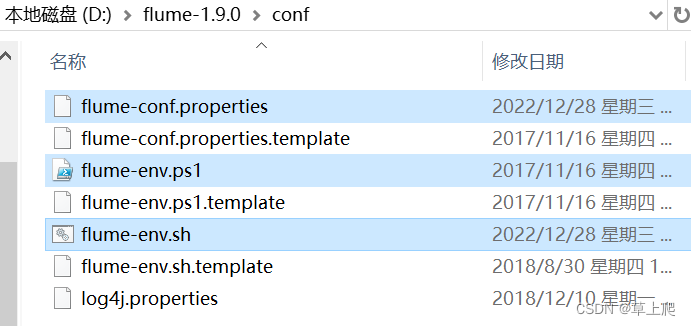
将jdk 19的安装路径添加到D:\flume-1.9.0\conf\flume-env.sh中,如下图所示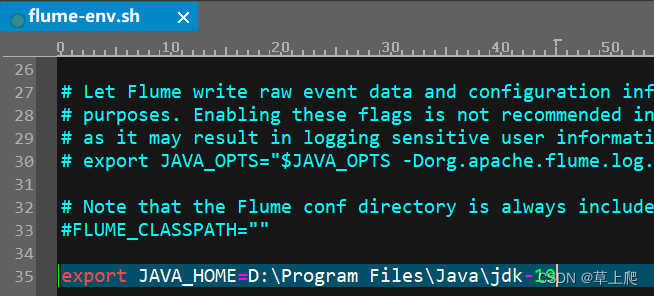
将D:\flume-1.9.0\conf\flume-conf.properties的内容修改为
agent.sources = r1
agent.sinks = k1
agent.channels = c1  # Describe/configure the source
agent.sources.r1.type = thrift
agent.sources.r1.port = 9090
agent.sources.r1.bind = 0.0.0.0
agent.sources.r1.threads = 10 # Use a channel which buffers events in file
agent.channels.c1.type = memory
agent.channels.c1.capacity = 10000000
agent.channels.c1.transactionCapacity= 2000  # Describe the sink k1
agent.sinks.k1.type = logger  # Bind the source and sink to the channel
agent.sources.r1.channels = c1
agent.sinks.k1.channel = c1
这里将Source设置为thrift,Sink为logger,这样就能接收thrift客户端发送的数据,并在flume控制台中打印出来。这里端口号是9090,那么thrift客户端的端口号也要设置为9090
将flume添加到环境变量
①新建系统变量FLUME_HOME,值为D:\flume-1.9.0
②将%FLUME_HOME%\bin和%FLUME_HOME%\conf添加到环境变量Path中
启动flume
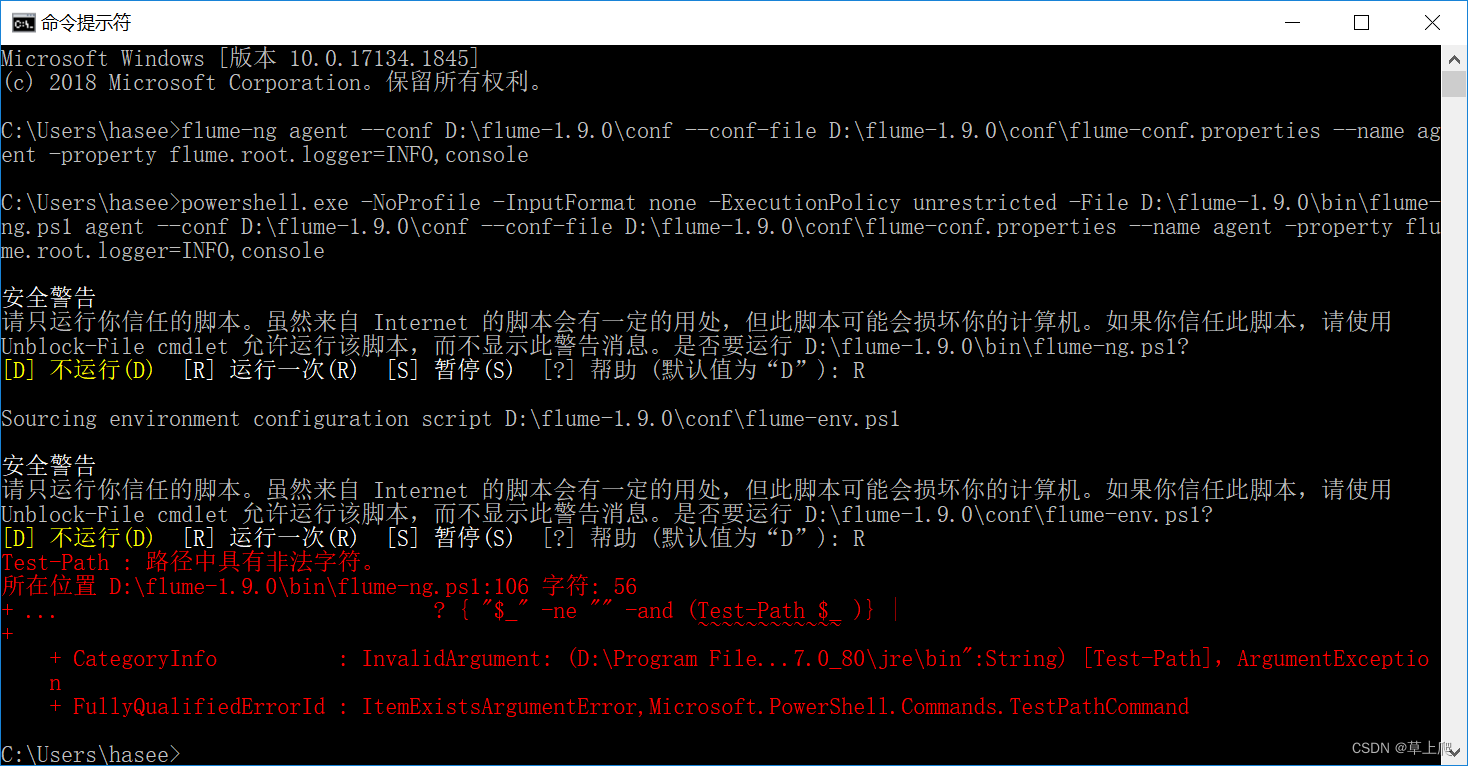
flume-ng agent --conf D:\flume-1.9.0\conf --conf-file D:\flume-1.9.0\conf\flume-conf.properties --name agent -property flume.root.logger=INFO,console会报如下错误
Test-Path : 路径中具有非法字符。
所在位置 D:\flume-1.9.0\bin\flume-ng.ps1:106 字符: 56
+ ... ? { "$_" -ne "" -and (Test-Path $_ )} |
+ ~~~~~~~~~~~~
+ CategoryInfo : InvalidArgument: (D:\Program File...7.0_80\jre\bin":String) [Test-Path],ArgumentExceptio
n
+ FullyQualifiedErrorId : ItemExistsArgumentError,Microsoft.PowerShell.Commands.TestPathCommand
具体如下图所示
解决方法是修改D:\flume-1.9.0\bin\flume-ng.ps1文件
将GetHadoopHome、GetHbaseHome和GetHiveHome这三个函数的定义和调用全部注释掉或者删掉,因为系统中未安装这三个软件,肯定找不到
再次运行flume,成功。提示Started Thrift source
三.用thrift验证flume
解压flume src,在src\flume-ng-sdk\src\main\thrift中有一个flume.thrift文件,这个是thrift和flume通信的接口文件,将这个文件稍做修改,去掉枚举中的ERROR,它与windows的宏定义冲突。修改后的flume.thrift如下所示
namespace java org.apache.flume.thriftstruct ThriftFlumeEvent {1: required map  headers,2: required binary body,
}enum Status {OK,FAILED,UNKNOWN
}service ThriftSourceProtocol {Status append(1: ThriftFlumeEvent event),Status appendBatch(1: list events),
}
参考上篇博客Qt中调用thrift,执行
thrift -r --gen cpp flume.thrift将上篇博客中的Thrift_Client稍作修改,如下所示
#include
#include
#include #include "ThriftSourceProtocol.h"
#include using namespace std;
using namespace apache::thrift;
using namespace apache::thrift::protocol;
using namespace apache::thrift::transport;class ThriftClient
{
public:ThriftClient(): socket(new TSocket("127.0.0.1", 9090)), transport(new TFramedTransport(socket)), protocol(new TCompactProtocol(transport)){pClient = new ThriftSourceProtocolClient(protocol);}~ThriftClient(){}void sendEvent(){std::string body("The first event");ThriftFlumeEvent event;event.__set_headers(headers);event.__set_body(body);if (!transport->isOpen()){transport->open();}Status::type res = pClient->append(event);if (res == Status::OK){std::cout<<"Send event: "<close();}void sendBatchEvent(){std::string body2("The second event");ThriftFlumeEvent event;event.__set_headers(headers);event.__set_body(body2);events.push_back(event);std::string body3("The third event");event.__set_headers(headers);event.__set_body(body3);events.push_back(event);if (!transport->isOpen()){transport->open();}Status::type res = pClient->appendBatch(events);if (res == Status::OK){for(auto event:events){std::cout<<"Send event: "<close();}private:// Thrift protocol needings...std::shared_ptr socket;std::shared_ptr transport;std::shared_ptr protocol;ThriftSourceProtocolClient *pClient;std::map headers;std::vector events;
};int main(int argc, char **argv)
{ThriftClient client;client.sendEvent();client.sendBatchEvent();return 0;
}
这里的端口设置为9090。发送event有两种方式,单条发送和批量发送。代码中发送了三条event,flume的控制台也打印三条,如下图所示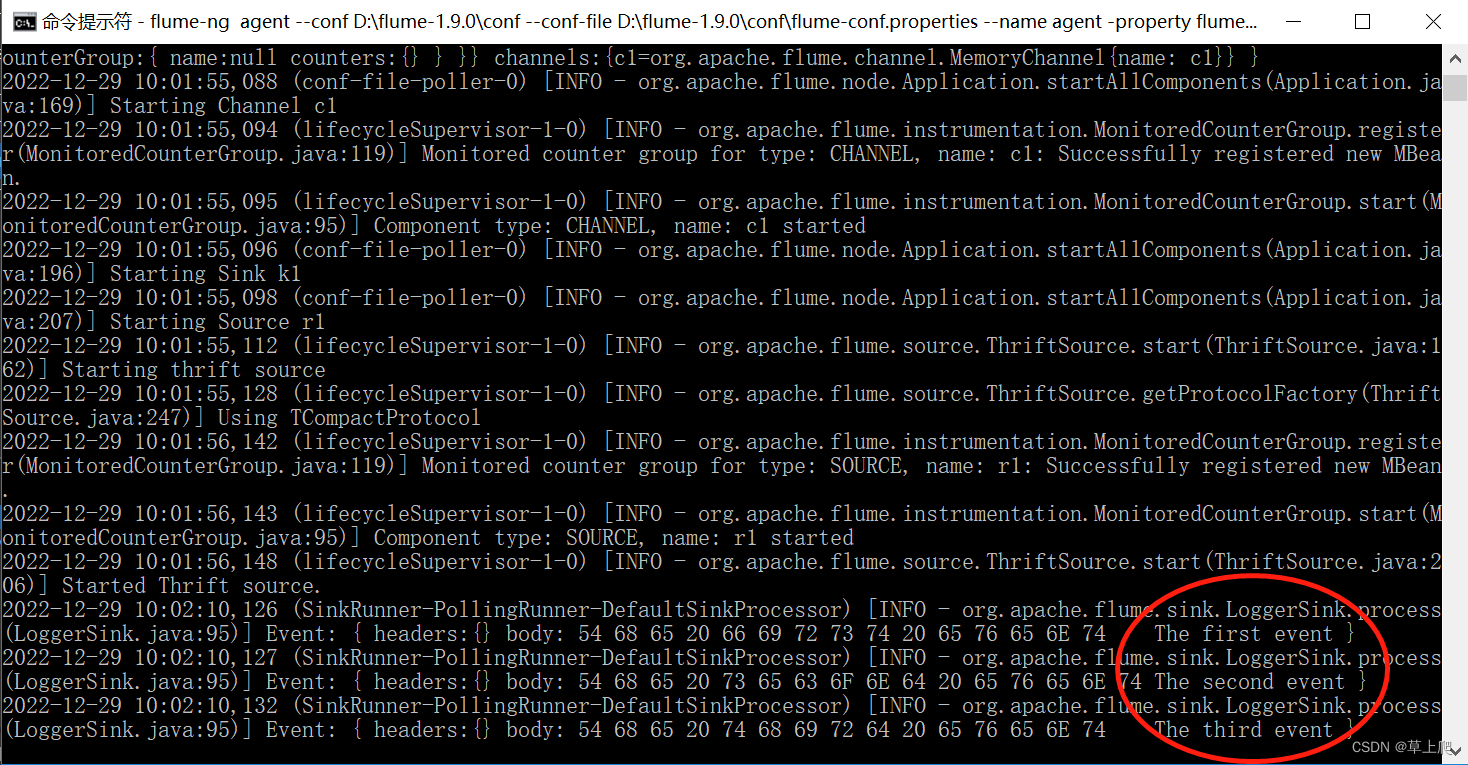
现在把flume的Sink也指定为thrift,端口号为9091
agent.sources = r1
agent.sinks = k1
agent.channels = c1  # Describe/configure the source
agent.sources.r1.type = thrift
agent.sources.r1.port = 9090
agent.sources.r1.bind = 0.0.0.0
agent.sources.r1.threads = 10 # Use a channel which buffers events in file
agent.channels.c1.type = memory
agent.channels.c1.capacity = 10000000
agent.channels.c1.transactionCapacity= 2000  # Describe the sink k1
agent.sinks.k1.type = thrift
agent.sinks.k1.hostname = 127.0.0.1
agent.sinks.r1.port = 9091  # Bind the source and sink to the channel
agent.sources.r1.channels = c1
agent.sinks.k1.channel = c1
将上篇博客中的Thrift_Server稍作修改,如下所示
#include "ThriftSourceProtocol.h"
#include
#include
#include
#include
#include using namespace ::apache::thrift;
using namespace ::apache::thrift::protocol;
using namespace ::apache::thrift::transport;
using namespace ::apache::thrift::server;class ThriftSourceProtocolHandler : virtual public ThriftSourceProtocolIf {
public:ThriftSourceProtocolHandler() {// Your initialization goes here}Status::type append(const ThriftFlumeEvent& event) {// Your implementation goes herestd::cout< & events) {// Your implementation goes herefor(auto event:events){std::cout< handler(new ThriftSourceProtocolHandler());::std::shared_ptr processor(new ThriftSourceProtocolProcessor(handler));::std::shared_ptr serverTransport(new TServerSocket(port));::std::shared_ptr transportFactory(new TFramedTransportFactory());::std::shared_ptr protocolFactory(new TCompactProtocolFactory());TSimpleServer server(processor, serverTransport, transportFactory, protocolFactory);server.serve();return 0;
}
重新启动flume,然后启动Thrift_Server,最后启动Thrfit_Client,结果如下图所示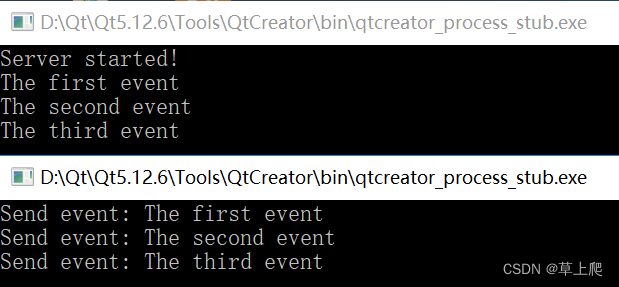
至此,验证通过!
原文链接:https://blog.csdn.net/caoshangpa/article/details/128502780