
【数据结构】双向链表的接口实现(附图解和源码)
创始人
2024-05-26 22:15:32
0次
双向链表的接口实现(附图解和源码)
文章目录
- 双向链表的接口实现(附图解和源码)
- 前言
- 一、定义结构体
- 二、接口实现(附图解+源码)
- 1.初始化双向链表
- 2.开辟新空间
- 3.尾插数据
- 4.尾删数据
- 5.打印双向链表中数据
- 6.头插数据
- 7.头删数据
- 8.查找结点位置
- 9.在pos位置之前插入
- 10.删除pos位置
- 11.销毁双向链表
- 三、源代码展示
- 1.test.c(测试+主函数)
- 2.List.h(接口函数的声明)
- 3.List.c(接口函数的实现)
- 总结
前言
本文主要介绍双向链表中增删查改等接口实现,结尾附总源码!
一、定义结构体

代码如下(示例):
typedef int LTDataType;
typedef struct ListNode
{LTDataType data;struct ListNode* prev;struct ListNode* next;
}ListNode;
二、接口实现(附图解+源码)
这里一共10个接口,我会我都会一 一为大家讲解(图解+源码)
1.初始化双向链表
初始化出一个哨兵位的头结点(用malloc开辟),next和prev都指向自己。具体如下图!
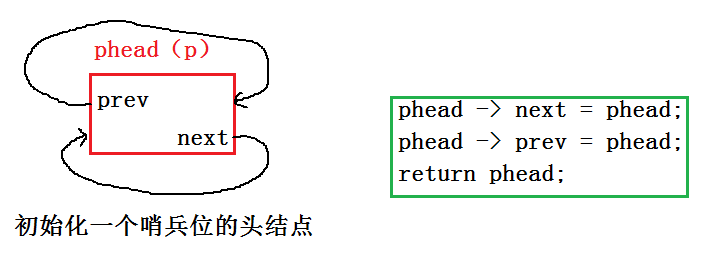

代码如下(示例):
ListNode* ListInit()
{ListNode* p = (ListNode*)malloc(sizeof(ListNode));if (p == NULL){perror(errno);}ListNode* phead = p;phead->next = phead;phead->prev = phead;return phead;
}
2.开辟新空间
(1)开辟一个链表类型的动态空间,将地址给newnode;
(2)将值放入 newnode 的 data 数据内;
(3)将 newnode 的 next 和 prev 都置为NULL;
注意:1.将malloc开辟空间存到 newnode 里面时,参数为结构体所占的字节大小!2.对 newnode 进行 NULL 判断!
代码如下(示例):
ListNode* BuyListNode(LTDataType x)
{ListNode* p = (ListNode*)malloc(sizeof(ListNode));if (p == NULL){perror(errno);}ListNode* newNode = p;newNode->data = x;newNode->next = NULL;newNode->prev = NULL;return newNode;
}
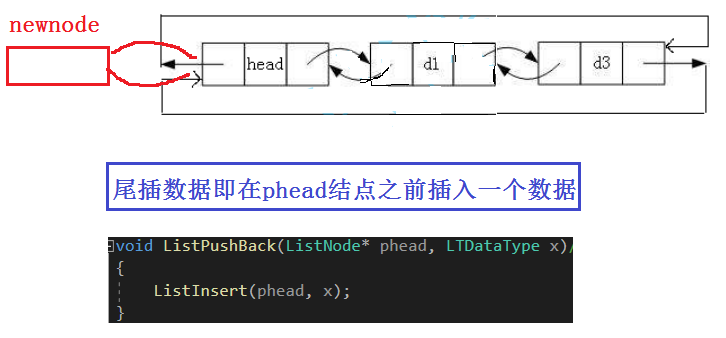
3.尾插数据


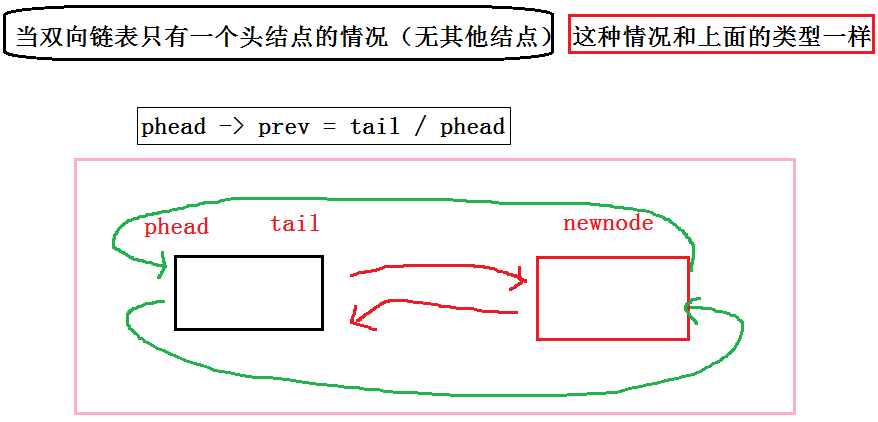
代码如下(示例):
void ListPushBack(ListNode* phead, LTDataType x)//尾插数据
{ListNode* tail = phead->prev;ListNode* newnode = BuyListNode(x);//第一个链接tail->next = newnode;newnode->prev = tail;//第二个链接phead->prev = newnode;newnode->next = phead;
}
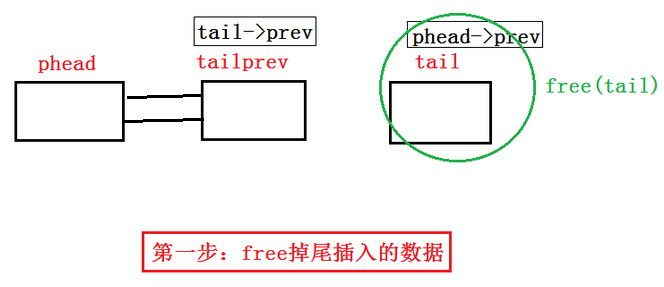
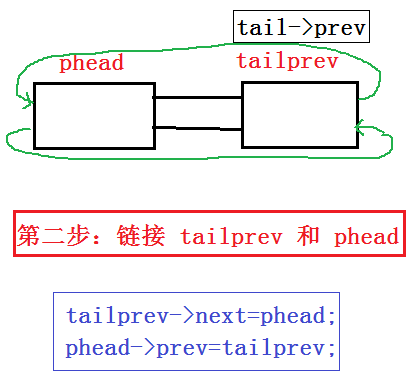
4.尾删数据
这里需要两次进行断言:
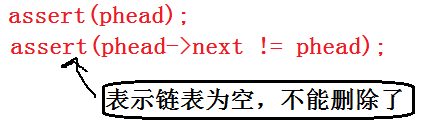
代码如下(示例):
void ListPopBack(ListNode* phead)//尾删
{assert(phead);assert(phead->next != phead);ListNode* tail = phead->prev;ListNode* tailprev = tail->prev;free(tail);//连接tailprev->next = phead;phead->prev = tailprev;
}
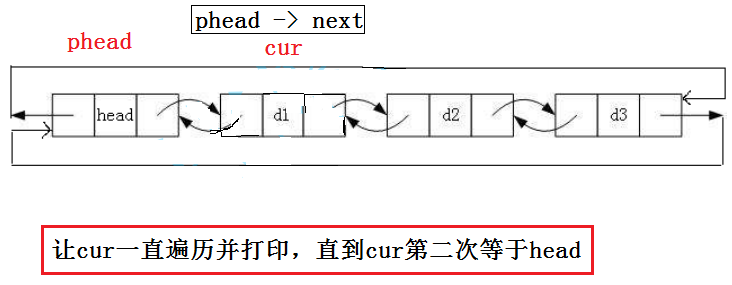
5.打印双向链表中数据
代码如下(示例):
void ListPrint(ListNode* phead)//打印数据
{assert(phead);ListNode* cur = phead->next;while (cur != phead){printf("%d ", cur->data);cur = cur->next;}printf("\n");
}
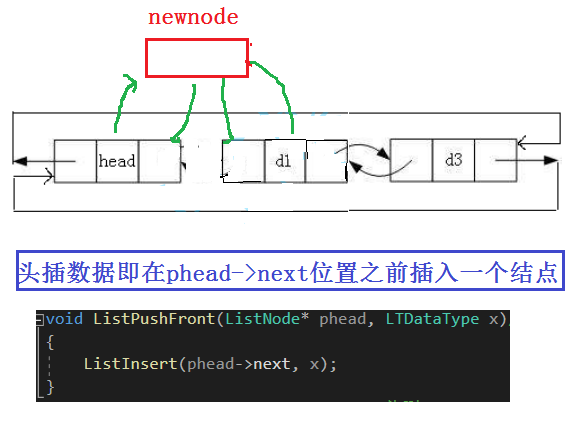
6.头插数据
头插数据也是很简单的一个接口,链接两次即可,如下图!
代码如下(示例):
void ListPushFront(ListNode* phead, LTDataType x)//头插
{assert(phead);ListNode* newNode = BuyListNode(x);ListNode* next = phead->next;phead->next = newNode;newNode->prev = phead;newNode->next = next;next->prev = newNode;
}
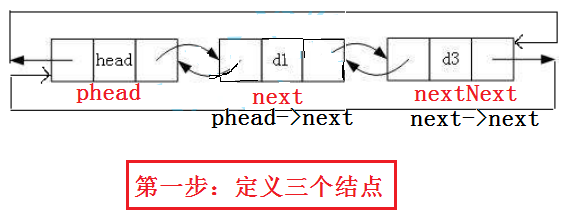
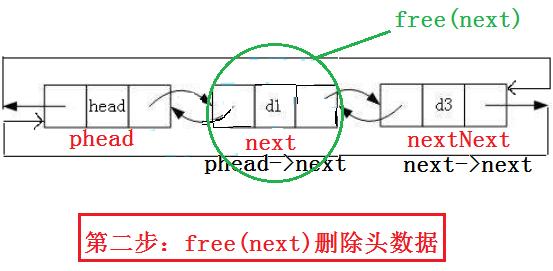
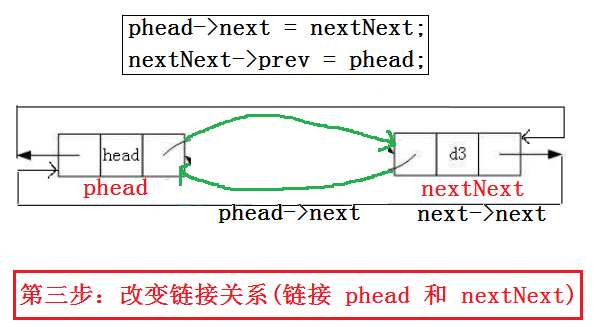
7.头删数据
在头删数据时和尾删数据一样都需要进行两次断言!如下图!

代码如下(示例):
void ListPopFront(ListNode* phead)//头删
{assert(phead);assert(phead->next != phead);ListNode* next = phead->next;ListNode* nextNext = next->next;phead->next = nextNext;nextNext->prev = phead;free(next);
}
8.查找结点位置
这个比较简单,和单链表一样,直接用cur遍历即可,直接上代码:
代码如下(示例):
ListNode* ListFind(ListNode* phead, LTDataType x)
{assert(phead);ListNode* cur = phead->next;while (cur != phead){if (cur->data == x){return cur;}cur = cur->next;}return NULL;
}
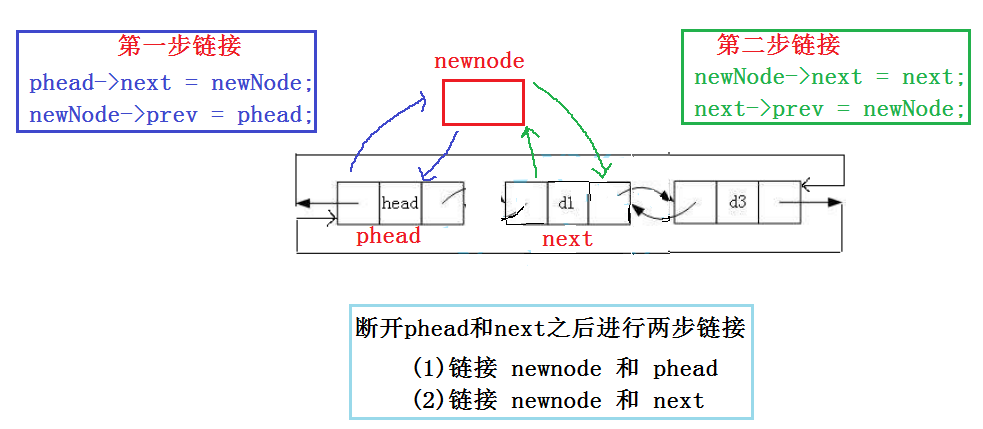
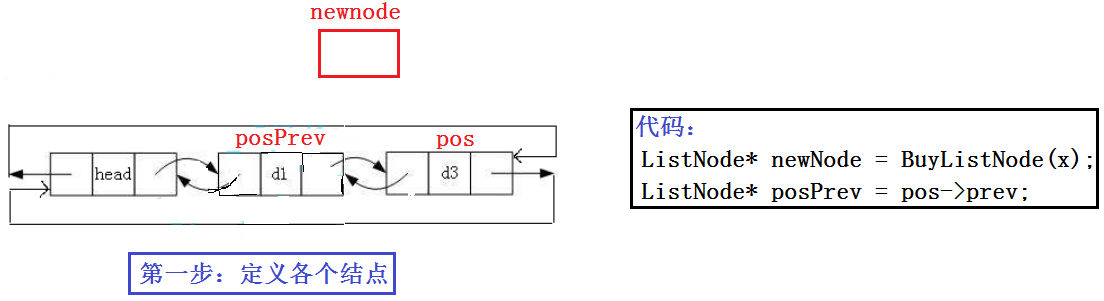
9.在pos位置之前插入
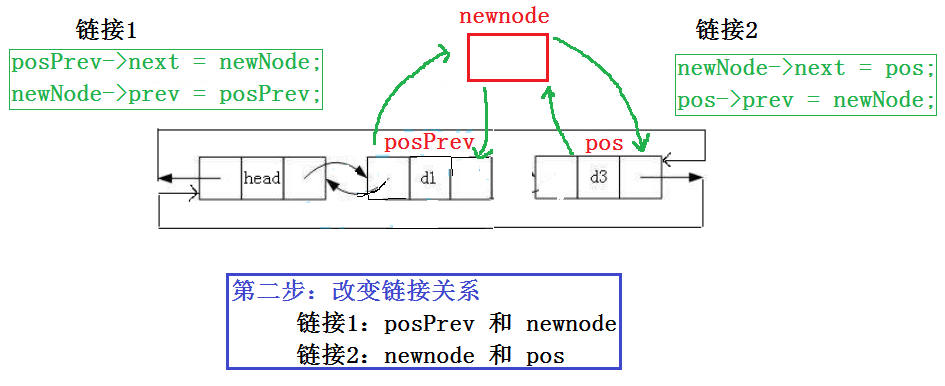
代码如下(示例):
void ListInsert(ListNode* pos, LTDataType x)//pos位置之前插入
{assert(pos);ListNode* newNode = BuyListNode(x);ListNode* posPrev = pos->prev;// posPrev  newnode posposPrev->next = newNode;newNode->prev = posPrev;newNode->next = pos;pos->prev = newNode;
}
根据ListInsert接口我们可以把头插和尾插进行改版,如下图!
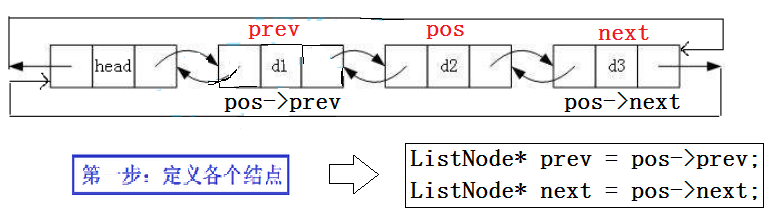
10.删除pos位置
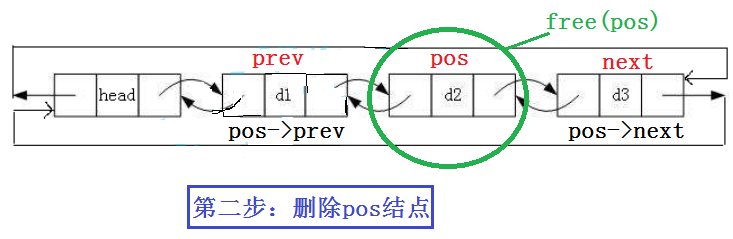
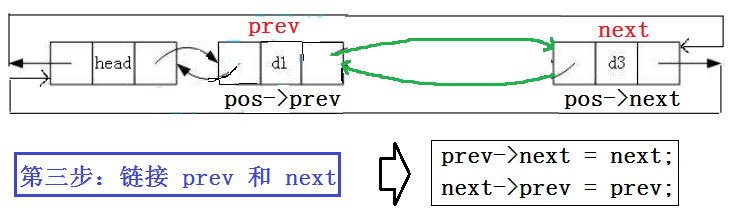
代码如下(示例):
void ListErase(ListNode* pos)//删除pos位置
{assert(pos);ListNode* prev = pos->prev;ListNode* next = pos->next;free(pos);pos = NULL;prev->next = next;next->prev = prev;
}
11.销毁双向链表
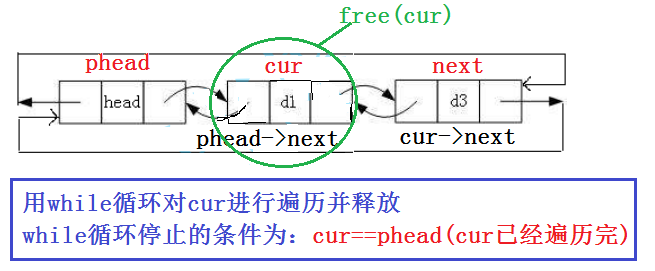
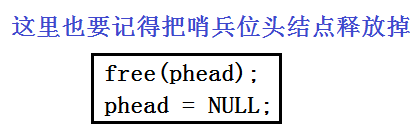
代码如下(示例):
void ListDestory(ListNode* phead)
{assert(phead);ListNode* cur = phead->next;while (cur != phead){ListNode* next = cur->next;free(cur);cur = next;}free(phead);phead = NULL;
}
三、源代码展示
1.test.c(测试+主函数)
代码如下(示例):
#include "list.h"
void Testlist1()
{ListNode* n1 = ListInit();ListPushBack(n1, 1);//尾插ListPushBack(n1, 2);//尾插//ListPushBack(n1, 3);//尾插//ListPushBack(n1, 4);//尾插//ListPushBack(n1, 5);//尾插//ListPopFront(n1);//头删//ListPopBack(n1);//尾删//ListPushFront(n1, 0);//头插ListPrint(n1);
}
void Testlist2()
{ListNode* n1 = ListInit();ListPushBack(n1, 1);//尾插ListPushBack(n1, 2);//尾插ListPushBack(n1, 3);//尾插ListPushBack(n1, 4);//尾插ListPushBack(n1, 5);//尾插ListNode* p = ListFind(n1, 5);printf("%d \n", p->data);
}
void Testlist3()
{ListNode* n1 = ListInit();ListPushBack(n1, 1);//尾插ListPushBack(n1, 2);//尾插ListPushBack(n1, 3);//尾插ListPushBack(n1, 4);//尾插ListPushBack(n1, 5);//尾插//ListNode* p = ListFind(n1, 5);//ListInsert(p, 0);ListDestory(n1);ListPrint(n1);
}
int main()
{//Testlist1();//Testlist2();Testlist3();return 0;
}
2.List.h(接口函数的声明)
代码如下(示例):
#include
#include
#include
#include
typedef int LTDataType;
typedef struct ListNode
{LTDataType data;struct ListNode* prev;struct ListNode* next;
}ListNode;
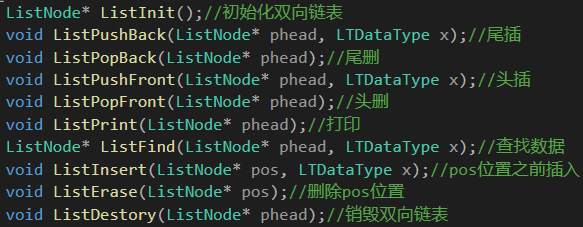
ListNode* ListInit();//初始化双向链表
void ListPushBack(ListNode* phead, LTDataType x);//尾插
void ListPopBack(ListNode* phead);//尾删
void ListPushFront(ListNode* phead, LTDataType x);//头插
void ListPopFront(ListNode* phead);//头删
void ListPrint(ListNode* phead);//打印
ListNode* ListFind(ListNode* phead, LTDataType x);//查找数据
void ListInsert(ListNode* pos, LTDataType x);//pos位置之前插入
void ListErase(ListNode* pos);//删除pos位置
void ListDestory(ListNode* phead);//销毁双向链表
3.List.c(接口函数的实现)
代码如下(示例):
#include "list.h"
ListNode* ListInit()
{ListNode* p = (ListNode*)malloc(sizeof(ListNode));if (p == NULL){perror(errno);}ListNode* phead = p;phead->next = phead;phead->prev = phead;return phead;
}
ListNode* BuyListNode(LTDataType x)
{ListNode* p = (ListNode*)malloc(sizeof(ListNode));if (p == NULL){perror(errno);}ListNode* newNode = p;newNode->data = x;newNode->next = NULL;newNode->prev = NULL;return newNode;
}
void ListPushBack(ListNode* phead, LTDataType x)//尾插数据
{ListNode* tail = phead->prev;ListNode* newnode = BuyListNode(x);//第一个链接tail->next = newnode;newnode->prev = tail;//第二个链接phead->prev = newnode;newnode->next = phead;//ListInsert(phead, x);
}
void ListPrint(ListNode* phead)//打印数据
{assert(phead);ListNode* cur = phead->next;while (cur != phead){printf("%d ", cur->data);cur = cur->next;}printf("\n");
}
void ListPopBack(ListNode* phead)//尾删
{assert(phead);assert(phead->next != phead);ListNode* tail = phead->prev;ListNode* tailprev = tail->prev;free(tail);//连接tailprev->next = phead;phead->prev = tailprev;
}
void ListPushFront(ListNode* phead, LTDataType x)//头插
{assert(phead);ListNode* newNode = BuyListNode(x);ListNode* next = phead->next;phead->next = newNode;newNode->prev = phead;newNode->next = next;next->prev = newNode;//ListInsert(phead->next, x);
}
void ListPopFront(ListNode* phead)//头删
{assert(phead);assert(phead->next != phead);ListNode* next = phead->next;ListNode* nextNext = next->next;phead->next = nextNext;nextNext->prev = phead;free(next);
}
ListNode* ListFind(ListNode* phead, LTDataType x)
{assert(phead);ListNode* cur = phead->next;while (cur != phead){if (cur->data == x){return cur;}cur = cur->next;}return NULL;
}
void ListInsert(ListNode* pos, LTDataType x)//pos位置之前插入
{assert(pos);ListNode* newNode = BuyListNode(x);ListNode* posPrev = pos->prev;// posPrev  newnode posposPrev->next = newNode;newNode->prev = posPrev;newNode->next = pos;pos->prev = newNode;
}
void ListErase(ListNode* pos)//删除pos位置
{assert(pos);ListNode* prev = pos->prev;ListNode* next = pos->next;free(pos);pos = NULL;prev->next = next;next->prev = prev;
}
void ListDestory(ListNode* phead)
{assert(phead);ListNode* cur = phead->next;while (cur != phead){ListNode* next = cur->next;free(cur);cur = next;}free(phead);phead = NULL;
}
总结
以上就是今天要讲的内容,本文介绍双向链表的接口实现(附图解和源码)。
如果我的博客对你有所帮助记得三连支持一下,感谢大家的支持!

上一篇:C语言 | 问题20230225
下一篇:大数据技术之Hive(三)函数
相关内容
热门资讯
安卓子系统windows11,...
你知道吗?最近科技圈可是炸开了锅,因为安卓子系统在Windows 11上的兼容性成了大家热议的话题。...
电脑里怎么下载安卓系统,电脑端...
你有没有想过,你的电脑里也能装上安卓系统呢?没错,就是那个让你手机不离手的安卓!今天,就让我来带你一...
索尼相机魔改安卓系统,魔改系统...
你知道吗?最近在摄影圈里掀起了一股热潮,那就是索尼相机魔改安卓系统。这可不是一般的改装,而是让这些专...
安卓系统哪家的最流畅,安卓系统...
你有没有想过,为什么你的手机有时候像蜗牛一样慢吞吞的,而别人的手机却能像风一样快?这背后,其实就是安...
安卓最新系统4.42,深度解析...
你有没有发现,你的安卓手机最近是不是有点儿不一样了?没错,就是那个一直在默默更新的安卓最新系统4.4...
android和安卓什么系统最...
你有没有想过,你的安卓手机到底是用的是什么系统呢?是不是有时候觉得手机卡顿,运行缓慢,其实跟这个系统...
平板装安卓xp系统好,探索复古...
你有没有想过,把安卓系统装到平板上,再配上XP系统,这会是怎样一番景象呢?想象一边享受着安卓的便捷,...
投影仪装安卓系统,开启智能投影...
你有没有想过,家里的老式投影仪也能焕发第二春呢?没错,就是那个曾经陪你熬夜看电影的“老伙计”,现在它...
安卓系统无线车载carplay...
你有没有想过,开车的时候也能享受到苹果设备的便利呢?没错,就是那个让你在日常生活中离不开的iOS系统...
谷歌安卓8系统包,系统包解析与...
你有没有发现,手机更新换代的速度简直就像坐上了火箭呢?这不,最近谷歌又发布了安卓8系统包,听说这个新...
微软平板下软件安卓系统,开启全...
你有没有想过,在微软平板上也能畅享安卓系统的乐趣呢?没错,这就是今天我要跟你分享的神奇故事。想象你手...
coloros是基于安卓系统吗...
你有没有想过,手机里的那个色彩斑斓的界面,背后其实有着一个有趣的故事呢?没错,我要说的就是Color...
安卓神盾系统应用市场,一站式智...
你有没有发现,手机里的安卓神盾系统应用市场最近可是火得一塌糊涂啊!这不,我就来给你好好扒一扒,看看这...
黑莓平板安卓系统升级,解锁无限...
亲爱的读者们,你是否还记得那个曾经风靡一时的黑莓手机?那个标志性的全键盘,那个独特的黑莓体验,如今它...
安卓文件系统采用华为,探索高效...
你知道吗?最近安卓系统在文件管理上可是有了大动作呢!华为这个科技巨头,竟然悄悄地给安卓文件系统来了个...
深度系统能用安卓app,探索智...
你知道吗?现在科技的发展真是让人惊叹不已!今天,我要给你揭秘一个超级酷炫的话题——深度系统能用安卓a...
安卓系统的分区类型,深度解析存...
你有没有发现,你的安卓手机里藏着不少秘密?没错,就是那些神秘的分区类型。今天,就让我带你一探究竟,揭...
安卓系统铠无法兑换,揭秘无法兑...
最近是不是有很多小伙伴在玩安卓系统的游戏,突然发现了一个让人头疼的问题——铠无法兑换!别急,今天就来...
汽车安卓系统崩溃怎么刷,一键刷...
亲爱的车主朋友们,你是否曾遇到过汽车安卓系统崩溃的尴尬时刻?手机系统崩溃还能重启,但汽车系统崩溃了,...
miui系统可以刷安卓p系统吗...
亲爱的手机控们,你是否对MIUI系统情有独钟,同时又对安卓P系统的新鲜功能垂涎欲滴?今天,就让我带你...