
【Java基础】10分钟看懂Java NIO
一、IO概述
IO的操作方式通常分为几种:同步阻塞BIO、同步非阻塞NIO、异步非阳塞AIO
1、在JDK1.4之前,我们建立网络连接的时候采用的是 BIO 模式。
2、Java NIO(New IO或Non Blocking IO) 是从Java 1.4版本开始引入的一个新的IOAPI,可以替代标准的Java IO API。NIO支持面向缓冲区的、基于通道的IO操作NIO将以更加高效的方式进行文件的读写操作。BIO与NIO一个比较重要的不同是我们使用 BIO的时候往往会引入多线程,每个连接对应一个单独的线程,而 NIO则是使用单线程或者只使用少量的多线程,让连接共用一个线程。
3、AIO 也就是NIO2,在Java 7 中引入了 NIO的改进版 NIO2它是异步非阻塞的IO 模型。
二、BIO、NIO、AIO应用场景
1、BIO方式适用于连接数目比较小且固定的架构,这种方式对服务器资源要求比较高, 并发局限于应用中,JDK1.4以前的唯一选择,但程序简单易理解。
2、NIO方式适用于连接数目多且连接比较短(轻操作)的架构,比如聊天服务器,弹幕 系统,服务器间通讯等。编程比较复杂,JDK1.4开始支持。
3、AIO方式使用于连接数目多且连接比较长(重操作)的架构,比如相册服务器,充分 调用OS参与并发操作,编程比较复杂,JDK7开始支持
三、NIO的基本用法
NIO是New I/O的简称,与旧式基于流的I/O相对,从名字上来看,它表示新的一套I/O标准。它是从JDK1.4中被纳入到JDK中的。
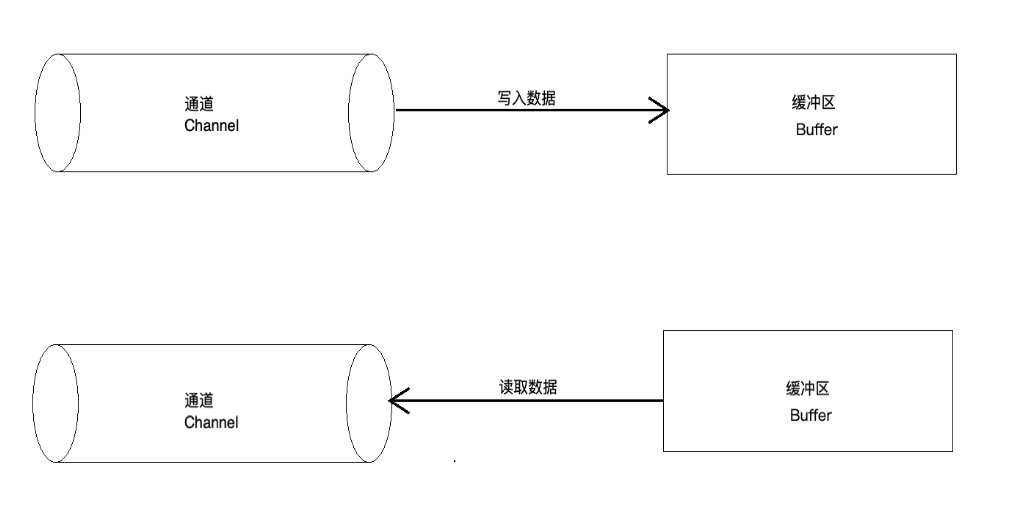
与旧式的IO流相比,NIO是基于Block的,它以块为单位来处理数据,最为重要的两个组件是缓冲区Buffer和通道Channel。缓冲区是一块连续的内存块,是NIO读写数据的载体;通道表示缓冲数据的源头和目的地,它用于向缓冲区读取或者写入数据,是访问缓冲区的接口。
1、Buffer的基本原理
Buffer中最重要的3个参数:位置(position)、容量(capacity)、上限(limit)。他们3者的含义如下
位置(position): 表示当前缓冲区的位置,从position位置之后开始读写数据。
容量(capacity): 表示缓冲区的最大容量
上限(limit): 表示缓冲区的实际上限,它总是小于或等于容量
position 和limit 的含义取决于 Buffer 处在读模式还是写模式。不管 Buffer 处在什么模式,capacity的含义总是一样的。
以下是关于capacity,position 和limit 在读写模式中的说明
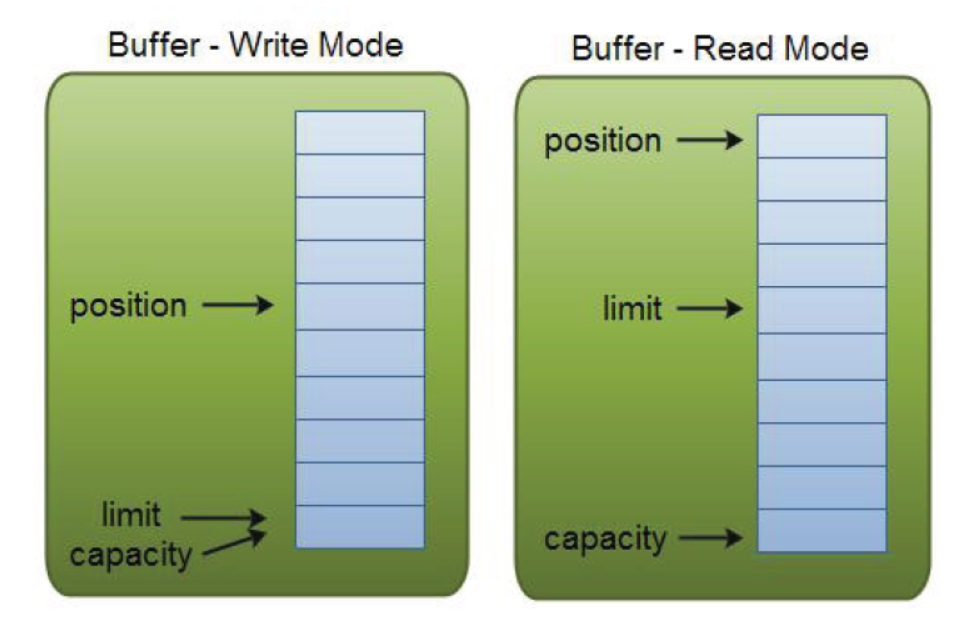
(1) capacity
作为一个内存块,Buffer 有一个固定的大小值,也叫“capacity”.你只能往里写capacity 个byte、long,char等类型。一旦 Buffer满了,需要将其清空(通过读数据或者清除数据)才能继续写数据往里写数据
(2) position
写数据到 Buffer 中时,position 表示写入数据的当前位置,position 的初始值为0。当一个 byte、long 等数据写到 Buffer后, position 会向下移动到下一个可插入数据的 Buffer单元。position 最大可为 capacity -1(因为 position 的初始值为0)
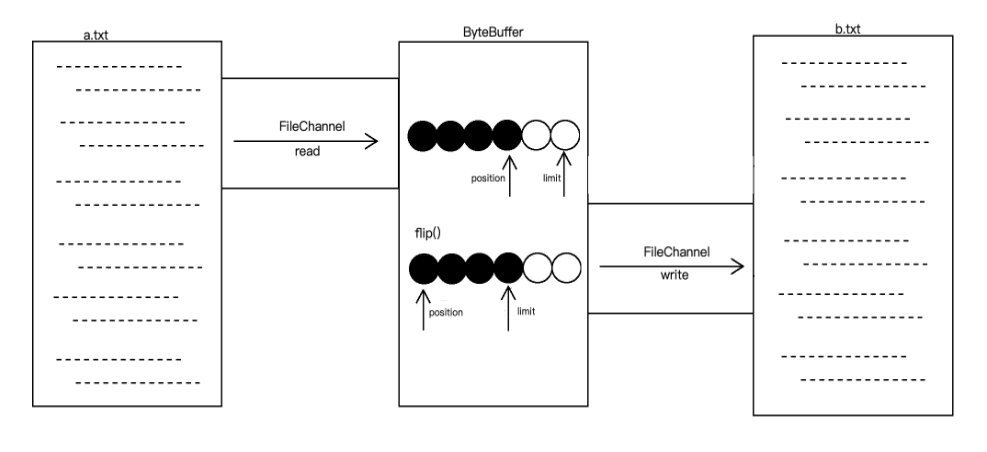
读数据到 Buffer 中时,position 表示读入数据的当前位置,如 position=2 时表示已开始读入了3个byte,或从第3个byte 开始读取。通过 ByteBuffer.flip(切换到读模式时 position 会被重置为0,当Buffer从 position 读入数据后,position 会下移到下一个可读入的数据 Buffer 单元。
(3) limit
写数据时,limit 表示可对 Buffer 最多写入多少个数据。写模式下,limit 等于Buffer的 capacity。
读数据时,limit 表示 Buffer 里有多少可读数据 (not null 的数据),因此能读到之前写入的所有数据(limit被设置成已写数据的数量,这个值在写模式下就是position)
1.1、Buffer 的类型
Java NIO 有以下 Buffer类型
ByteBuffer
MappedByteBuffer
CharBuffer
DoubleBuffer
FloatBuffer
IntBuffer
LongBuffer
ShortBuffer
这些 Buffer 类型代表了不同的数据类型。换句话说,就是可以通过char,short,intlong,float 或 double 类型来操作缓冲区中的字节。
1.2、buffer常用api
JDK1.4时,引入的api
public final int capacity( )//返回此缓冲区的容量
public final int position( )//返回此缓冲区的位置
public final Buffer position (int newPositio)//设置此缓冲区的位置
public final int limit( )//返回此缓冲区的限制
public final Buffer limit (int newLimit)//设置此缓冲区的限制
public final Buffer mark( )//在此缓冲区的位置设置标记
public final Buffer reset( )//将此缓冲区的位置重置为以前标记的位置
public final Buffer clear( )//清除此缓冲区, 即将各个标记恢复到初始状态,但是数据并没有真正擦除, 后面操作会覆盖
public final Buffer flip( )//反转此缓冲区
public final Buffer rewind( )//重绕此缓冲区
public final int remaining( )//返回当前位置与限制之间的元素数
public final boolean hasRemaining( )//告知在当前位置和限制之间是否有元素
public abstract boolean isReadOnly( );//告知此缓冲区是否为只读缓冲区
JDK1.6时引入的api
public abstract boolean hasArray();//告知此缓冲区是否具有可访问的底层实现数组
public abstract Object array();//返回此缓冲区的底层实现数组
public abstract int arrayOffset();//返回此缓冲区的底层实现数组中第一个缓冲区元素的偏移量
public abstract boolean isDirect();//告知此缓冲区是否为直接缓冲区
以下是buffer的例子:
package com.biyu.buffer;import org.junit.jupiter.api.Test;import java.io.FileInputStream;
import java.io.FileNotFoundException;
import java.io.FileOutputStream;
import java.io.RandomAccessFile;
import java.nio.ByteBuffer;
import java.nio.MappedByteBuffer;
import java.nio.channels.FileChannel;public class BufferDemo2 {static private final int start = 0;static private final int size = 1024;//内存映射文件io@Testpublic void b04() throws Exception {RandomAccessFile raf = new RandomAccessFile("d:\\atguigu\\01.txt", "rw");FileChannel fc = raf.getChannel();MappedByteBuffer mbb = fc.map(FileChannel.MapMode.READ_WRITE, start, size);mbb.put(0, (byte) 97);mbb.put(1023, (byte) 122);raf.close();}//直接缓冲区@Testpublic void b03() throws Exception {String infile = "d:\\atguigu\\01.txt";FileInputStream fin = new FileInputStream(infile);FileChannel finChannel = fin.getChannel();String outfile = "d:\\atguigu\\02.txt";FileOutputStream fout = new FileOutputStream(outfile);FileChannel foutChannel = fout.getChannel();//创建直接缓冲区ByteBuffer buffer = ByteBuffer.allocateDirect(1024);while (true) {buffer.clear();int r = finChannel.read(buffer);if(r == -1) {break;}buffer.flip();foutChannel.write(buffer);}}//只读缓冲区@Testpublic void b02() {ByteBuffer buffer = ByteBuffer.allocate(10);for (int i = 0; i < buffer.capacity(); i++) {buffer.put((byte)i);}//创建只读缓冲区ByteBuffer readonly = buffer.asReadOnlyBuffer();for (int i = 0; i < buffer.capacity(); i++) {byte b = buffer.get(i);b *=10;buffer.put(i,b);}readonly.position(0);readonly.limit(buffer.capacity());while (readonly.remaining()>0) {System.out.println(readonly.get());}}//缓冲区分片@Testpublic void b01() {ByteBuffer buffer = ByteBuffer.allocate(10);for (int i = 0; i < buffer.capacity(); i++) {buffer.put((byte)i);}//创建子缓冲区buffer.position(3);buffer.limit(7);//获取while (buffer.hasRemaining()) {int value = buffer.get();System.out.println(value + " ");}System.out.println("******************");ByteBuffer slice = buffer.slice();//改变子缓冲区内容for (int i = 0; i 0) {System.out.println(buffer.get());}}
}
2、FileChannel通道
FileChannel是用于操作文件的通道,可以用于读取文件、也可以写入文件
package com.biyu.channel;import java.io.RandomAccessFile;
import java.nio.channels.DatagramChannel;
import java.nio.channels.FileChannel;
import java.nio.channels.ServerSocketChannel;
import java.nio.channels.SocketChannel;//通道之间数据传输
public class FileChannelDemo4 {//transferTo()public static void main(String[] args) throws Exception {// 创建两个fileChannelRandomAccessFile aFile = new RandomAccessFile("d:\\a.txt","rw");FileChannel fromChannel = aFile.getChannel();RandomAccessFile bFile = new RandomAccessFile("d:\\b.txt","rw");FileChannel toChannel = bFile.getChannel();//fromChannel 传输到 toChannellong position = 0;long size = fromChannel.size();fromChannel.transferTo(0,size,toChannel);aFile.close();bFile.close();System.out.println("over!");}
}
3、SocketChannel通道
NIO中通过SocketChannel与ServerSocketChannel替代TCP协议的网络通信编程。
获取对象 public static SocketChannelopen()
连接服务器 boolean connect(SocketAddress remote)
SocketAddress是抽象类,使用其子类InetSocketAddress创建的对象。InetSocketAddress(String ip,int port)
等待客户端连接 SocketChannel accept()
客户端代码:
package com.biyu.channel;import org.junit.jupiter.api.Test;import java.io.IOException;
import java.net.InetSocketAddress;
import java.net.SocketAddress;
import java.nio.ByteBuffer;
import java.nio.channels.DatagramChannel;
import java.nio.channels.SocketChannel;
import java.nio.charset.Charset;public class SocketChannelDemo {public static void main(String[] args) throws Exception {//创建SocketChannelSocketChannel socketChannel = SocketChannel.open(new InetSocketAddress("www.baidu.com", 80));//        SocketChannel socketChanne2 = SocketChannel.open();
//        socketChanne2.connect(new InetSocketAddress("www.baidu.com", 80));//设置阻塞和非阻塞socketChannel.configureBlocking(false);//读操作ByteBuffer byteBuffer = ByteBuffer.allocate(16);socketChannel.read(byteBuffer);socketChannel.close();System.out.println("read over");}}
4、ServerSocketChannel通道
ServerSocketChannel 服务端通道,用于服务端监听TCP连接
获取对象 public static ServerSocketChannel open()
绑定端口号 ServerSocketChannel bind(SocketAddress local)
服务端代码:
package com.biyu.channel;import java.io.IOException;
import java.net.InetSocketAddress;
import java.nio.ByteBuffer;
import java.nio.channels.ServerSocketChannel;
import java.nio.channels.SocketChannel;public class ServerSocketChannelDemo {public static void main(String[] args) throws Exception {//端口号int port = 8888;//bufferByteBuffer buffer = ByteBuffer.wrap("hello atguigu".getBytes());//ServerSocketChannelServerSocketChannel ssc = ServerSocketChannel.open();//绑定ssc.socket().bind(new InetSocketAddress(port));//设置非阻塞模式ssc.configureBlocking(false);//监听有新链接传入while(true) {System.out.println("Waiting for connections");SocketChannel sc = ssc.accept();if(sc == null) { //没有链接传入System.out.println("null");Thread.sleep(2000);} else {System.out.println("Incoming connection from: " + sc.socket().getRemoteSocketAddress());buffer.rewind(); //指针0sc.write(buffer);sc.close();}}}
}
5、NIO Selector选择器
Selector 一般称 为选择器 ,当然你也可以翻译为 多路复用器 。它是Java NIO核心组件中的一个,用于检查一个或多个NIO Channel(通道)的状态是否处于可读、可写。如此可以实现单线程管理多个channels,也就是可以管理多个网络链接。

package com.biyu.selector;import org.junit.jupiter.api.Test;import java.io.IOException;
import java.net.InetSocketAddress;
import java.nio.ByteBuffer;
import java.nio.channels.SelectionKey;
import java.nio.channels.Selector;
import java.nio.channels.ServerSocketChannel;
import java.nio.channels.SocketChannel;
import java.util.Date;
import java.util.Iterator;
import java.util.Scanner;
import java.util.Set;public class SelectorDemo2 {//服务端代码@Testpublic void serverDemo() throws Exception {//1 获取服务端通道ServerSocketChannel serverSocketChannel = ServerSocketChannel.open();//2 切换非阻塞模式serverSocketChannel.configureBlocking(false);//3 创建bufferByteBuffer serverByteBuffer = ByteBuffer.allocate(1024);//4 绑定端口号serverSocketChannel.bind(new InetSocketAddress("127.0.0.1",8080));//5 获取selector选择器Selector selector = Selector.open();//6 通道注册到选择器,进行监听serverSocketChannel.register(selector, SelectionKey.OP_ACCEPT);//7 选择器进行轮询,进行后续操作while(selector.select()>0) {Set selectionKeys = selector.selectedKeys();//遍历Iterator selectionKeyIterator = selectionKeys.iterator();while(selectionKeyIterator.hasNext()) {//获取就绪操作SelectionKey next = selectionKeyIterator.next();//判断什么操作if(next.isAcceptable()) {//获取连接SocketChannel accept = serverSocketChannel.accept();//切换非阻塞模式accept.configureBlocking(false);//注册accept.register(selector,SelectionKey.OP_READ);} else if(next.isReadable()) {SocketChannel channel = (SocketChannel) next.channel();ByteBuffer byteBuffer = ByteBuffer.allocate(1024);//读取数据int length = 0;while((length = channel.read(byteBuffer))>0) {byteBuffer.flip();System.out.println(new String(byteBuffer.array(),0,length));byteBuffer.clear();}}selectionKeyIterator.remove();}}}//客户端代码@Testpublic void clientDemo() throws Exception {//1 获取通道,绑定主机和端口号SocketChannel socketChannel =SocketChannel.open(new InetSocketAddress("127.0.0.1",8080));//2 切换到非阻塞模式socketChannel.configureBlocking(false);//3 创建bufferByteBuffer byteBuffer = ByteBuffer.allocate(1024);//4 写入buffer数据byteBuffer.put(new Date().toString().getBytes());//5 模式切换byteBuffer.flip();//6 写入通道socketChannel.write(byteBuffer);//7 关闭byteBuffer.clear();}public static void main(String[] args) throws IOException {//1 获取通道,绑定主机和端口号SocketChannel socketChannel =SocketChannel.open(new InetSocketAddress("127.0.0.1",8080));//2 切换到非阻塞模式socketChannel.configureBlocking(false);//3 创建bufferByteBuffer byteBuffer = ByteBuffer.allocate(1024);Scanner scanner = new Scanner(System.in);while(scanner.hasNext()) {String str = scanner.next();//4 写入buffer数据byteBuffer.put((new Date().toString()+"--->"+str).getBytes());//5 模式切换byteBuffer.flip();//6 写入通道socketChannel.write(byteBuffer);//7 关闭byteBuffer.clear();}}
}
四、NIO编程步骤总结
第一步 创建ServerSocketChannle通道,绑定监听端口
第二步 设置通道是非阻塞模式
第三步 创建Selector选择器
监听连接事件第四步 把Channel注册到Selector选择器上,
第五步 调用Selector的select方法 (循环调用)监测通道的就绪状况
第六步 调用selectKeys方法获取就绪channel集合
第七步 遍历就绪channel集合,判断就绪事件类型,实现具体的业务操作
第八步 根据业务,是否需要再次注册监听事件,重复执行