
cocosCreator 之 节点组件
创始人
2025-05-30 23:27:16
0次
cocosCreator版本: 3.7
简介
cocosCreator的工作流程是通过节点–组件来实现的,节点作为场景中的基本单位, 而不同功能的组件挂载在节点之上,来完成页面的搭建。
比如Canvas节点的组成组件部分:

在cocosCreator中,脚本也可以作为组件嵌入到节点中。每个不同功能的节点都是由各种组件组成。
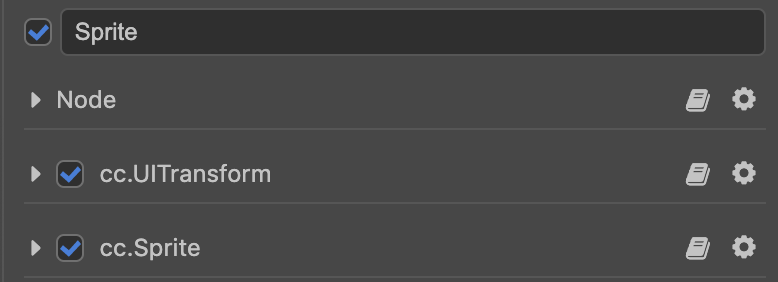
比如,Sprite节点的组成组件部分:
比如,Button节点的组成组件部分:
简单的理解就如官方文档所说: 场景由多个节点构成,节点作为实体,不同功能的组件挂载到节点上。参考:节点和组件

脚本访问节点
在组件脚本中,访问当前脚本的所在节点,我们可以使用通过this.node访问。
基本属性:

postion节点位置相关,使用方法:
// 通过接口方法使用
this.node.setPosition(100, 50, 0);
this.node.setPosition(new Vec3(100, 50, 0));
// 通过变量使用
this.node.position = new Vec3(100, 50, 0);
rotation节点旋转相关,使用方法:
this.node.setRotationFromEuler(90, 0, 0);
scale节点缩放相关,使用方法:
this.node.setScale(2, 2, 2);
常用属性:
- 激活相关
this.node.active = true;				// 激活节点
this.node.active = false;				//
激活后的节点,该节点和所有子节点上的组件都会被启用
- 节点是否有效相关
// 通常用于检测节点是否销毁的判定
let isValid = this.node.isValid;
- 获取节点的子节点相关
let children = this.node.children;				// 获取子节点的数组相关,不包含子节点的子节点
let length = this.node.children.length;		// 获取子节点的数量
- 更换节点的父节点相关
// 父节点为parentNode, 子节点为this.node
// 方法1
this.node.parent = parentNode;
// 方法2, 注意removeFromParent的参数要为false, 否则会清空节点上绑定的事件和action等
this.node.removeFromParent(false);
parentNode.addChild(this.node);
- 创建新节点
let node = new Node("Box");
node.setPostion(0, 0, 0);
// 创建的节点不会主动添加到场景中,需要手动添加
director.getScene().addChild(node);
- 克隆节点相关,主要接口使用:
instantiate
@property(Node)
private bulletNode: Node = null;start() {let scene = director.getScene();let newNode = instantiate(bulletNode);newNode.setPosition(0, 0, 0);scene.addChild(newNode);
}
关于克隆节点相关,也可以通过预制体来构建
@property({type: Prefab})
private bulletNode: Prefab = null; start() {// ...
}
- 销毁节点相关
// 使用this.node.destory()
// 它并不是立即被移除,而是在当前帧逻辑更新结束后,执行
this.node.destory()
注意:destory和removeFromParent二者相比, 后者并不会从内从中释放,引擎内部仍会持有它的数据。
如果一个节点不再使用,就调用它的destory就可以了,否则会导致内存泄漏。
脚本访问节点组件
脚本访问同节点下的其他组件可使用接口:getComponent
// 访问该组件所在的节点
let curNode = this.node; // 访问该节点下下的组件, 脚本也作为组件,使用脚本的名字即可
let label = this.node.getComponent(Label);
let script = this.node.getComponent("MainScene");
脚本访问其他节点或组件, 一般通过属性检查器和Property来设定,比如:
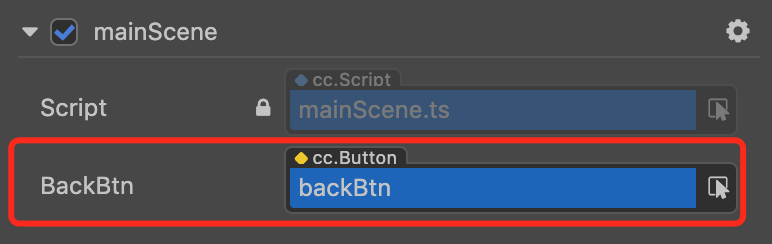
@property({type: Button, tooltip: "这是一个按钮"})
public backBtn: Button = null!;start() {this.backBtn.position = new Vec3(0, 0, 0);
}
更多参考:访问节点和其他组件
组件
cocosCreator中的组件主要由两大类:
- 2D渲染组件
- UI组件
2D渲染组件主要有:
UI组件主要有:
继承于Componet的类都被称为组件类,其对象被称为组件。需要注意的是:组件的不能由构造函数创建,必须通过节点来创建,这样节点就能够操控组件的生命周期。
@ccclass("MyComponent")
class MyComponent extends Component {//
}// 创建组件
const componet = this.node.addComponent(MyComponent);
// 销毁组件
this.node.removeComponet(MyComponet);
同一节点上的组件执行顺序按照属性检查器来的排列顺序从上到下的执行, 可以通过齿轮按钮的向上移动/向下移动来控制。
如果使用脚本控制的话,可以使用executionOrder来设定,比如:
import { _decorator, Component, Button} from 'cc';
const { ccclass, property, executionOrder} = _decorator;@ccclass('mainScene')
// 数值越小,越先执行。默认为0
// 仅对onLoad, onEnable, start, update, lateUpdate有效, 对onDisable, onDestory无效
@executionOrder(-1)
export class mainScene extends Component {
}
详情参考:组件和组件执行顺序
相关内容
热门资讯
电视安卓系统哪个品牌好,哪家品...
你有没有想过,家里的电视是不是该升级换代了呢?现在市面上电视品牌琳琅满目,各种操作系统也是让人眼花缭...
安卓会员管理系统怎么用,提升服...
你有没有想过,手机里那些你爱不释手的APP,背后其实有个强大的会员管理系统在默默支持呢?没错,就是那...
安卓系统软件使用技巧,解锁软件...
你有没有发现,用安卓手机的时候,总有一些小技巧能让你玩得更溜?别小看了这些小细节,它们可是能让你的手...
安卓系统提示音替换
你知道吗?手机里那个时不时响起的提示音,有时候真的能让人心情大好,有时候又让人抓狂不已。今天,就让我...
安卓开机不了系统更新
手机突然开不了机,系统更新还卡在那里,这可真是让人头疼的问题啊!你是不是也遇到了这种情况?别急,今天...
安卓系统中微信视频,安卓系统下...
你有没有发现,现在用手机聊天,视频通话简直成了标配!尤其是咱们安卓系统的小伙伴们,微信视频功能更是用...
安卓系统是服务器,服务器端的智...
你知道吗?在科技的世界里,安卓系统可是个超级明星呢!它不仅仅是个手机操作系统,竟然还能成为服务器的得...
pc电脑安卓系统下载软件,轻松...
你有没有想过,你的PC电脑上安装了安卓系统,是不是瞬间觉得世界都大不一样了呢?没错,就是那种“一机在...
电影院购票系统安卓,便捷观影新...
你有没有想过,在繁忙的生活中,一部好电影就像是一剂强心针,能瞬间让你放松心情?而我今天要和你分享的,...
安卓系统可以写程序?
你有没有想过,安卓系统竟然也能写程序呢?没错,你没听错!这个我们日常使用的智能手机操作系统,竟然有着...
安卓系统架构书籍推荐,权威书籍...
你有没有想过,想要深入了解安卓系统架构,却不知道从何下手?别急,今天我就要给你推荐几本超级实用的书籍...
安卓系统看到的炸弹,技术解析与...
安卓系统看到的炸弹——揭秘手机中的隐形威胁在数字化时代,智能手机已经成为我们生活中不可或缺的一部分。...
鸿蒙系统有安卓文件,畅享多平台...
你知道吗?最近在科技圈里,有个大新闻可是闹得沸沸扬扬的,那就是鸿蒙系统竟然有了安卓文件!是不是觉得有...
宝马安卓车机系统切换,驾驭未来...
你有没有发现,现在的汽车越来越智能了?尤其是那些豪华品牌,比如宝马,它们的内饰里那个大屏幕,简直就像...
p30退回安卓系统
你有没有听说最近P30的用户们都在忙活一件大事?没错,就是他们的手机要退回安卓系统啦!这可不是一个简...
oppoa57安卓原生系统,原...
你有没有发现,最近OPPO A57这款手机在安卓原生系统上的表现真是让人眼前一亮呢?今天,就让我带你...
安卓系统输入法联想,安卓系统输...
你有没有发现,手机上的输入法真的是个神奇的小助手呢?尤其是安卓系统的输入法,简直就是智能生活的点睛之...
怎么进入安卓刷机系统,安卓刷机...
亲爱的手机控们,你是否曾对安卓手机的刷机系统充满好奇?想要解锁手机潜能,体验全新的系统魅力?别急,今...
安卓系统程序有病毒
你知道吗?在这个数字化时代,手机已经成了我们生活中不可或缺的好伙伴。但是,你知道吗?即使是安卓系统,...
奥迪中控安卓系统下载,畅享智能...
你有没有发现,现在汽车的中控系统越来越智能了?尤其是奥迪这种豪华品牌,他们的中控系统简直就是科技与艺...