
Selenium+Pytest自动化测试框架实战,还不会点这里一清二楚,全网最细教程!
如果下方文字内容没有看明白的话,我推荐大家看一套视频,比文字内容讲的更加详细!
在华为工作了10年的大佬出的Web自动化测试教程,华为现用技术教程!_哔哩哔哩_bilibili在华为工作了10年的大佬出的Web自动化测试教程,华为现用技术教程!共计16条视频,包括:1. 【web自动化】主流Web自动化测试技术对比、2. 【web自动化】Selenium自动化测试环境一键搭建、3. 【web自动化】Selenium八大定位策略详解等,UP主更多精彩视频,请关注UP账号。 https://www.bilibili.com/video/BV1sM4y1d7tq/?spm_id_from=333.337.search-card.all.click
前言
1、Selenium是一个免费的(开源)自动化测试组件,适用于跨不同浏览器和平台的Web应用程序【selenium是一个自动化工具,而不是自动化框架】。它非常类似于HP Quick Test Pro (QTP现在叫UFT),只是Selenium侧重于自动化基于Web的应用程序。使用Selenium工具进行的测试通常称为Selenium测试。
2、Selenium不仅仅是一个工具,而是一套软件,每个软件都满足组织的不同测试需求。它有四个组成部分:
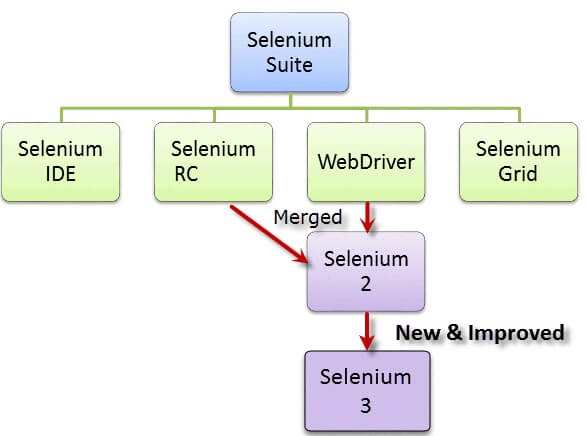
目前,Selenium RC和WebDriver被合并到一个框架中,形成Selenium 2;Selenium 1是指Selenium RC。
一、测试框架简介
1、测试框架的优点
- 代码复用率高,如果不使用框架的话,代码会显得很冗余。
- 可以组装日志、报告、邮件等一些高级功能。
- 提高元素等数据的可维护性,元素发生变化时,只需要更新一下配置文件。
- 使用更灵活的PageObject设计模式。
2、测试框架的整体目录
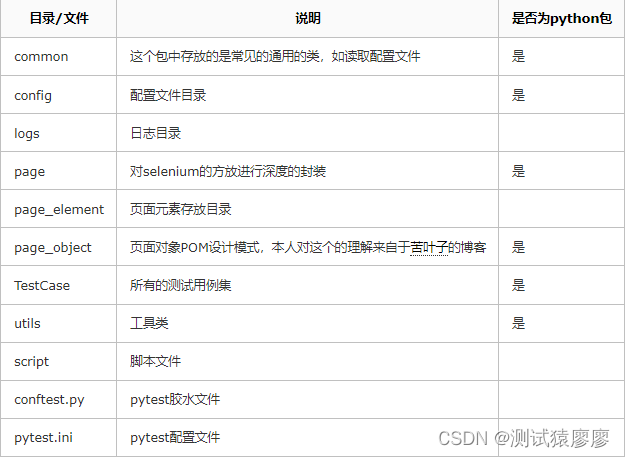
【注意】 __init__.py 文件用以标识此目录为一个python包。
二、首先时间管理
首先,因为很多的模块都会用到当前时间的时间戳,或者日期等等字符串,所以先单独把时间操作(我们需要获取的不同格式的时间信息)封装成一个模块。
然后让其他模块来调用即可。在 utils 目录新建 times.py 模块。
#!/usr/bin/env python3
# -*- coding:utf-8 -*-
import time
import datetime
from functools import wrapsdef timestamp():"""时间戳"""return time.time()def dt_strftime(fmt="%Y%m"):"""datetime格式化时间:param fmt "%Y%m%d %H%M%S"""return datetime.datetime.now().strftime(fmt)def sleep(seconds=1.0):"""睡眠时间"""time.sleep(seconds)def running_time(func):"""函数运行时间"""@wraps(func)def wrapper(*args, **kwargs):start = timestamp()res = func(*args, **kwargs)print("校验元素done!用时%.3f秒!" % (timestamp() - start))return resreturn wrapperif __name__ == '__main__':print(dt_strftime("%Y%m%d%H%M%S"))
三、添加配置文件
1、conf.py
UI自动化测试框架中应该有一个文件对整体的目录进行管理;
在项目中的 config 目录创建 conf.py 文件,所有的目录配置信息写在这个文件里面。
import os
from selenium.webdriver.common.by import By
from utils.times import dt_strftimeclass ConfigManager(object):# 项目目录BASE_DIR = os.path.dirname(os.path.dirname(os.path.abspath(__file__)))# 页面元素目录ELEMENT_PATH = os.path.join(BASE_DIR, 'page_element')# 报告文件REPORT_FILE = os.path.join(BASE_DIR, 'report.html')# 元素定位的类型LOCATE_MODE = {'css': By.CSS_SELECTOR,'xpath': By.XPATH,'name': By.NAME,'id': By.ID,'class': By.CLASS_NAME}# 邮件信息EMAIL_INFO = {'username': '1948287451@qq.com',  # 切换成你自己的地址'password': 'QQ邮箱授权码','smtp_host': 'smtp.qq.com','smtp_port': 465}# 收件人ADDRESSEE = ['1948287451@qq.com',]@propertydef log_file(self):"""日志目录"""log_dir = os.path.join(self.BASE_DIR, 'logs')if not os.path.exists(log_dir):os.makedirs(log_dir)return os.path.join(log_dir, '{}.log'.format(dt_strftime()))@propertydef ini_file(self):"""配置文件"""ini_file = os.path.join(self.BASE_DIR, 'config', 'config.ini')if not os.path.exists(ini_file):raise FileNotFoundError("配置文件%s不存在!" % ini_file)return ini_filecm = ConfigManager()
if __name__ == '__main__':print(cm.BASE_DIR)
2、config.ini
在项目 config 目录新建一个 config.ini 文件,里面暂时先放入需要测试的URL。
[HOST]
HOST = https://www.baidu.com
3、读取配置文件
①配置文件创建好了,接下来我们需要读取这个配置文件以使用里面的信息。
②使用python内置的 configparser 模块对 config.ini 文件信息进行了读取。
③对于测试url值的提取,使用python高阶语法 @property 属性值,写法更简单。
④在 common 目录中新建一个 readconfig.py 文件。】
import configparser
from config.conf import cmHOST = 'HOST'class ReadConfig(object):"""配置文件"""def __init__(self):self.config = configparser.RawConfigParser()  # 当有%的符号时请使用Raw读取self.config.read(cm.ini_file, encoding='utf-8')def _get(self, section, option):"""获取"""return self.config.get(section, option)def _set(self, section, option, value):"""更新"""self.config.set(section, option, value)with open(cm.ini_file, 'w') as f:self.config.write(f)@propertydef url(self):return self._get(HOST, HOST)ini = ReadConfig()if __name__ == '__main__':print(ini.url)
四、记录操作日志
在 utils 目录中新建 logger.py 文件。
import logging
from config.conf import cmclass Log:def __init__(self):self.logger = logging.getLogger()if not self.logger.handlers:self.logger.setLevel(logging.DEBUG)# 创建一个handle写入文件fh = logging.FileHandler(cm.log_file, encoding='utf-8')fh.setLevel(logging.INFO)# 创建一个handle输出到控制台ch = logging.StreamHandler()ch.setLevel(logging.INFO)# 定义输出的格式formatter = logging.Formatter(self.fmt)fh.setFormatter(formatter)ch.setFormatter(formatter)# 添加到handleself.logger.addHandler(fh)self.logger.addHandler(ch)@propertydef fmt(self):return '%(levelname)s\t%(asctime)s\t[%(filename)s:%(lineno)d]\t%(message)s'log = Log().loggerif __name__ == '__main__':log.info('hello world')
五、项目中元素相关
管理页面元素
1、新建page_element目录并在该目录下新建search.yaml文件
①本教程选择的测试地址是百度首页,所以对应的元素也是百度首页的。
②项目框架设计中有一个page_element 目录就是专门来存放定位元素的文件的。
③通过对各种配置文件的对比,我在这里选择的是YAML文件格式。其易读,交互性好。
④在 page_element 中新建一个 search.yaml 文件。文件内容如下:
搜索框: "id==kw"
候选: "css==.bdsug-overflow"
搜索候选: "css==#form div li"
搜索按钮: "id==su"
2、在common目录中创建readelement.py文件。
①在 common 目录中创建 readelement.py 文件。实现了定位元素的存储和调用。文件内容如下:
②通过特殊方法 __getitem__ 实现调用任意属性,读取yaml中的值
import os
import yaml
from config.conf import cmclass Element(object):"""获取元素"""def __init__(self, name):self.file_name = '%s.yaml' % nameself.element_path = os.path.join(cm.ELEMENT_PATH, self.file_name)if not os.path.exists(self.element_path):raise FileNotFoundError("%s 文件不存在!" % self.element_path)with open(self.element_path, encoding='utf-8') as f:self.data = yaml.safe_load(f)def __getitem__(self, item):"""获取属性"""data = self.data.get(item)if data:name, value = data.split('==')return name, valueraise ArithmeticError("{}中不存在关键字:{}".format(self.file_name, item))if __name__ == '__main__':search = Element('search')print(search['搜索框'])
3、新建script脚本文件目录并新建inspect.py文件
在 script 脚本文件目录中创建 inspect.py 文件,对所有的元素yaml文件内容进行审查。
import os
import yaml
from config.conf import cm
from utils.times import running_time@running_time
def inspect_element():"""检查所有的元素是否正确只能做一个简单的检查"""for files in os.listdir(cm.ELEMENT_PATH):_path = os.path.join(cm.ELEMENT_PATH, files)with open(_path, encoding='utf-8') as f:data = yaml.safe_load(f)for k in data.values():try:pattern, value = k.split('==')except ValueError:raise Exception("元素表达式中没有`==`")if pattern not in cm.LOCATE_MODE:raise Exception('%s中元素【%s】没有指定类型' % (_path, k))elif pattern == 'xpath':assert '//' in value,\'%s中元素【%s】xpath类型与值不配' % (_path, k)elif pattern == 'css':assert '//' not in value, \'%s中元素【%s]css类型与值不配' % (_path, k)else:assert value, '%s中元素【%s】类型与值不匹配' % (_path, k)if __name__ == '__main__':inspect_element()
六、封装Selenium基类
①工厂模式的写法:很直白,简单,又明了。【创建driver对象,打开百度网页,搜索selenium,点击搜索,然后停留5秒,查看结果,最后关闭浏览器。】
import time
from selenium import webdriverdriver = webdriver.Chrome()
driver.get('https://www.baidu.com')
driver.find_element_by_xpath("//input[@id='kw']").send_keys('selenium')
driver.find_element_by_xpath("//input[@id='su']").click()
time.sleep(5)
driver.quit()
②那为什么要封装selenium的方法呢?首先我们上述这种较为原始的方法,基本不适用于平时做UI自动化测试的:因为在UI界面实际运行情况远远比较复杂,可能因为网络原因,或者控件原因,我们元素还没有显示出来,就进行点击或者输入。所以我们需要封装selenium方法,通过内置的显式等待或一定的条件语句,才能构建一个稳定的方法。而且把selenium方法封装起来,有利于平时的代码维护。
1、新建page目录并创建webpage.py文件
①在 page 目录创建 webpage.py 文件。文件内容如下:
②在文件中我们对主要用了显示等待对selenium的 click , send_keys 等方法,做了二次封装。提高了运行的成功率。
复制代码
from selenium.webdriver.support import expected_conditions as EC
from selenium.webdriver.support.ui import WebDriverWait
from selenium.common.exceptions import TimeoutExceptionfrom config.conf import cm
from utils.times import sleep
from utils.logger import log"""
selenium基类
本文件存放了selenium基类的封装方法
"""class WebPage(object):"""selenium基类"""def __init__(self, driver):# self.driver = webdriver.Chrome()self.driver = driverself.timeout = 20self.wait = WebDriverWait(self.driver, self.timeout)def get_url(self, url):"""打开网址并验证"""self.driver.maximize_window()self.driver.set_page_load_timeout(60)try:self.driver.get(url)self.driver.implicitly_wait(10)log.info("打开网页:%s" % url)except TimeoutException:raise TimeoutException("打开%s超时请检查网络或网址服务器" % url)@staticmethoddef element_locator(func, locator):"""元素定位器"""name, value = locatorreturn func(cm.LOCATE_MODE[name], value)def find_element(self, locator):"""寻找单个元素"""return WebPage.element_locator(lambda *args: self.wait.until(EC.presence_of_element_located(args)), locator)def find_elements(self, locator):"""查找多个相同的元素"""return WebPage.element_locator(lambda *args: self.wait.until(EC.presence_of_all_elements_located(args)), locator)def elements_num(self, locator):"""获取相同元素的个数"""number = len(self.find_elements(locator))log.info("相同元素:{}".format((locator, number)))return numberdef input_text(self, locator, txt):"""输入(输入前先清空)"""sleep(0.5)ele = self.find_element(locator)ele.clear()ele.send_keys(txt)log.info("输入文本:{}".format(txt))def is_click(self, locator):"""点击"""self.find_element(locator).click()sleep()log.info("点击元素:{}".format(locator))def element_text(self, locator):"""获取当前的text"""_text = self.find_element(locator).textlog.info("获取文本:{}".format(_text))return _text@propertydef get_source(self):"""获取页面源代码"""return self.driver.page_sourcedef refresh(self):"""刷新页面F5"""self.driver.refresh()self.driver.implicitly_wait(30)
七、创建页面对象
1、新建page_object目录并创建一个searchpage.py文件
①在 page_object 目录下创建一个 searchpage.py 文件。
②在该文件中我们对,输入搜索关键词,点击搜索,搜索联想,进行了封装。【在平时中我们应该养成写注释的习惯,因为过一段时间后,没有注释,代码读起来很费劲。】
八、应用pytest测试框架
1、pytest.ini文件创建
①pytest项目中的配置文件,可以对pytest执行过程中操作做全局控制。
②在项目根目录新建 pytest.ini 文件。文件内容如下:
[pytest]
addopts = --html=report.html --self-contained-html
③addopts 指定执行时的其他参数说明:
- --html=report/report.html --self-contained-html 生成pytest-html带样式的报告
-s输出我们用例中的调式信息-q安静的进行测试-v可以输出用例更加详细的执行信息,比如用例所在的文件及用例名称等
九、编写测试用例
1、新建TestCase目录并创建test_search.py文件
①在 TestCase 目录中创建 test_search.py 文件。文件内容如下:
② pytest.fixture装饰器实现了和unittest的setup,teardown一样的前置启动,后置清理的装饰器。
③第一个测试用例:实现了在百度搜索selenium关键字,并点击搜索按钮,并在搜索结果中,用正则查找结果页源代码,返回数量大于10我们就认为通过。
④第二个测试用例:实现了百度搜索selenium关键字,然后断言搜索候选中的所有结果有没有selenium关键字。
import re
import pytest
from utils.logger import log
from common.readconfig import ini
from page_object.searchpage import SearchPageclass TestSearch:@pytest.fixture(scope='function', autouse=True)def open_baidu(self, drivers):"""打开百度"""search = SearchPage(drivers)search.get_url(ini.url)def test_001(self, drivers):"""搜索"""search = SearchPage(drivers)search.input_search("selenium")search.click_search()result = re.search(r'selenium', search.get_source)log.info(result)assert resultdef test_002(self, drivers):"""测试搜索候选"""search = SearchPage(drivers)search.input_search("selenium")log.info(list(search.imagine))assert all(["selenium" in i for i in search.imagine])if __name__ == '__main__':pytest.main(['TestCase/test_search.py'])
十、conftest.py
①在项目根目录下新建一个 conftest.py 文件。
②conftest.py是测试框架pytest的胶水文件,里面用到了fixture函数,封装并传递出了driver。
复制代码
import pytest
from py.xml import html
from selenium import webdriverdriver = None@pytest.fixture(scope='session', autouse=True)
def drivers(request):""":param request: python内置的fixture函数,本函数中用来注册终结函数:return: 返回driver实例"""global driverif driver is None:driver = webdriver.Chrome()driver.maximize_window()def fn():driver.quit()request.addfinalizer(fn)return driver@pytest.hookimpl(hookwrapper=True)
def pytest_runtest_makereport(item):"""当测试失败的时候,自动截图,展示到html报告中:param item:"""pytest_html = item.config.pluginmanager.getplugin('html')outcome = yieldreport = outcome.get_result()report.description = str(item.function.__doc__)extra = getattr(report, 'extra', [])if report.when == 'call' or report.when == "setup":xfail = hasattr(report, 'wasxfail')if (report.skipped and xfail) or (report.failed and not xfail):file_name = report.nodeid.replace("::", "_") + ".png"screen_img = _capture_screenshot()if file_name:html = '![]() ' % screen_imgextra.append(pytest_html.extras.html(html))report.extra = extradef pytest_html_results_table_header(cells):cells.insert(1, html.th('用例名称'))cells.insert(2, html.th('Test_nodeid'))cells.pop(2)def pytest_html_results_table_row(report, cells):cells.insert(1, html.td(report.description))cells.insert(2, html.td(report.nodeid))cells.pop(2)def pytest_html_results_table_html(report, data):if report.passed:del data[:]data.append(html.div('通过的用例未捕获日志输出.', class_='empty log'))def _capture_screenshot():'''截图保存为base64:return:'''return driver.get_screenshot_as_base64()
' % screen_imgextra.append(pytest_html.extras.html(html))report.extra = extradef pytest_html_results_table_header(cells):cells.insert(1, html.th('用例名称'))cells.insert(2, html.th('Test_nodeid'))cells.pop(2)def pytest_html_results_table_row(report, cells):cells.insert(1, html.td(report.description))cells.insert(2, html.td(report.nodeid))cells.pop(2)def pytest_html_results_table_html(report, data):if report.passed:del data[:]data.append(html.div('通过的用例未捕获日志输出.', class_='empty log'))def _capture_screenshot():'''截图保存为base64:return:'''return driver.get_screenshot_as_base64()
十一、发送邮件
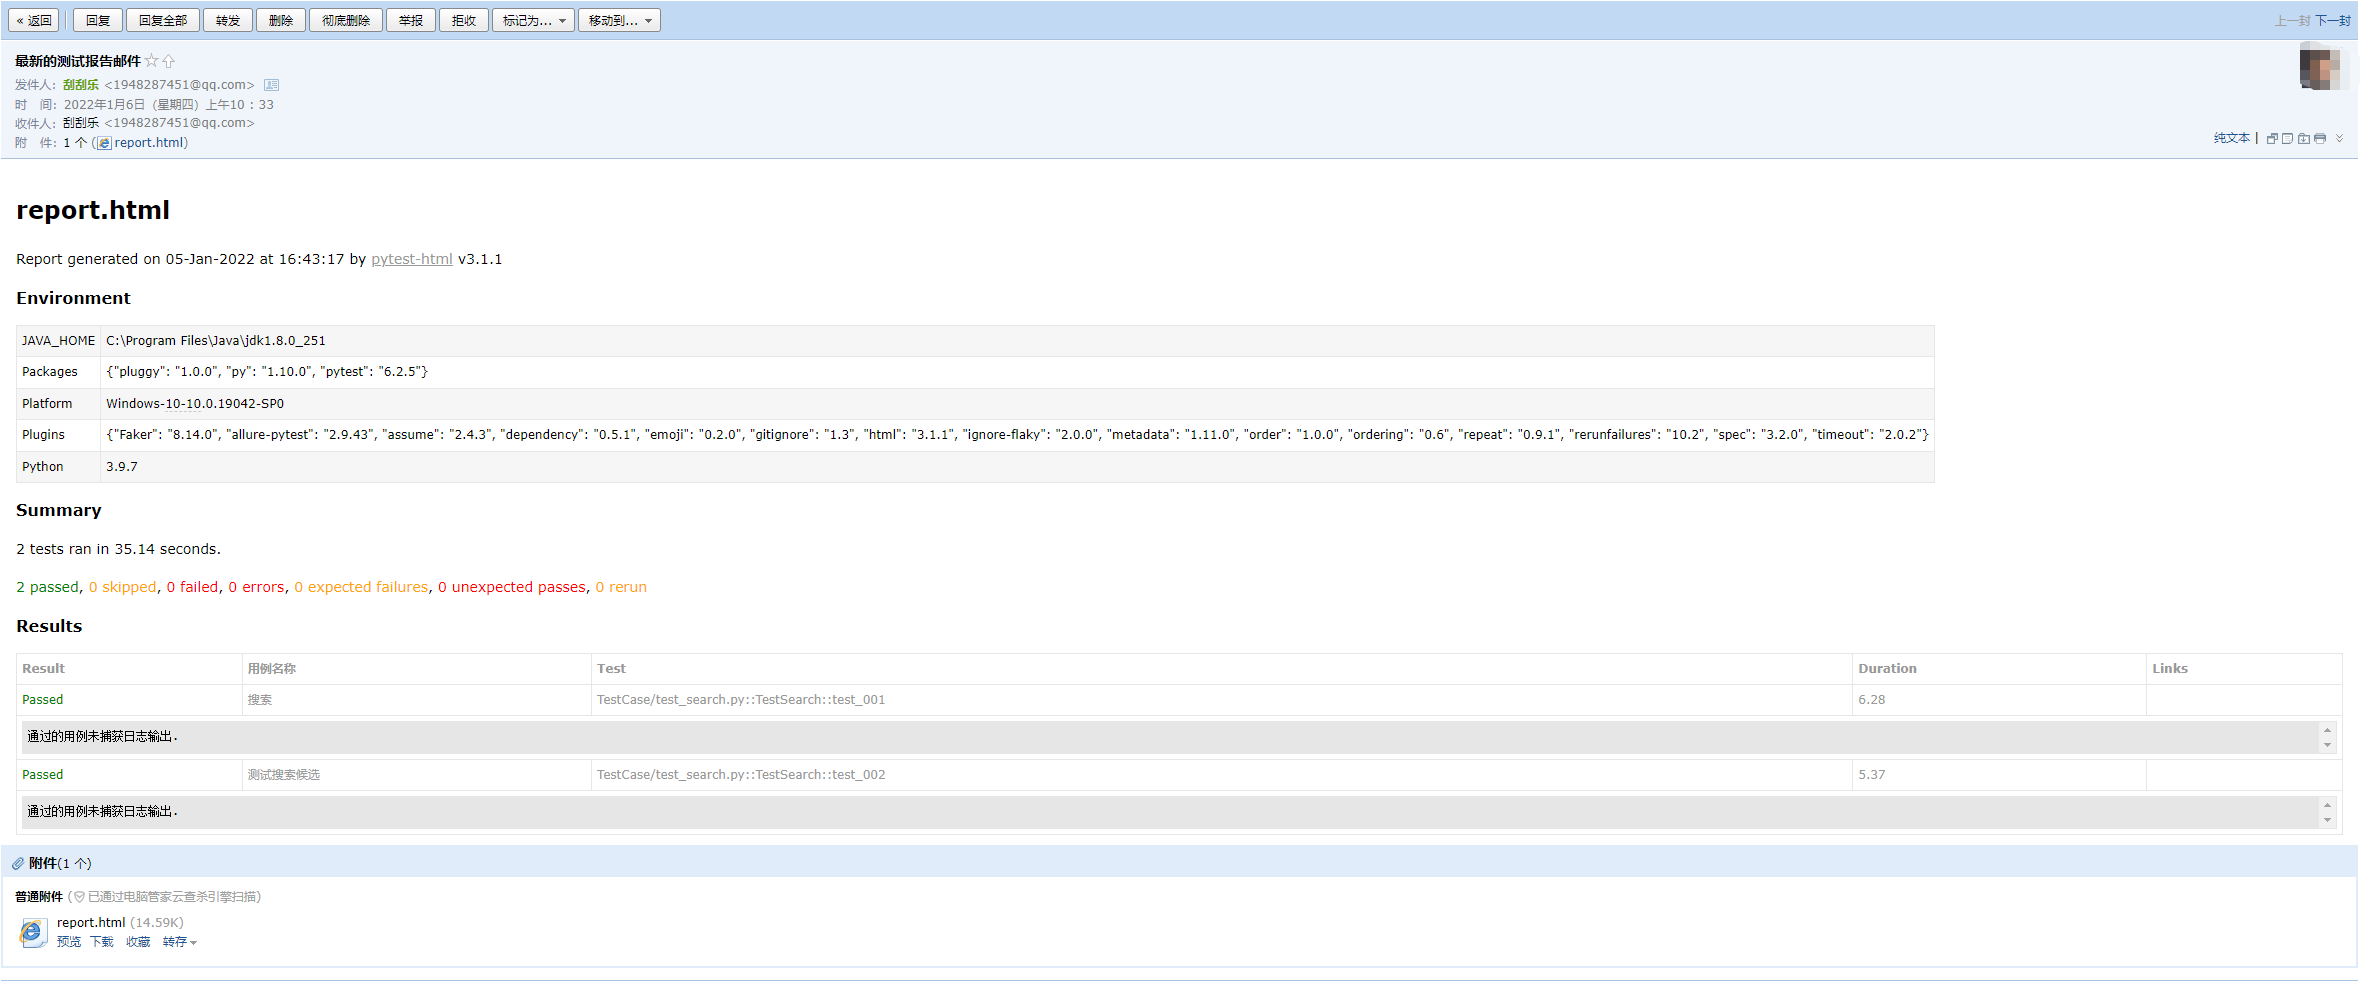
①当项目执行完成之后,需要发送到自己或者其他人邮箱里查看结果。
②编写发送邮件的模块。
③在 utils 目录中新建 send_mail.py 文件,文件内容如下:
import zmail
from config.conf import cmdef send_report():"""发送报告"""with open(cm.REPORT_FILE, encoding='utf-8') as f:content_html = f.read()try:mail = {'from': '1084502012@qq.com','subject': '最新的测试报告邮件','content_html': content_html,'attachments': [cm.REPORT_FILE, ]}server = zmail.server(*cm.EMAIL_INFO.values())server.send_mail(cm.ADDRESSEE, mail)print("测试邮件发送成功!")except Exception as e:print("Error: 无法发送邮件,{}!", format(e))if __name__ == "__main__":'''请先在config/conf.py文件设置QQ邮箱的账号和密码'''send_report()
④在 config/conf.py 文件中设置我们自己的QQ邮箱账号以及QQ邮箱授权码。运行 send_report() 函数。
⑤运行结果:

上一篇:美国专利法中对于发生在专利公开日和授权日之间的侵权行为考量
下一篇:根号杂题选做