【春招必备】Java面试题,面试加分项,从jvm层面了解线程的启动和停止
前言
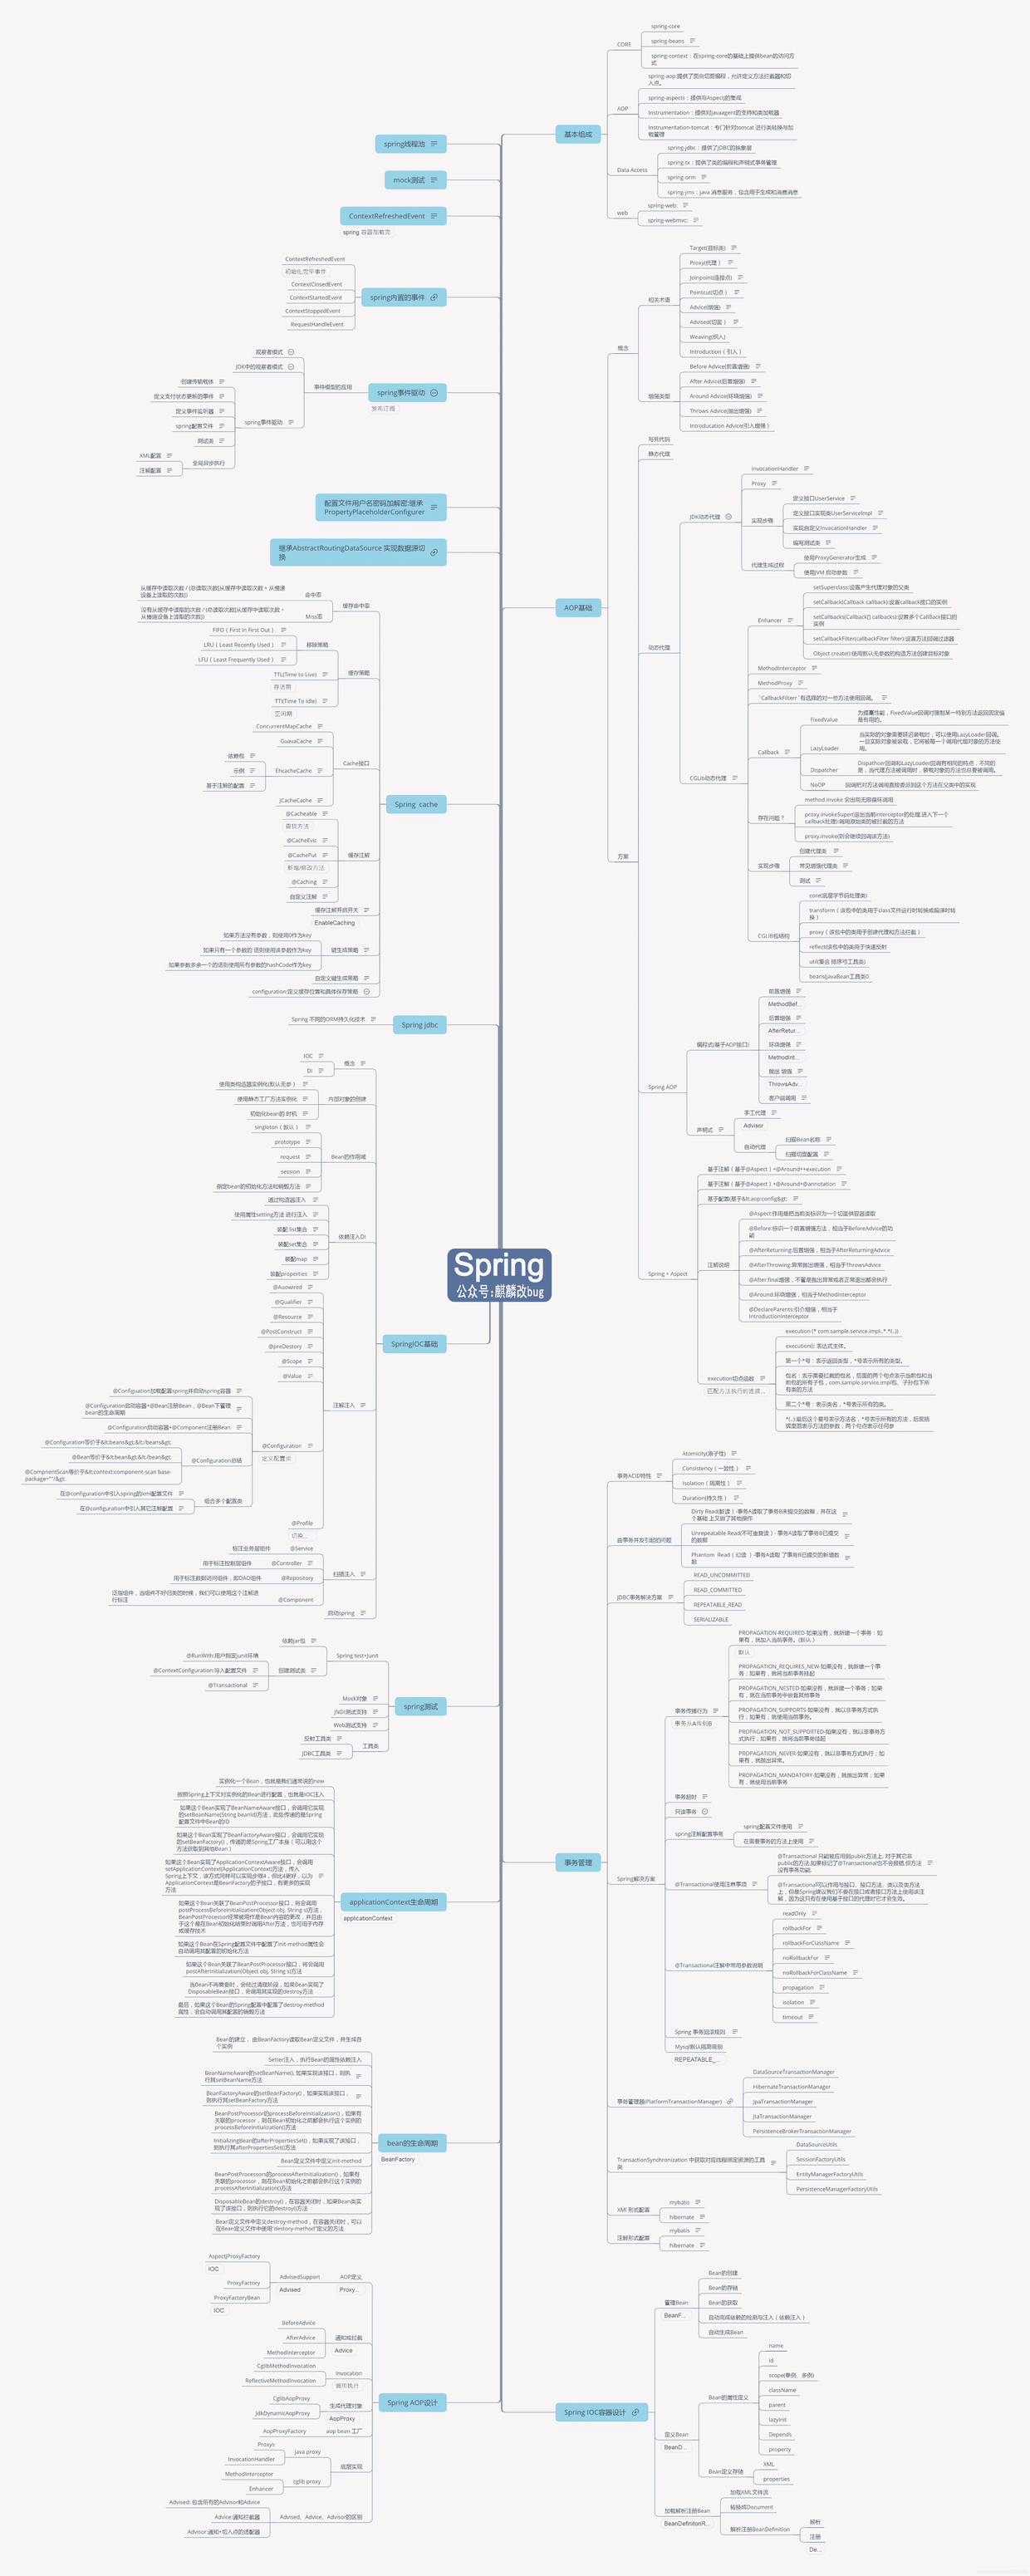
Spring 作为一个轻量级的 Java 开发框架,将面向接口的编程思想贯穿整个 Java 系统应用,因此在 Java 面试中常被提。本次介绍的主要是解析面试过程中如果从源码角度分析常见的问题,为了方便大家阅读,小编这里还整理了一份微服务方面的思维导图,整理给到大家。

小编整理的这份Java后端开发面试总结包含了JavaOOP、Java集合容器、Java异常、并发编程、Java反射、Java序列化、JVM、Redis、Spring MVC、MyBatis、MySQL数据库、消息中间件MQ、Dubbo、Linux、ZooKeeper、 分布式&数据结构与算法等26个专题技术点,都是小编在各个大厂总结出来的面试真题,已经有很多粉丝靠这份PDF拿下众多大厂的offer,
线程的启动的实现原理
线程停止的实现原理分析
为什么中断线程会抛出InterruptedException
线程的启动原理
前面我们简单分析过了线程的使用,通过调用线程的start方法来启动线程,线程启动后会调用run方法执行业务逻辑,run方法执行完毕后,线程的生命周期也就终止了。
很多同学最早学习线程的时候会比较疑惑,启动一个线程为什么是调用start方法,而不是run方法,这做一个简单的分析,先简单看一下start方法的定义
public class Thread implements Runnable {
public synchronized void start() {
/**
-
This method is not invoked for the main method thread or “system”
-
group threads created/set up by the VM. Any new functionality added
-
to this method in the future may have to also be added to the VM.
-
A zero status value corresponds to state “NEW”.
*/
if (threadStatus != 0)
throw new IllegalThreadStateException();
/* Notify the group that this thread is about to be started
-
so that it can be added to the group’s list of threads
-
and the group’s unstarted count can be decremented. */
group.add(this);
boolean started = false;
try {
start0(); //注意这里
started = true;
} finally {
try {
if (!started) {
group.threadStartFailed(this);
}
} catch (Throwable ignore) {
/* do nothing. If start0 threw a Throwable then
it will be passed up the call stack */
}
}
}
private native void start0();//注意这里
我们看到调用start方法实际上是调用一个native方法start0()来启动一个线程,首先start0()这个方法是在Thread的静态块中来注册的,代码如下
public class Thread implements Runnable {
/* Make sure registerNatives is the first thing does. */
private static native void registerNatives();
static {
registerNatives();
}
这个registerNatives的作用是注册一些本地方法提供给Thread类来使用,比如start0()、isAlive()、currentThread()、sleep();这些都是大家很熟悉的方法。
registerNatives的本地方法的定义在文件 Thread.c,
Thread.c定义了各个操作系统平台要用的关于线程的公共数据和操作,以下是Thread.c的全部内容
static JNINativeMethod methods[] = {
{“start0”, “()V”, (void *)&JVM_StartThread},
{“stop0”, “(” OBJ “)V”, (void *)&JVM_StopThread},
{“isAlive”, “()Z”, (void *)&JVM_IsThreadAlive},
{“suspend0”, “()V”, (void *)&JVM_SuspendThread},
{“resume0”, “()V”, (void *)&JVM_ResumeThread},
{“setPriority0”, “(I)V”, (void *)&JVM_SetThreadPriority},
{“yield”, “()V”, (void *)&JVM_Yield},
{“sleep”, “(J)V”, (void *)&JVM_Sleep},
{“currentThread”, “()” THD, (void *)&JVM_CurrentThread},
{“countStackFrames”, “()I”, (void *)&JVM_CountStackFrames},
{“interrupt0”, “()V”, (void *)&JVM_Interrupt},
{“isInterrupted”, “(Z)Z”, (void *)&JVM_IsInterrupted},
{“holdsLock”, “(” OBJ “)Z”, (void *)&JVM_HoldsLock},
{“getThreads”, “()[” THD, (void *)&JVM_GetAllThreads},
{“dumpThreads”, “([” THD “)[[” STE, (void *)&JVM_DumpThreads},
{“setNativeName”, “(” STR “)V”, (void *)&JVM_SetNativeThreadName},
};
#undef THD
#undef OBJ
#undef STE
#undef STR
JNIEXPORT void JNICALL
Java_java_lang_Thread_registerNatives(JNIEnv *env, jclass cls)
{
(*env)->RegisterNatives(env, cls, methods, ARRAY_LENGTH(methods));
}
从这段代码可以看出,start0(),实际会执行 JVM_StartThread方法,这个方法是干嘛的呢? 从名字上来看,似乎是在JVM层面去启动一个线程,如果真的是这样,那么在JVM层面,一定会调用Java中定义的run方法。那接下来继续去找找答案。我们找到 jvm.cpp这个文件;这个文件需要下载hotspot的源码才能找到.
JVM_ENTRY(void, JVM_StartThread(JNIEnv* env, jobject jthread))
JVMWrapper(“JVM_StartThread”);
native_thread = new JavaThread(&thread_entry, sz);
JVM_ENTRY是用来定义 JVM_StartThread函数的,在这个函数里面创建了一个真正和平台有关的本地线程. 本着打破砂锅查到底的原则,继续看看 newJavaThread做了什么事情,继续寻找JavaThread的定义
在hotspot的源码中 thread.cpp文件中1558行的位置可以找到如下代码
JavaThread::JavaThread(ThreadFunction entry_point, size_t stack_sz) :
Thread()
#if INCLUDE_ALL_GCS
, _satb_mark_queue(&_satb_mark_queue_set),
_dirty_card_queue(&_dirty_card_queue_set)
#endif // INCLUDE_ALL_GCS
{
if (TraceThreadEvents) {
tty->print_cr(“creating thread %p”, this);
}
initialize();
_jni_attach_state = _not_attaching_via_jni;
set_entry_point(entry_point);
// Create the native thread itself.
// %note runtime_23
os::ThreadType thr_type = os::java_thread;
thr_type = entry_point == &compiler_thread_entry ? os::compiler_thread :
os::java_thread;
os::create_thread(this, thr_type, stack_sz);
_safepoint_visible = false;
// The _osthread may be NULL here because we ran out of memory (too many threads active).
// We need to throw and OutOfMemoryError - however we cannot do this here because the caller
// may hold a lock and all locks must be unlocked before throwing the exception (throwing
// the exception consists of creating the exception object & initializing it, initialization
// will leave the VM via a JavaCall and then all locks must be unlocked).
//
// The thread is still suspended when we reach here. Thread must be explicit started
// by creator! Furthermore, the thread must also explicitly be added to the Threads list
// by calling Threads:add. The reason why this is not done here, is because the thread
// object must be fully initialized (take a look at JVM_Start)
}
这个方法有两个参数,第一个是函数名称,线程创建成功之后会根据这个函数名称调用对应的函数;第二个是当前进程内已经有的线程数量。最后我们重点关注与一下 os::create_thread,实际就是调用平台创建线程的方法来创建线程。
接下来就是线程的启动,会调用Thread.cpp文件中的Thread::start(Thread* thread)方法,代码如下
void Thread::start(Thread* thread) {
trace(“start”, thread);
// Start is different from resume in that its safety is guaranteed by context or
// being called from a Java method synchronized on the Thread object.
if (!DisableStartThread) {
if (thread->is_Java_thread()) {
// Initialize the thread state to RUNNABLE before starting this thread.
// Can not set it after the thread started because we do not know the
// exact thread state at that time. It could be in MONITOR_WAIT or
// in SLEEPING or some other state.
java_lang_Thread::set_thread_status(((JavaThread*)thread)->threadObj(),
java_lang_Thread::RUNNABLE);
}
os::start_thread(thread);
}
}
start方法中有一个函数调用: os::start_thread(thread);,调用平台启动线程的方法,最终会调用Thread.cpp文件中的JavaThread::run()方法
// The first routine called by a new Java thread
void JavaThread::run() {
// initialize thread-local alloc buffer related fields
this->initialize_tlab();
// used to test validitity of stack trace backs
this->record_base_of_stack_pointer();
// Record real stack base and size.
this->record_stack_base_and_size();
// Initialize thread local storage; set before calling MutexLocker
this->initialize_thread_local_storage();
this->create_stack_guard_pages();
this->cache_global_variables();
// Thread is now sufficient initialized to be handled by the safepoint code as being
// in the VM. Change thread state from _thread_new to _thread_in_vm
ThreadStateTransition::transition_and_fence(this, _thread_new, _thread_in_vm);
assert(JavaThread::current() == this, “sanity check”);
assert(!Thread::current()->owns_locks(), “sanity check”);
DTRACE_THREAD_PROBE(start, this);
// This operation might block. We call that after all safepoint checks for a new thread has
// been completed.
this->set_active_handles(JNIHandleBlock::allocate_block());
if (JvmtiExport::should_post_thread_life()) {
JvmtiExport::post_thread_start(this);
}
EventThreadStart event;
if (event.should_commit()) {
event.set_javalangthread(java_lang_Thread::thread_id(this->threadObj()));
event.commit();
}
// We call another function to do the rest so we are sure that the stack addresses used
// from there will be lower than the stack base just computed
thread_main_inner();
// Note, thread is no longer valid at this point!
}
这个方法中主要是做一系列的初始化操作,最后有一个方法 thread_main_inner, 接下来看看这个方法的逻辑是什么样的
void JavaThread::thread_main_inner() {
assert(JavaThread::current() == this, “sanity check”);
assert(this->threadObj() != NULL, “just checking”);
// Execute thread entry point unless this thread has a pending exception
// or has been stopped before starting.
// Note: Due to JVM_StopThread we can have pending exceptions already!
if (!this->has_pending_exception() &&
!java_lang_Thread::is_stillborn(this->threadObj())) {
{
ResourceMark rm(this);
this->set_native_thread_name(this->get_thread_name());
}
HandleMark hm(this);
this->entry_point()(this, this);
}
DTRACE_THREAD_PROBE(stop, this);
this->exit(false);
delete this;
}
和主流程无关的代码咱们先不去看,直接找到最核心的代码块 this->entry_point()(this,this);, 这个entrypoint应该比较熟悉了,因为我们在前面提到了,在::JavaThread这个方法中传递的第一个参数,代表函数名称,线程启动的时候会调用这个函数。
如果大家还没有晕车的话,应该记得我们在jvm.cpp文件中看到的代码,在创建 native_thread=newJavaThread(&thread_entry,sz); 的时候传递了一个threadentry函数,所以我们在jvm.cpp中找到这个函数的定义如下
static void thread_entry(JavaThread* thread, TRAPS) {
{
HandleMark hm(THREAD);
Handle obj(THREAD, thread->threadObj());
JavaValue result(T_VOID);
JavaCalls::call_virtual(&result,
obj,
KlassHandle(THREAD, SystemDictionary::Thread_klass()),
vmSymbols::run_method_name(), //注意这里
vmSymbols::void_method_signature(),
THREAD);
}
可以看到 vmSymbols::run_method_name()这个调用,其实就是通过回调方法调用Java线程中定义的run方法, run_method_name是一个宏定义,在vmSymbols.hpp文件中可以找到如下代码
#define VM_SYMBOLS_DO(template, do_alias)
…
template(run_method_name, “run”)
…
所以结论就是,Java里面创建线程之后必须要调用start方法才能真正的创建一个线程,该方法会调用虚拟机启动一个本地线程,本地线程的创建会调用当前系统创建线程的方法进行创建,并且线程被执行的时候会回调 run方法进行业务逻辑的处理

线程的终止方法及原理
线程的终止有主动和被动之分,被动表示线程出现异常退出或者run方法执行完毕,线程会自动终止。主动的方式是 Thread.stop()来实现线程的终止,但是stop()方法是一个过期的方法,官方是不建议使用,理由很简单,stop()方法在中介一个线程时不会保证线程的资源正常释放,也就是不会给线程完成资源释放工作的机会,相当于我们在linux上通过kill -9强制结束一个进程。
那么如何安全的终止一个线程呢?
我们先看一下下面的代码,代码演示了一个正确终止线程的方法,至于它的实现原理,稍后我们再分析
public class InterruptedDemo implements Runnable{
@Override
public void run() {
long i=0l;
while(!Thread.currentThread().isInterrupted()){//notice here
i++;
}
System.out.println(“result:”+i);
}
public static void main(String[] args) throws InterruptedException {
InterruptedDemo interruptedDemo=new InterruptedDemo();
Thread thread=new Thread(interruptedDemo);
thread.start();
Thread.sleep(1000);//睡眠一秒
thread.interrupt();//notice here
}
}
代码中有两处需要注意,在main线程中,调用了线程的interrupt()方法、在run方法中,while循环中通过 Thread.currentThread().isInterrupted()来判断线程中断的标识。所以我们在这里猜想一下,应该是在线程中维护了一个中断标识,通过 thread.interrupt()方法去改变了中断标识的值使得run方法中while循环的判断不成立而跳出循环,因此run方法执行完毕以后线程就终止了。
线程中断的原理分析
我们来看一下 thread.interrupt()方法做了什么事情
public class Thread implements Runnable {
…
public void interrupt() {
if (this != Thread.currentThread())
checkAccess();
synchronized (blockerLock) {
Interruptible b = blocker;
if (b != null) {
interrupt0(); // Just to set the interrupt flag
b.interrupt(this);
return;
}
}
interrupt0();
}
…
这个方法里面,调用了interrupt0(),这个方法在前面分析start方法的时候见过,是一个native方法,这里就不再重复贴代码了,同样,我们找到jvm.cpp文件,找到JVM_Interrupt的定义
JVM_ENTRY(void, JVM_Interrupt(JNIEnv* env, jobject jthread))
JVMWrapper(“JVM_Interrupt”);
// Ensure that the C++ Thread and OSThread structures aren’t freed before we operate
oop java_thread = JNIHandles::resolve_non_null(jthread);
MutexLockerEx ml(thread->threadObj() == java_thread ? NULL : Threads_lock);
// We need to re-resolve the java_thread, since a GC might have happened during the
// acquire of the lock
JavaThread* thr = java_lang_Thread::thread(JNIHandles::resolve_non_null(jthread));
if (thr != NULL) {
Thread::interrupt(thr);
}
JVM_END
这个方法比较简单,直接调用了 Thread::interrupt(thr)这个方法,这个方法的定义在Thread.cpp文件中,代码如下
void Thread::interrupt(Thread* thread) {
trace(“interrupt”, thread);
debug_only(check_for_dangling_thread_pointer(thread)😉
os::interrupt(thread);
}
Thread::interrupt方法调用了os::interrupt方法,这个是调用平台的interrupt方法,这个方法的实现是在 os_*.cpp文件中,其中星号代表的是不同平台,因为jvm是跨平台的,所以对于不同的操作平台,线程的调度方式都是不一样的。我们以os_linux.cpp文件为例
void os::interrupt(Thread* thread) {
assert(Thread::current() == thread || Threads_lock->owned_by_self(),
“possibility of dangling Thread pointer”);
//获取本地线程对象
OSThread* osthread = thread->osthread();
if (!osthread->interrupted()) {//判断本地线程对象是否为中断
osthread->set_interrupted(true);//设置中断状态为true
// More than one thread can get here with the same value of osthread,
// resulting in multiple notifications. We do, however, want the store
// to interrupted() to be visible to other threads before we execute unpark().
//这里是内存屏障,这块在后续的文章中会剖析;内存屏障的目的是使得interrupted状态对其他线程立即可见
OrderAccess::fence();
//_SleepEvent相当于Thread.sleep,表示如果线程调用了sleep方法,则通过unpark唤醒
ParkEvent * const slp = thread->_SleepEvent ;
if (slp != NULL) slp->unpark() ;
}
// For JSR166. Unpark even if interrupt status already was set
if (thread->is_Java_thread())
((JavaThread*)thread)->parker()->unpark();
//_ParkEvent用于synchronized同步块和Object.wait(),这里相当于也是通过unpark进行唤醒
ParkEvent * ev = thread->_ParkEvent ;
if (ev != NULL) ev->unpark() ;
}
通过上面的代码分析可以知道,thread.interrupt()方法实际就是设置一个interrupted状态标识为true、并且通过ParkEvent的unpark方法来唤醒线程。
对于synchronized阻塞的线程,被唤醒以后会继续尝试获取锁,如果失败仍然可能被park
在调用ParkEvent的park方法之前,会先判断线程的中断状态,如果为true,会清除当前线程的中断标识
Object.wait、Thread.sleep、Thread.join会抛出InterruptedException
这里给大家普及一个知识点,为什么Object.wait、Thread.sleep和Thread.join都会抛出InterruptedException?首先,这个异常的意思是表示一个阻塞被其他线程中断了。然后,由于线程调用了interrupt()中断方法,那么Object.wait、Thread.sleep等被阻塞的线程被唤醒以后会通过is_interrupted方法判断中断标识的状态变化,如果发现中断标识为true,则先清除中断标识,然后抛出InterruptedException
需要注意的是,InterruptedException异常的抛出并不意味着线程必须终止,而是提醒当前线程有中断的操作发生,至于接下来怎么处理取决于线程本身,比如
直接捕获异常不做任何处理
将异常往外抛出
停止当前线程,并打印异常信息
为了让大家能够更好的理解上面这段话,我们以Thread.sleep为例直接从jdk的源码中找到中断标识的清除以及异常抛出的方法代码
找到 is_interrupted()方法,linux平台中的实现在os_linux.cpp文件中,代码如下
bool os::is_interrupted(Thread* thread, bool clear_interrupted) {
assert(Thread::current() == thread || Threads_lock->owned_by_self(),
“possibility of dangling Thread pointer”);
OSThread* osthread = thread->osthread();
bool interrupted = osthread->interrupted(); //获取线程的中断标识
if (interrupted && clear_interrupted) {//如果中断标识为true
osthread->set_interrupted(false);//设置中断标识为false
// consider thread->_SleepEvent->reset() … optional optimization
}
return interrupted;
}
找到Thread.sleep这个操作在jdk中的源码体现,怎么找?相信如果前面大家有认真看的话,应该能很快找到,代码在jvm.cpp文件中
JVM_ENTRY(void, JVM_Sleep(JNIEnv* env, jclass threadClass, jlong millis))
JVMWrapper(“JVM_Sleep”);
if (millis < 0) {
THROW_MSG(vmSymbols::java_lang_IllegalArgumentException(), “timeout value is negative”);
}
//判断并清除线程中断状态,如果中断状态为true,抛出中断异常
if (Thread::is_interrupted (THREAD, true) && !HAS_PENDING_EXCEPTION) {
THROW_MSG(vmSymbols::java_lang_InterruptedException(), “sleep interrupted”);
}
// Save current thread state and restore it at the end of this block.
// And set new thread state to SLEEPING.
JavaThreadSleepState jtss(thread);
注意上面加了中文注释的地方的代码,先判断is_interrupted的状态,然后抛出一个InterruptedException异常。到此为止,我们就已经分析清楚了中断的整个流程。
Java线程的中断标识判断
了解了thread.interrupt方法的作用以后,再回过头来看Java中 Thread.currentThread().isInterrupted()这段代码,就很好理解了。由于前者先设置了一个中断标识为true,所以 isInterrupted()这个方法的返回值为true,故而不满足while循环的判断条件导致退出循环。
这里有必要再提一句,就是这个线程中断标识有两种方式复位,第一种是前面提到过的InterruptedException;另一种是通过Thread.interrupted()对当前线程的中断标识进行复位。
最后
【这里想说,因为自己也走了很多弯路过来的,所以才下定决心整理,收集过程虽不易,但想到能帮助到一部分自学java想提升Java架构师技术的,P5-P6-P7-P8 的人,心里也是甜的!有需要的伙伴请点㊦方】↓↓↓↓↓↓↓↓↓↓↓↓↓↓↓↓↓↓↓↓↓↓↓↓↓↓↓↓↓↓↓↓↓↓↓↓↓↓↓↓↓↓↓↓↓↓↓↓↓↓↓↓↓↓↓↓↓↓↓↓↓↓↓↓↓↓↓↓↓↓↓↓↓↓↓↓↓↓↓↓↓↓↓↓↓↓↓↓
