
centos7搭建DNS服务(use)
参考:centos7搭建DNS服务完整版
CentOS 7 配置DNS服务
Centos7 DNS 服务器配置步骤 --use
DNS服务类型
| 主机记录 | 记录类型 | 记录值 |
|---|---|---|
| ns1 | A | 192.168.1.1 |
| ns2 | A | 192.168.1.2 |
| www | A | 192.168.1.100 |
| bbs | CNAME | www |
| ftp | A | 192.168.1.110 |
| MX 10 | 192.168.1.120 |
一、服务配置
1.1 关闭SELinux与防火墙(use)
[root@localhost ~]# setenforce 0
[root@localhost ~]# systemctl stop firewalld# 永久关闭
[root@localhost ~]# sed -i 's/SELINUX=enforcing/SELINUX=disabled/g' /etc/selinux/config
[root@localhost ~]# systemctl disable firewalld
1.2 配置网卡
配置网卡,使其可以访问本地DNS, 详情可参考:Centos7修改DNS Server
windows修改DNS配置,可参考:win10修改DNS配置
[root@localhost ~]# vi /etc/sysconfig/network-scripts/ifcfg-eno16777736BOOTPROTO=static
ONBOOT=yes
IPADDR=192.168.1.1
NETMASK=255.255.255.0
DNS1=114.114.114.114
DNS2=127.0.0.1 # 访问本地DNS服务
1.3 yum 安装DNS服务
安装bind包, vim包:
[root@localhost ~]# yum install -y bind* vim*
查看bind是否安装完成:
[root@localhost yum.repos.d]# rpm -aq | grep bind
1.4 配置示例1(参考)
1.4.1 编辑dns配置文件
vim /etc/named.conf
- listen-on port 53 {192.168.80.150;}; 设置为本地的IP地址即可。
- listen-on port 53 { any; }; 设置为所有IP地址均可访问。
- allow-query {any;} 设置为所有人都可以访问。
named.conf文件说明:
  ......                                     //略
options{
listen-on port 53 { 127.0.0.1;);    // 指定BIND侦听的DNS查询请求的本  // 机即P地址及端口
listen-on-v6 port 53{::1;};         // 限于 IPv6
directory "/var/named";  // 指定区域配置文件所在的路径dump-file "/var/named/data/cache_dump.db";
statistics-file "/var/named/data/named_stats.txt";
memstatistics-file "/var/named/data/named_mem_stats.txt";
allow-query { localhost;};  // 指定接收DNS查询请求的客户端
recursion yes;
dnssec-enable yes;
dnssec-validation yes;      // 改为no可以忽略SELinux影响
dnssec-lookaside auto;
.....
};// 以下用于指定BIND服务的日志参数
logging {channel default debug {file "data/named.run";severity dynamic;};};
zone “.”  IN  {  // 用于指定根服务器的配置信息,一般不能改动
type hint;
file "named.ca";
};
include”/etc/named.zones”; // 指定主配置文件,一定根据实际修改
include "/etc/named.root.key";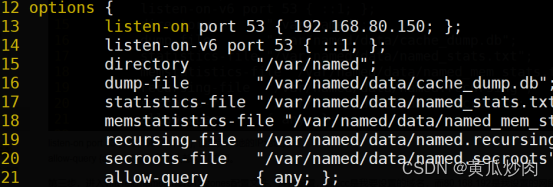
1.4.2 编辑dns区域配置文件
配置详解:
zone "ssx.com" IN {     // 正向根域文件的定义type master;      // 作为根域file "ssx.com.hosts";  // 根域正向解析文件名
};Zone "10.168.192 .in-addr.arpa" IN {   // 反向根域文件的定义type master;                // 作为根域file "ssx.com.back";        // 根域反向解析文件名
};
进入vi /etc/named.rfc1912.zones配置文件,进行配置,pip.cc是要设置的域名,而80.168.192为设置的网段,其中file 名字(自定义命名),要与/var/named/文件的配置文件一一对应:

1.4.3 配置文件设置
cd /var/named/目录下使用touch 创建两个文件要与上面的文件一一对应。然后使用模板文件named.localhost 进项覆盖刚才创建的文件。

上述创建完要使用 chown root:named zheng 和fan 来改变文件权限:
1.4.4 进入你创建的"zhang", "fan"等文件里面
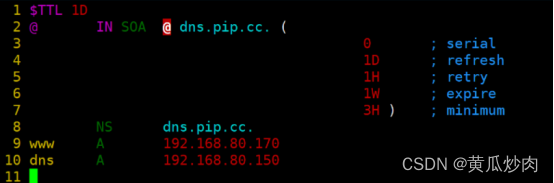
@dns.pip.cc. 是你的主机名加上域名(注意细节cc.的点点)
然后添加主机记录
- NS dns.pip.cc. 本机的域名
- dns A 192.168.80.150 dns为pip.cc的域名前坠,对应着192.168.80.150
- www A 192.168.80.170 www为pip.cc的域名前坠,对应着192.168.80.170
- ftp A 192.168.80.180 ftp为pip.cc的域名前坠,对应着192.168.80.180
1.4.5 编辑PTR文件
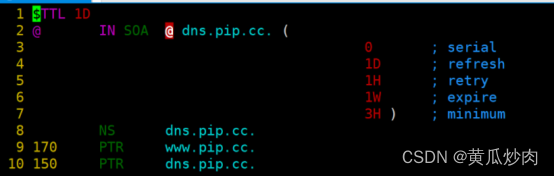
按照上面的反着写即可,原理都是一样的。
1.5 配置示例2(参考)
1.5.1 编辑主配置文件(named.conf)
[root@localhost ~]# vim /etc/named.confoptions {directory    "/var/named";dump-file    "/var/named/data/cache_dump.db";statistics-file    "/var/named/data/named_stats.txt";memstatistics-file    "/var/named/data/named_mem_stats.txt";recursion yes;dnssec-enable no;dnssec-validation no;dnssec-lookaside auto;bindkeys-file "/etc/named.iscdlv.key";managed-keys-directory "/var/named/dynamic";pid-file "/run/named/named.pid";session-keyfile "/run/named/session.key";
};
1.5.2 编辑区域配置文件(named.rfc1912.zones)
[root@localhost ~]# vim /etc/named.rfc1912.zoneszone "1.168.192.in-addr.arpa" IN {type master;file "infanx.com.loopback";allow-update { none; };
};zone "infanx.com" IN {type master;file "infanx.com.empty";allow-update { none; };
};
1.5.3 编辑正反向配置文件
[root@localhost ~]# cd /var/named
[root@localhost named]# cp -p named.localhost infanx.com.empty
[root@localhost named]# cp -p named.loopback infanx.com.loopback
正向文件:
$TTL 1D
@       IN SOA  ns1.infanx.com. rname.invalid. (0       ; serial1D      ; refresh1H      ; retry1W      ; expire3H )    ; minimumIN      NS      ns1IN      NS      ns2
ns1     IN      A       192.168.1.1
ns2     IN      A       192.168.1.2
www     IN      A       192.168.1.100
bbs     IN      CNAME   www
ftp     IN      A       192.168.1.110
mail    IN      MX  10  192.168.1.120
反向文件:
$TTL 1D
@       IN SOA  ns1.infanx.com. rname.invalid. (0       ; serial1D      ; refresh1H      ; retry1W      ; expire3H )    ; minimumIN      NS      ns1.infanx.com.IN      NS      ns2.infanx.com.
1       IN      PTR     ns1.infanx.com.
2       IN      PTR     ns2.infanx.com.
100     IN      PTR     www.infanx.com.
100     IN      PTR     bbs.infanx.com.
110     IN      PTR     ftp.infanx.com.
120     IN      PTR     mail.infanx.com.
1.6 配置示例3(use)
1.6.1 编辑主配置文件(named.conf)
默认配置即可:
[root@localhost ~]# vim /etc/named.confoptions {listen-on port 53 { any; };listen-on-v6 port 53 { ::1; };directory       "/var/named";dump-file       "/var/named/data/cache_dump.db";statistics-file "/var/named/data/named_stats.txt";memstatistics-file "/var/named/data/named_mem_stats.txt";recursing-file  "/var/named/data/named.recursing";secroots-file   "/var/named/data/named.secroots";allow-query { any; };/*- If you are building an AUTHORITATIVE DNS server, do NOT enable recursion.- If you are building a RECURSIVE (caching) DNS server, you need to enablerecursion.- If your recursive DNS server has a public IP address, you MUST enable accesscontrol to limit queries to your legitimate users. Failing to do so willcause your server to become part of large scale DNS amplificationattacks. Implementing BCP38 within your network would greatlyreduce such attack surface*/recursion yes;forward first;forwarders { 114.114.114.114; 8.8.8.8; };dnssec-enable no;dnssec-validation no;/* Path to ISC DLV key */bindkeys-file "/etc/named.root.key";managed-keys-directory "/var/named/dynamic";pid-file "/run/named/named.pid";session-keyfile "/run/named/session.key";
};logging {channel default_debug {file "data/named.run";severity dynamic;};
};
1.6.2 编辑区域配置文件(named.rfc1912.zones)
[root@localhost ~]# vim /etc/named.rfc1912.zoneszone "api.crc.testing" IN {type master;file "api.crc.testing.zone";allow-update { none; };
};zone "console-openshift-console.apps-crc.testing" IN {type master;file "console-openshift-console.apps-crc.testing.zone";allow-update { none; };
};
1.6.3 编辑正反向配置文件
[root@localhost ~]# cd /var/named
[root@localhost named]# cp -p named.localhost console-openshift-console.apps-crc.testing.zone
[root@localhost named]# cp -p named.loopback api.crc.testing.zone
正向文件:
vi api.crc.testing.zone
$TTL 1D
@       IN SOA  ns1.infanx.com. rname.invalid. (0       ; serial1D      ; refresh1H      ; retry1W      ; expire3H )    ; minimumIN      NS      ns1IN      NS      ns2
ns1     IN      A       192.168.1.1
ns2     IN      A       192.168.1.2
www     IN      A       192.168.1.100
bbs     IN      CNAME   www
ftp     IN      A       192.168.1.110
mail    IN      MX  10  192.168.1.120
反向文件:
$TTL 1D
@       IN SOA  ns1.infanx.com. rname.invalid. (0       ; serial1D      ; refresh1H      ; retry1W      ; expire3H )    ; minimumIN      NS      ns1.infanx.com.IN      NS      ns2.infanx.com.
1       IN      PTR     ns1.infanx.com.
2       IN      PTR     ns2.infanx.com.
100     IN      PTR     www.infanx.com.
100     IN      PTR     bbs.infanx.com.
110     IN      PTR     ftp.infanx.com.
120     IN      PTR     mail.infanx.com.
1.6.4 检查正向解析文件
[root@localhost ~]# named-checkzone ssx.com /var/named/ssx.com.hosts
1.7 重启DNS服务
[root@localhost named]# systemctl restart named
1.8 测试解析记录
按照1.5章节配置结果进行配置:
[root@localhost named]# nslookup
> ns1.infanx.com
Server:        192.168.1.1
Address:    192.168.1.1#53
Name:    ns1.infanx.com
Address: 192.168.1.1> ns2.infanx.com
Server:        192.168.1.1
Address:    192.168.1.1#53
Name:    ns2.infanx.com
Address: 192.168.1.2> www.infanx.com
Server:        192.168.1.1
Address:    192.168.1.1#53
Name:    www.infanx.com
Address: 192.168.1.100> bbs.infanx.com
Server:        192.168.1.1
Address:    192.168.1.1#53
bbs.infanx.com    canonical name = www.infanx.com.
Name:    www.infanx.com
Address: 192.168.1.100> ftp.infanx.com
Server:        192.168.1.1
Address:    192.168.1.1#53
Name:    ftp.infanx.com
Address: 192.168.1.110> mail.infanx.com
Server:        192.168.1.1
Address:    192.168.1.1#53
Name:    ftp.infanx.com
Address: 192.168.1.120> 192.168.1.1
Server:        192.168.100.100
Address:    192.168.100.100#53
1.1.168.192.in-addr.arpa    name = ns1.infanx.com.> 192.168.1.2
Server:        192.168.100.100
Address:    192.168.100.100#53
2.1.168.192.in-addr.arpa    name = ns2.infanx.com.> 192.168.1.100
Server:        192.168.100.100
Address:    192.168.100.100#53
100.1.168.192.in-addr.arpa    name = bbs.infanx.com.
100.1.168.192.in-addr.arpa    name = www.infanx.com.> 192.168.1.110
Server:        192.168.100.100
Address:    192.168.100.100#53
110.1.168.192.in-addr.arpa    name = ftp.infanx.com.> 192.168.1.120
Server:        192.168.100.100
Address:    192.168.100.100#53
120.1.168.192.in-addr.arpa    name = mail.infanx.com.
二、缓存DNS(转发器)(选做)
在第二台服务器上安装DNS服务 作为主DNS服务器的缓存DNS
2.1 服务配置
安装DNS服务
编辑主配置文件
[root@localhost ~]# vim /etc/named.confoptions {directory       "/var/named";dump-file       "/var/named/data/cache_dump.db";statistics-file "/var/named/data/named_stats.txt";memstatistics-file "/var/named/data/named_mem_stats.txt";recursion yes;forwarders { 192.168.1.1; };//指明转发器是谁forward first;//first:优先使用转发器,如果查询不到再使用本地DNS;//only:仅使用转发器,如果查询不到则返回DNS客户端查询失败;dnssec-enable no;dnssec-validation no;dnssec-lookaside auto;bindkeys-file "/etc/named.iscdlv.key";managed-keys-directory "/var/named/dynamic";pid-file "/run/named/named.pid";session-keyfile "/run/named/session.key";
};
或者编辑区域配置文件 配置局部转发器 原理同上
[root@localhost ~]# vim /etc/named.rfc1912.zoneszone "infanx.com" IN {type forward;forwarders { 192.168.1.1; };forward first;
};
重启DNS服务
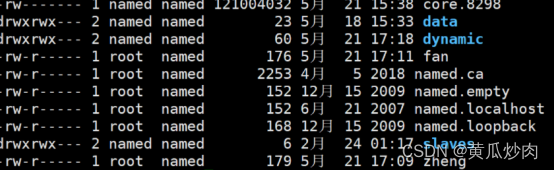
进入slaves文件夹验证
[root@localhost ~]# cd /var/named/slaves
[root@localhost slaves]# ll
总用量 8
-rw-r--r--. 1 named named 466 2月  17 00:00 infanx.com.empty
-rw-r--r--. 1 named named 466 2月  17 00:00 infanx.com.loopback
三、辅助DNS(DNS集群)(选做)
3.1 题目要求
主DNS正反向文件中分别添加辅助DNS的 NS记录 和 A记录
3.2 服务配置
安装DNS服务 编辑区域配置文件
[root@localhost ~]# vim /etc/named.rfc1912.zoneszone "1.168.192.in-addr.arpa" IN {type slave;file "slaves/infanx.com.loopback";masters { 192.168.1.1; };
};zone "infanx.com" IN {type slave;file "slaves/infanx.com.empty";masters { 192.168.1.1; };
};
zone “区域名称” IN {
type slave; //区域类型为辅助
file “slaves/文件名”; //文件必须保存在slaves下,其他目录没有权限
masters { IP1; IP2; }; //指出主服务器是谁
};
在主DNS上修改区域文件时,必须将SOA记录的serial加1,因为slave是通过serial值来进行判断更新的。
四、子DNS(子域授权)(选做)
父DNS配置DNS基础的正向解析文件
父DNS进行子域授权ftp.infanx.com
4.1 服务配置
子域服务器安装DNS
编辑父域正向文件添加NS记录指向子域主DNS
frp     IN      NS      ns1.frp
ns1.frp IN      A       192.168.1.200
子域编辑区域配置文件
[root@localhost ~]# vim /etc/named.rfc1912.zoneszone "frp.infanx.com" IN {type master;file "frp.infanx.com.empty";allow-update { none; };
};
为子域创建正向文件并添加解析记录
[root@localhost ~]# cd /var/named
[root@localhost named]# cp -p named.localhost frp.infanx.com.empty
[root@localhost named]# vim frp.infanx.com.empty$TTL 1D
@       IN SOA  ns1.frp.infanx.com. rname.invalid. (0       ; serial1D      ; refresh1H      ; retry1W      ; expire3H )    ; minimumIN      NS      ns1
ns1     IN      A       192.168.1.200
nj      IN      A       192.168.1.201
hz      IN      A       192.168.1.202
sh      IN      A       192.168.1.203
重启服务并测试
[root@localhost named]# systemctl restart named
[root@localhost named]# nslookup
> ns1.frp.infanx.com
Server:        192.168.1.1
Address:    192.168.1.1#53
Non-authoritative answer:
Name:    ns1.frp.infanx.com
Address: 192.168.100.200> nj.frp.infanx.com
Server:        192.168.1.1
Address:    192.168.1.1#53
Non-authoritative answer:
Name:    nj.frp.infanx.com
Address: 192.168.1.201> hz.frp.infanx.com
Server:        192.168.1.1
Address:    192.168.1.1#53
Non-authoritative answer:
Name:    hz.frp.infanx.com
Address: 192.168.1.202> sh.frp.infanx.com
Server:        192.168.1.1
Address:    192.168.1.1#53
Non-authoritative answer:
Name:    sh.frp.infanx.com
Address: 192.168.1.203