双目三维重建系统(双目标定+立体校正+双目测距+点云显示)Python
双目三维重建系统(双目标定+立体校正+双目测距+点云显示)Python
目录
双目三维重建系统(双目标定+立体校正+双目测距+点云显示)Python
1.项目结构
2. Environment
3.双目相机标定和校准
(0) 双目摄像头
(1) 采集标定板的左右视图
(2) 单目相机标定和校准
(3) 双目相机标定和校准
(4)关于MATLAB双目标定结果
4.视差图和深度图
(1) 立体校正
(2) 立体匹配与视差图计算
(3) Demo
5.双目测距
6.3D点云显示
7.示例代码Demo
8.双目三维重建项目代码(Python版本)
9.双目三维重建项目代码(C++版本)
本篇博客将实现Python版本的双目三维重建系统,项目代码实现包含:`双目标定`,`立体校正(含消除畸变)`,`立体匹配`,`视差计算`和`深度距离计算/3D坐标计算` 的知识点。限于篇幅,本博客不会过多赘述算法原理,而是手把手教你,如何搭建一套属于自己的双目三维重建的系统。项目代码包含:
- 支持双USB连接线的双目摄像头
- 支持单USB连接线的双目摄像头(左右摄像头被拼接在同一个视频中显示)
- 采集标定板的左右视图:get_stereo_images.py
- 支持单目相机标定:mono_camera_calibration.py ,无需Matlab标定
- 支持双目相机标定:stereo_camera_calibration.py,无需Matlab标定
- 支持使用WLS滤波器对视差图进行滤波
- 支持双目测距,误差在1cm内(鼠标点击图像即可获得其深度距离)
- 支持Open3D和PCL点云显示
- 源码支持Windows和Ubuntu系统
诚然,网上有很多双测距的代码,但项目都不是十分完整,而且恢复视差图效果也一般,难以达到商业实际应用,究其原因,主要有下面2个:
- 双目摄像头质量问题,
- 双目标定存在问题,导致校准误差较大
- 没有使用WLS滤波器对视差图进行滤波,该方法可以极大提高视差图的效果
【尊重原创,转载请注明出处】:https://blog.csdn.net/guyuealian/article/details/121301896
【完整的项目代码】双目三维重建系统(双目标定+立体校正+双目测距+点云显示)Python源码
先看一下双目测距的效果图(鼠标点击图像即可获得其深度距离):
三维重建中,除了双目相机,还有TOF和结构光3D 相机
飞行时间(Time of flight,TOF),代表公司微软Kinect2,PMD,SoftKinect, 联想 Phab,在手机中一般用于3D建模、AR应用,AR测距(华为TOF镜头)
双目视觉(Stereo Camera),代表公司 Leap Motion, ZED, 大疆;
结构光(Structured-light),代表公司有奥比中光,苹果iPhone X(Prime Sense),微软 Kinect1,英特尔RealSense, Mantis Vision 等,在手机(iPhone,华为)中3D结构光主要用于人脸解锁、支付、美颜等场景。
- 关于3D相机技术(飞行时间+双目+结构光)的区别,可以参考我的一篇博客《3D相机技术调研(飞行时间TOF+双目+结构光)》
- 如果你对结构光三维重建感兴趣,可参考鄙人的博客《结构光三维重建-3D Scanning Software实现三维重建》
1.项目结构
.
├── config       # 相机参数文件
├── core         # 相机核心算法包
├── data         # 相机采集的数据
├── demo         # demo文件
├── libs         # 第三方依赖包
├── scripts      # 脚本
│   ├── mono_camera_calibration.sh     # 单目相机校准Linux脚本
│   ├── mono_camera_calibration.bat    # 单目相机校准Windows脚本
│   ├── stereo_camera_calibration.sh   # 双目相机校准Linux脚本
│   └── stereo_camera_calibration.bat  # 双目相机校准Windows脚本
├── get_stereo_images.py                      # 采集标定文件
├── mono_camera_calibration.py                # 单目相机标定
├── stereo_camera_calibration.py              # 双目相机标定
└── README.md
2. Environment
项目都自带requirements.txt文件,里面包含了项目开发所需要的python依赖包已经对应的版本号,比如下图第一个依赖包numpy==1.19.5,说明项目使用了numpy库,对应的版本是1.19.5,你可选择使用pip安装对应的版本:
# 在终端输入
pip install numpy==1.19.5
# 可以使用-i指定镜像源,加快安装速度
pip install numpy==1.19.5 -i https://pypi.tuna.tsinghua.edu.cn/simple
项目依赖包,可参考requirements.txt
numpy==1.19.5
matplotlib==3.1.0
Pillow==6.0.0
bcolz==1.2.1
easydict==1.9
opencv-contrib-python==4.5.4.60
opencv-python==4.5.1.48
pandas==1.1.5
polyaxon-client==0.5.6
polyaxon-deploy==0.5.6
polyaxon-dockerizer==0.0.9
polyaxon-schemas==0.5.6
PyYAML==5.3.1
scikit-image==0.17.2
scikit-learn==0.24.0
scipy==1.5.4
seaborn==0.11.2
tqdm==4.55.1
xmltodict==0.12.0
memory_profiler
open3d-python==0.7.0.0- python-pcl (可以不安装,安装python-pcl需要一丢丢耐心,实在不行,就用open3d吧)
- open3d-python==0.7.0.0(注意版本号)
- opencv-python
- opencv-contrib-python
项目安装教程请参考(初学者入门,麻烦先看完下面教程,配置好开发环境):
- 项目开发使用教程和常见问题和解决方法
- 视频教程:3 如何用Anaconda创建pycharm环境
- 视频教程:4 如何在pycharm中使用Anaconda创建的python环境
3.双目相机标定和校准
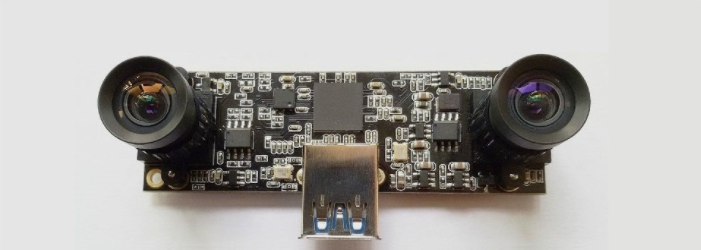
(0) 双目摄像头
下面这款双目摄像头(RGB+RGB)是在某宝购买的(几百元,链接就不发了,免得说我打广告),作为本项目的双目相机,其基线是固定的6cm,是单USB连接线的双目摄像头(左右摄像头被拼接在同一个视频中显示),基本满足我们测试需求。一般基线越长,可测量的距离越远,网友也可以根据自己需要购买。
一点注意事项:
- 双目相机三维重建也可以使用RGB+IR(红外)的摄像头,甚至IR+IR的也是可以,本人亲测,RGB+IR的相机,其效果也是杠杠的。
- 基线不太建议太小,作为测试,一般baseline在3~9cm就可以满足需求,有些无人车的双目基线更是恐怖到1~2米长
- 从双目三维重建原理中可知,左右摄像头的成像平面尽可能在一个平面内,成像平面不在同一个平面的,尽管可以立体矫正,其效果也差很多。
- 一分钱,一分货,相机的质量好坏,直接决定了你的成像效果
(1) 采集标定板的左右视图
- 采集数据前,请调节相机焦距,尽可能保证视图中标定板清洗可见
- 采集棋盘格图像时,标定板一般占视图1/2到1/3左右
- 一般采集15~30张左右
Linux系统下终端运行(参数width和height请根据自己标定板填写):
width=8
height=11
left_video=0
right_video=-1
save_dir="data/camera"
detect=Truepython get_stereo_images.py \--left_video $left_video \--right_video $right_video \--width $width  \--height $height  \--save_dir $save_dir \--detect $detect \
Windows系统下终端运行(参数width和height请根据自己标定板填写):
python get_stereo_images.py --left_video 0 --right_video 1 --width 8 --height 11 --save_dir "data/camera" --detect True
参数说明(特别特别注意width和height)
- 参数width指的是棋盘格宽方向黑白格子相交点个数
- 参数height指的是棋盘格长方向黑白格子相交点个数
- 参数left_video是左路相机ID,一般就是相机连接主板的USB接口号
- 参数right_video是右路相机ID,一般就是相机连接主板的USB接口号
- PS:如果你的双目相机是单USB连接线的双目摄像头(左右摄像头被拼接在同一个视频中显示),则设置left_video=相机ID,而right_video=-1,
- 参数
detect建议设置True,这样可实时检测棋盘格,方面调整角度- 按键盘
s或者c保存左右视图图片
| left_image | right_image |
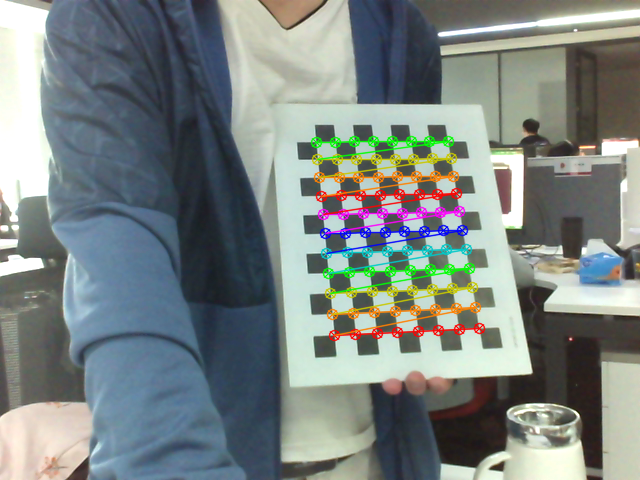 |  |
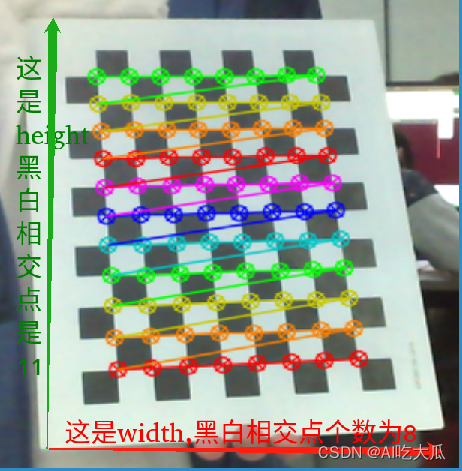
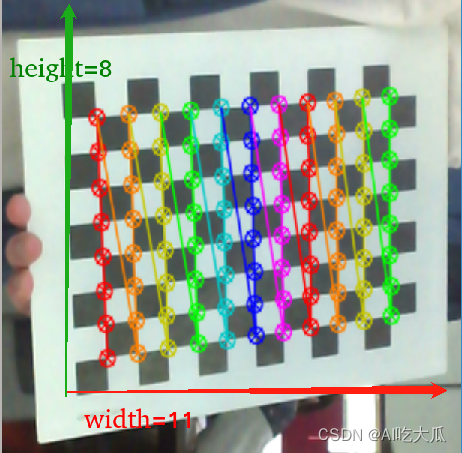
特别特别注意,width和height表示的是相交点个数,不是格子个数!!!不要搞反了
| width=8 ,height=11 | width=11 ,height=8 |
 |  |
下面是采集双目摄像头标定板左右视图的Python代码:get_stereo_images.py,除了OpenCV,没啥依赖,直接干就完事。
# -*-coding: utf-8 -*-
"""@Author : pan-author@E-mail : 390737991@qq.com@Date   : 2020-04-10 18:24:06
"""import os
import argparse
import cv2class StereoCamera(object):"""采集双目标定图片,按键盘【c】或【s】保存图片"""def __init__(self, chess_width, chess_height, detect=False):""":param chess_width: chessboard width size,即棋盘格宽方向黑白格子相交点个数,:param chess_height: chessboard height size,即棋盘格长方向黑白格子相交点个数:param detect: 是否实时检测棋盘格,方便采集数据"""self.chess_width = chess_widthself.chess_height = chess_heightself.detect = detectself.criteria = (cv2.TERM_CRITERIA_EPS + cv2.TERM_CRITERIA_MAX_ITER, 30, 0.001)def detect_chessboard(self, image):"""检测棋盘格"""gray = cv2.cvtColor(image, cv2.COLOR_BGR2GRAY)ret, corners = cv2.findChessboardCorners(gray, (self.chess_width, self.chess_height), None)if ret:# 角点精检测corners2 = cv2.cornerSubPix(gray, corners, (11, 11), (-1, -1), self.criteria)# Draw and display the cornersimage = cv2.drawChessboardCorners(image, (self.chess_width, self.chess_height), corners2, ret)return imagedef capture2(self, left_video, right_video, save_dir):"""用于采集双USB连接线的双目摄像头:param left_video:int or str,左路视频路径或者摄像头ID:param right_video:int or str,右视频路径或者摄像头ID:param save_dir: str,保存左右图片的路径:return:"""self.create_file(save_dir)capL = cv2.VideoCapture(left_video)capR = cv2.VideoCapture(right_video)widthL, heightL, numFramesL, fpsL = self.get_video_info(capL)widthR, heightR, numFramesR, fpsR = self.get_video_info(capR)print("capL:\n", widthL, heightL, numFramesL, fpsL)print("capR:\n", widthR, heightR, numFramesR, fpsR)save_videoL = self.create_file(save_dir, "video", "left_video.avi")save_videoR = self.create_file(save_dir, "video", "right_video.avi")writerL = self.get_video_writer(save_videoL, widthL, heightL, fpsL)writerR = self.get_video_writer(save_videoR, widthR, heightR, fpsR)i = 0while True:isuccessL, frameL = capL.read()isuccessR, frameR = capR.read()if not (isuccessL and isuccessR):print("No more frames")breakif self.detect:l = self.detect_chessboard(frameL.copy())r = self.detect_chessboard(frameR.copy())else:l = frameL.copy()r = frameR.copy()cv2.imshow('left', l)cv2.imshow('right', r)key = cv2.waitKey(10)if key == ord('q'):breakelif key == ord('c') or key == ord('s'):print("save image:{:0=3d}".format(i))cv2.imwrite(os.path.join(save_dir, "left_{:0=3d}.png".format(i)), frameL)cv2.imwrite(os.path.join(save_dir, "right_{:0=3d}.png".format(i)), frameR)i += 1writerL.write(frameL)writerR.write(frameR)capL.release()capR.release()cv2.destroyAllWindows()def capture1(self, video, save_dir):"""用于采集单USB连接线的双目摄像头(左右摄像头被拼接在同一个视频中显示):param video:int or str,视频路径或者摄像头ID:param save_dir: str,保存左右图片的路径"""self.create_file(save_dir)cap = cv2.VideoCapture(video)# 某些双目摄像头可能需要设置分辨率才能正常显示双目的图像# cap.set(cv2.CAP_PROP_FRAME_WIDTH, 640 * 2)# cap.set(cv2.CAP_PROP_FRAME_HEIGHT, 480)width, height, numFrames, fps = self.get_video_info(cap)print("capL:\n", width, height, numFrames, fps)save_videoL = self.create_file(save_dir, "video", "left_video.avi")save_videoR = self.create_file(save_dir, "video", "right_video.avi")writerL = self.get_video_writer(save_videoL, int(width / 2), height, fps)writerR = self.get_video_writer(save_videoR, int(width / 2), height, fps)i = 0while True:isuccess, frame = cap.read()if not isuccess:print("No more frames")break# 分离左右摄像头frameL = frame[:, :int(width / 2), :]frameR = frame[:, int(width / 2):, :]if self.detect:l = self.detect_chessboard(frameL.copy())r = self.detect_chessboard(frameR.copy())else:l = frameL.copy()r = frameR.copy()cv2.imshow('left', l)cv2.imshow('right', r)key = cv2.waitKey(10)if key == ord('q'):breakelif key == ord('c') or key == ord('s'):print("save image:{:0=3d}".format(i))cv2.imwrite(os.path.join(save_dir, "left_{:0=3d}.png".format(i)), frameL)cv2.imwrite(os.path.join(save_dir, "right_{:0=3d}.png".format(i)), frameR)i += 1writerL.write(frameL)writerR.write(frameR)cap.release()cv2.destroyAllWindows()@staticmethoddef get_video_info(video_cap):width = int(video_cap.get(cv2.CAP_PROP_FRAME_WIDTH))height = int(video_cap.get(cv2.CAP_PROP_FRAME_HEIGHT))numFrames = int(video_cap.get(cv2.CAP_PROP_FRAME_COUNT))fps = int(video_cap.get(cv2.CAP_PROP_FPS))return width, height, numFrames, fps@staticmethoddef get_video_writer(save_path, width, height, fps):if not os.path.exists(os.path.dirname(save_path)):os.makedirs(os.path.dirname(save_path))fourcc = cv2.VideoWriter_fourcc(*'XVID')frameSize = (int(width), int(height))video_writer = cv2.VideoWriter(save_path, fourcc, fps, frameSize)print("video:width:{},height:{},fps:{}".format(width, height, fps))return video_writer@staticmethoddef create_file(parent_dir, dir1=None, filename=None):out_path = parent_dirif dir1:out_path = os.path.join(parent_dir, dir1)if not os.path.exists(out_path):os.makedirs(out_path)if filename:out_path = os.path.join(out_path, filename)return out_pathdef str2bool(v):return v.lower() in ('yes', 'true', 't', 'y', '1')def get_parser():width = 8height = 11left_video = -1right_video = 0save_dir = "data/camera"parser = argparse.ArgumentParser(description='Camera calibration')parser.add_argument('--width', type=int, default=width, help='chessboard width size')parser.add_argument('--height', type=int, default=height, help='chessboard height size')parser.add_argument('--left_video', type=int, default=left_video, help='left video file or camera ID')parser.add_argument('--right_video', type=int, default=right_video, help='right video file or camera ID')parser.add_argument('--detect', type=str2bool, nargs='?', const=True, default=True, help='detect chessboard ')parser.add_argument('--save_dir', type=str, default=save_dir, help='YML file to save calibrate matrices')return parserif __name__ == '__main__':args = get_parser().parse_args()print("args={}".format(args))stereo = StereoCamera(args.width, args.height, detect=args.detect)if args.left_video > -1 and args.right_video > -1:# 双USB连接线的双目摄像头stereo.capture2(left_video=args.left_video, right_video=args.right_video, save_dir=args.save_dir)elif args.left_video > -1:# 单USB连接线的双目摄像头(左右摄像头被拼接在同一个视频中显示)stereo.capture1(video=args.left_video, save_dir=args.save_dir)elif args.right_video > -1:# 单USB连接线的双目摄像头(左右摄像头被拼接在同一个视频中显示)stereo.capture1(video=args.right_video, save_dir=args.save_dir)else:raise Exception("Error: Check your camera{}".format(args.left_video, args.right_video))
双目标定的目标是获得左右两个相机的内参、外参和畸变系数,其中内参包括左右相机的fx,fy,cx,cy,外参包括左相机相对于右相机的旋转矩阵和平移向量,畸变系数包括径向畸变系数(k1, k2,k3)和切向畸变系数(p1,p2)。
双目标定工具最常用的莫过于是MATLAB的工具箱: Stereo Camera Calibrator App,网上有太多教程,我就不赘述了。
我采用的是Deepin系统,懒得去安装Matlab了,所以就参考各路神仙,使用OpenCV实现了单目和双目的标定程序。
(2) 单目相机标定和校准(不要跳过这个步骤)
# Linux
bash scripts/mono_camera_calibration.sh
# windows
scripts/mono_camera_calibration.bat
#!/usr/bin/env bashimage_dir=data/lenacv-camera # 棋盘格图片
save_dir=configs/lenacv-camera # 保存标定结果
width=8
height=11
square_size=20 #mm
image_format=png # 图片格式,如png,jpg
show=True # 是否显示检测结果
# left camera calibration
python mono_camera_calibration.py \--image_dir $image_dir \--image_format $image_format \--square_size $square_size \--width $width \--height $height \--prefix left \--save_dir $save_dir \--show $show# right camera calibration
python mono_camera_calibration.py \--image_dir $image_dir \--image_format $image_format \--square_size $square_size \--width $width \--height $height \--prefix right \--save_dir $save_dir \--show $show一点注意事项:
- 标定代码会显示每一张图像的棋盘格的角点检测效果,如果发现有检测不到,或者角点检测出错,则需要自己手动删除这些图像,避免引入太大的误差
- 若误差超过0.1,建议重新调整摄像头并标定,不然效果会差很多
执行后,在$save_dir目录下会生成left_cam.yml和right_cam.yml左右相机参数文件
%YAML:1.0
---
K: !!opencv-matrixrows: 3cols: 3dt: ddata: [ 7.6327773983725410e+02, 0., 2.8768149780495781e+02, 0.,7.6350419482076416e+02, 2.1897333674659842e+02, 0., 0., 1. ]
D: !!opencv-matrixrows: 1cols: 5dt: ddata: [ 3.5020967324140520e-02, -4.0770563420764315e-02,-4.4231047037511739e-04, -1.0552565305999332e-03,-9.7750323762439514e-02 ]
其中K是相机内参矩阵,D是畸变系数矩阵
(3) 双目相机标定和校准
完成单目相机标定和校准后,接下来就是进行双目相机标定和校准,
# Linux
bash scripts/stereo_camera_calibration.sh
# windows
scripts/stereo_camera_calibration.bat
image_dir=data/lenacv-camera # 棋盘格图片
save_dir=configs/lenacv-camera # 保存标定结果
width=8
height=11
square_size=20 #mm
image_format=png # 图片格式,如png,jpg
#show=True # 是否显示检测结果
show=False # 是否显示检测结果
# stereo camera calibration
python stereo_camera_calibration.py \--left_file $save_dir/left_cam.yml \--right_file $save_dir/right_cam.yml \--left_prefix left \--right_prefix right \--width $width \--height $height \--left_dir $image_dir \--right_dir $image_dir \--image_format $image_format \--square_size $square_size \--save_dir $save_dir \
一点注意事项:
- 若误差超过0.1,建议重新调整摄像头并标定
执行后,在$save_dir目录下会生成stereo_cam.yml相机参数文件,这个文件,包含了左右相机的相机内参矩阵(K1,K2),畸变系数矩阵(D1,D2),左右摄像机之间的旋转矩阵R和平移矩阵T,以及本质矩阵E和基本矩阵F等.
有了双目相机内外参数信息(stereo_cam.yml),下面就可以进行立体矫正,计算视差了
(4)关于MATLAB双目标定结果
项目源码支持单目相机标定和双目相机标定,其实可以不用Matlab工具箱进行标定;当然如果你已经使用Matlab工具箱进行双目相机标定了,请对应参数修改 stereo_cam.yml文件
- 参数size,对应图像宽高(width,height)
- 参数K1,对应左目相机内参矩阵(3×3)
- 参数D1,对应左目相机畸变系数矩阵(5×1)
- 参数K2,对应右目相机内参矩阵(3×3)
- 参数D2,对应右目相机畸变系数矩阵(5×1)
- 参数T,对应双目相机平移向量T(3×1)
- 参数R,对应双目相机旋转矩阵R(3×3),Matlab给出的貌似是旋转向量om(1×3),请使用cv2.Rodrigues()将旋转向量转为旋转矩阵,参考下面的代码进行转换
- 至于配置文件中的参数,如R1, R2, P1, P2, Q这些重投影矩阵,可默写即可,不用修改,这些在运行时,会重新计算。
import cv2import numpy as np# 定义旋转矩阵R,旋转向量omR = [[9.9999370551606337e-01, 7.8563882630048958e-04, 3.4600144345510440e-03],[-7.9503149273969136e-04, 9.9999600080163187e-01, 2.7140938945082542e-03],[-3.4578682997252063e-03, -2.7168276311286426e-03, 9.9999033095047696e-01]]R = np.asarray(R)print(f"旋转矩阵R:\n {R}")# 把旋转矩阵R转化为旋转向量omom, _ = cv2.Rodrigues(R)print(f"旋转向量om:\n {om}")# 把旋转向量om转换为旋转矩阵RR1, _ = cv2.Rodrigues(om)print(f"旋转矩阵R1:\n {R1}")
4.视差图和深度图
(1) 立体校正
这部分基础知识来源于:https://blog.csdn.net/dulingwen/article/details/100115157
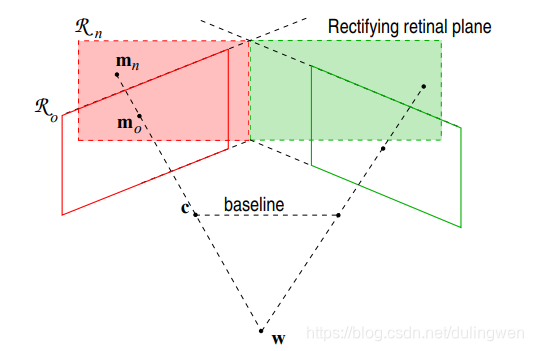
立体校正的目的是将拍摄于同一场景的左右两个视图进行数学上的投影变换,使得两个成像平面平行于基线,且同一个点在左右两幅图中位于同一行,简称共面行对准。只有达到共面行对准以后才可以应用三角原理计算距离。
def get_rectify_image(self, imgL, imgR):"""畸变校正和立体校正根据更正map对图片进行重构获取用于畸变校正和立体校正的映射矩阵以及用于计算像素空间坐标的重投影矩阵:param imgL::param imgR::return:"""# camera_params.get_rectify_transform(K1, D1, K2, D2, R, T, image_size)left_map_x, left_map_y = self.camera_config["left_map_x"], self.camera_config["left_map_y"]right_map_x, right_map_y = self.camera_config["right_map_x"], self.camera_config["right_map_y"]rectifiedL = cv2.remap(imgL, left_map_x, left_map_y, cv2.INTER_LINEAR, borderValue=cv2.BORDER_CONSTANT)rectifiedR = cv2.remap(imgR, right_map_x, right_map_y, cv2.INTER_LINEAR, borderValue=cv2.BORDER_CONSTANT)return rectifiedL, rectifiedR(2) 立体匹配与视差图计算
立体匹配的目的是为左图中的每一个像素点在右图中找到其对应点(世界中相同的物理点),这样就可以计算出视差:(xi和xj分别表示两个对应点在图像中的列坐标)。
大部分立体匹配算法的计算过程可以分成以下几个阶段:匹配代价计算、代价聚合、视差优化、视差细化。立体匹配是立体视觉中一个很难的部分,主要困难在于:
1.图像中可能存在重复纹理和弱纹理,这些区域很难匹配正确;
2.由于左右相机的拍摄位置不同,图像中几乎必然存在遮挡区域,在遮挡区域,左图中有一些像素点在右图中并没有对应的点,反之亦然;
3.左右相机所接收的光照情况不同;
4.过度曝光区域难以匹配;
5.倾斜表面、弯曲表面、非朗伯体表面;
6.较高的图像噪声等。
常用的立体匹配方法基本上可以分为两类:局部方法,例如BM、SGM、ELAS、Patch Match等,非局部的,即全局方法,例如Dynamic Programming、Graph Cut、Belief Propagation等,局部方法计算量小,匹配质量相对较低,全局方法省略了代价聚合而采用了优化能量函数的方法,匹配质量较高,但是计算量也比较大。
目前OpenCV中已经实现的方法有BM、binaryBM、SGBM、binarySGBM、BM(cuda)、Bellief Propogation(cuda)、Constant Space Bellief Propogation(cuda)这几种方法。比较好用的是SGBM算法,它的核心是基于SGM算法,但和SGM算法又有一些不同,比如匹配代价部分用的是BT代价(原图+梯度图)而不是HMI代价等等。有关SGM算法的原理解释,可以参考另一篇博客 : 《双目立体匹配算法:SGM 》https://blog.csdn.net/dulingwen/article/details/104142149
def get_disparity(self, imgL, imgR, use_wls=True):""":param imgL: 畸变校正和立体校正后的左视图:param imgR:畸变校正和立体校正后的右视图:param use_wls:是否使用WLS滤波器对视差图进行滤波:return dispL:ndarray(np.float32),返回视差图"""dispL = disparity.get_disparity_filter(imgL, imgR, use_wls=use_wls)# dispL = disparity.get_disparity_simple(imgL, imgR)return dispL(3) Demo
- 运行Demo进行立体矫正,计算视差图并恢复深度图,
- Demo的参数说明如下
| 参数 | 类型 | 说明 |
|---|---|---|
| calibration_file | str | 双目相机的配置文件,如"configs/lenacv-camera/stereo_cam.yml" |
| left_video | str | 左路相机ID或者视频文件 |
| right_video | str | 右路相机ID或者视频文件 |
| left_file | str | 左路测试图像文件 |
| right_file | str | 右路测试图像文件 |
| filter | bool | 是否对视差图进行滤波 |
python demo.py \--stereo_file "configs/lenacv-camera/stereo_cam.yml" \--left_video "data/lenacv-video/left_video.avi" \--right_video "data/lenacv-video/right_video.avi" \--filter True- 视差图滤波:
在立体匹配生成视差图之后,还可以对视差图进行滤波后处理,例如Guided Filter、Fast Global Smooth Filter(一种快速WLS滤波方法)、Bilatera Filter、TDSR、RBS等。 视差图滤波能够将稀疏视差转变为稠密视差,并在一定程度上降低视差图噪声,改善视差图的视觉效果,但是比较依赖初始视差图的质量。
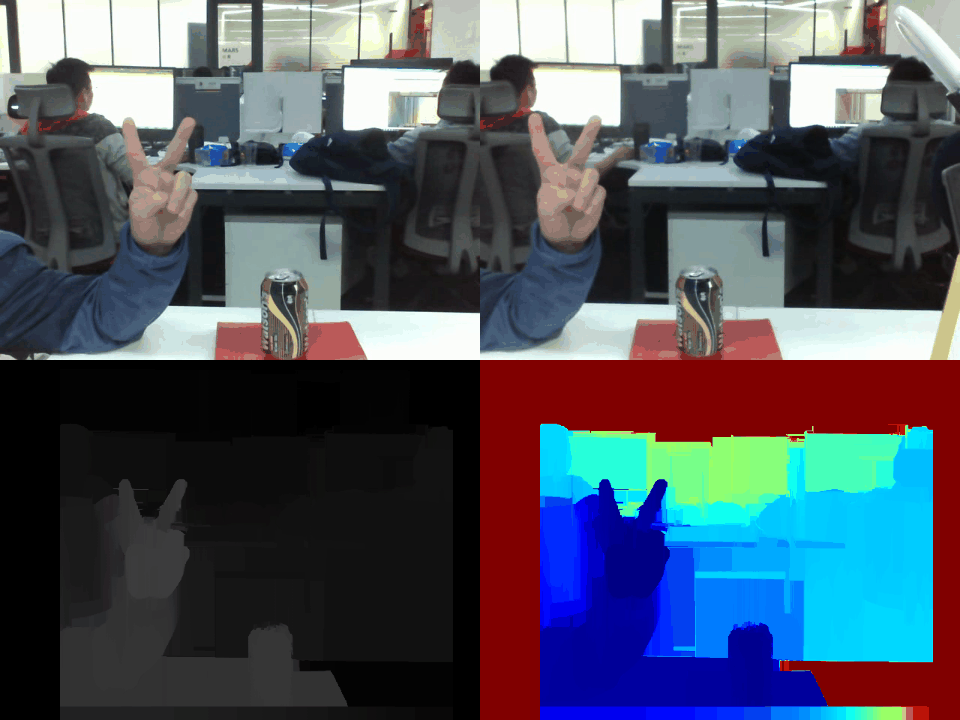
| 左视图 | 右视图 |
|---|---|
 |  |
| 视差图(未滤波) | 深度图(未滤波) |
 | 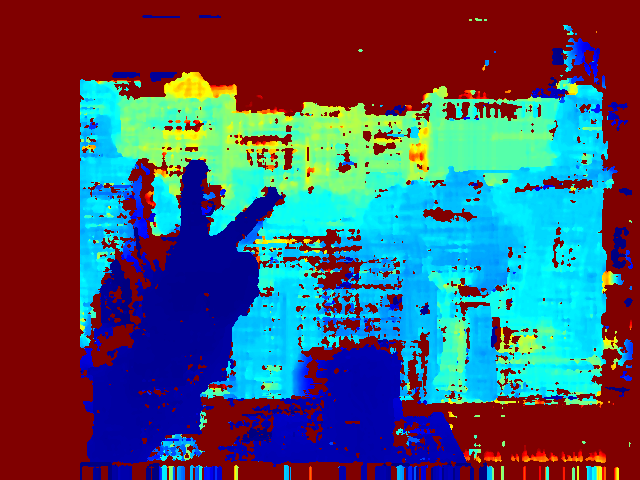 |
| 视差图(滤波后) | 深度图(滤波后) |
 | 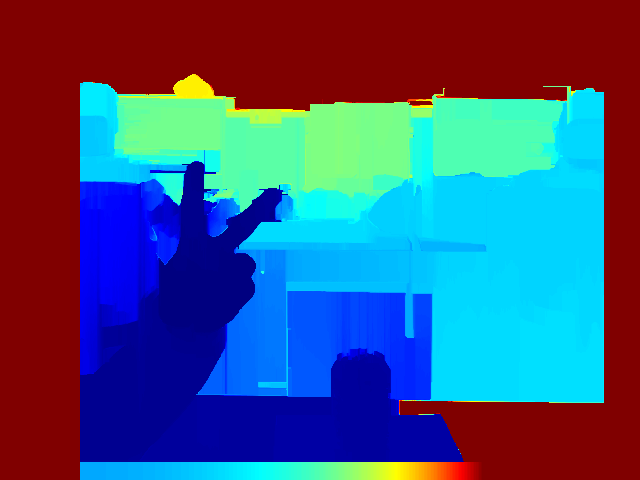 |
可以看到,使用WLS滤波后,视差图的整体效果都有明显改善
- 最终效果图
5.双目测距
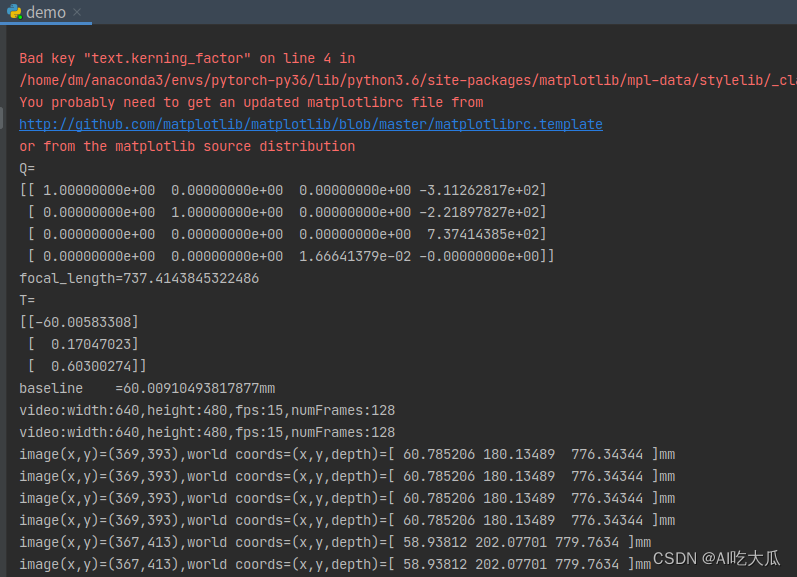
得到了视差图之后,就可以计算像素深度了,在opencv中使用StereoRectify()函数可以得到一个重投影矩阵Q,它是一个4*4的视差图到深度图的映射矩阵(disparity-to-depth mapping matrix ),使用Q矩阵和cv2.reprojectImageTo3D即可实现将像素坐标转换为三维坐标,该函数会返回一个3通道的矩阵,分别存储X、Y、Z坐标(左摄像机坐标系下)。
def reprojectImageTo3D(disparity, Q, _3dImage=None, handleMissingValues=None, ddepth=None):""":param disparity: 输入视差图:param Q: 输入4*4的视差图到深度图的映射矩阵,即重投影矩阵 通过stereoRectify得到(disparity-to-depth mapping matrix):param _3dImage: 映射后存储三维坐标的图像contains 3D coordinates of the point (x,y) computed from the disparity map:param handleMissingValues: 计算得到的非正常值是否给值,如果为true则给值10000:param ddepth: 输出类型 -1 即默认为CV_32FC3 还可以是 CV_16S, CV_32S, CV_32F:return:"""运算如下:
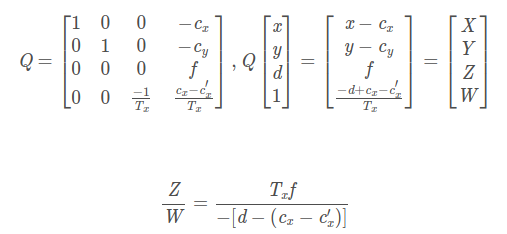
重投影矩阵Q中和
为左相机主点在图像中的坐标,f为焦距,
为两台相机投影中心间的平移(负值),即基线baseline,相当于平移向量T[0],
是右相机主点在图像中的坐标。
其中Z即是深度距离depth:
其中 f 为焦距长度(像素焦距),b为基线长度,d为视差,与
为两个相机主点的列坐标。
这里有个地方需要注意,如果获得视差图像是CV_16S类型的,这样的视差图的每个像素值由一个16bit表示,其中低位的4位存储的是视差值得小数部分,所以真实视差值应该是该值除以16。在进行映射后应该乘以16,以获得毫米级真实位置。
def get_depth(self, disparity, Q, scale=1.0, method=False):"""reprojectImageTo3D(disparity, Q),输入的Q,单位必须是毫米(mm):param disparity: 视差图:param Q: 重投影矩阵Q=[[1, 0, 0, -cx][0, 1, 0, -cy][0, 0, 0, f][1, 0, -1/Tx, (cx-cx`)/Tx]]其中f为焦距,Tx相当于平移向量T的第一个参数:param scale: 单位变换尺度,默认scale=1.0,单位为毫米:return depth:ndarray(np.uint16),depth返回深度图, 即距离"""# 将图片扩展至3d空间中,其z方向的值则为当前的距离if method:points_3d = cv2.reprojectImageTo3D(disparity, Q) # 单位是毫米(mm)x, y, depth = cv2.split(points_3d)else:# baseline = abs(camera_config["T"][0])baseline = 1 / Q[3, 2] # 基线也可以由T[0]计算fx = abs(Q[2, 3])depth = (fx * baseline) / disparitydepth = depth * scale# depth = np.asarray(depth, dtype=np.uint16)depth = np.asarray(depth, dtype=np.float32)return depth- 运行
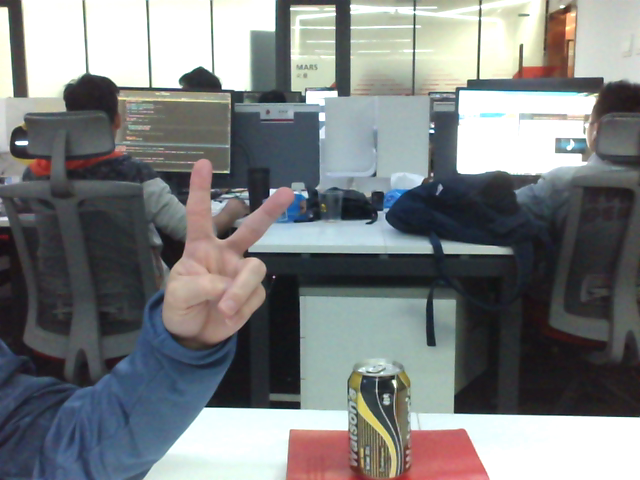
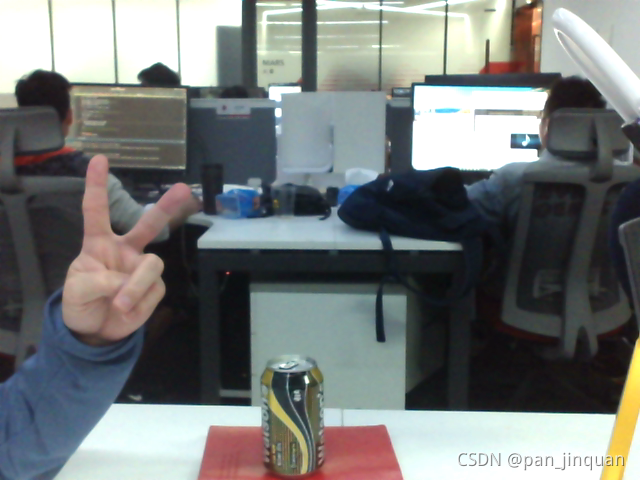
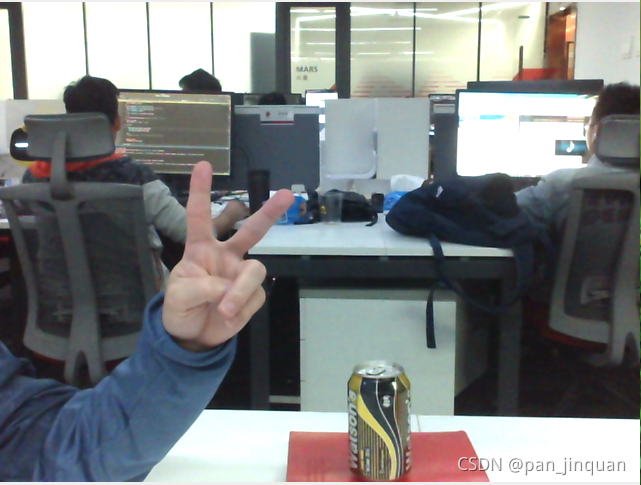
demo.py后,鼠标点击图像任意区域,终端会打印对应距离 - 鼠标点击杯子的区域会打印距离摄像头的距离约776mm,即0.776米,还是比较准的
双目测距的精度 说明:
根据上式可以看出,某点像素的深度精度取决于该点处估计的视差d的精度。假设视差d的误差恒定,当测量距离越远,得到的深度精度则越差,因此使用双目相机不适宜测量太远的目标。
如果想要对与较远的目标能够得到较为可靠的深度,一方面需要提高相机的基线距离,但是基线距离越大,左右视图的重叠区域就会变小,内容差异变大,从而提高立体匹配的难度,另一方面可以选择更大焦距的相机,然而焦距越大,相机的视域则越小,导致离相机较近的物体的距离难以估计。
理论上,深度方向的测量误差与测量距离的平方成正比,而X/Y方向的误差与距离成正比;而距离很近时,由于存在死角,会导致难以匹配的问题;想象一下,如果你眼前放置一块物体,那你左眼只能看到物体左侧表面,右眼同理只能看到物体右侧表面,这时由于配准失败,导致视差计算失败;这个问题在基线越长,问题就越严重
双目立体视觉系统精度分析_3D Vision-CSDN博客_双目视觉定位精度在一个三维测量项目中,如果采用立体视觉方案,首先,要根据测量需求(精度、测量范围、速度等),确定立体视觉的硬件方案。Thomas Luhmann在他的《Close-Range Photogrammetry and 3D Imaging》(2014)中,给出立体视觉系统的简化分析方法。这个方法假设两个相机的光轴平行,基线与光轴垂直,基线长度b和焦距值c不存在误差。分析了图像处理误差对立体定位https://blog.csdn.net/xuyuhua1985/article/details/50151269
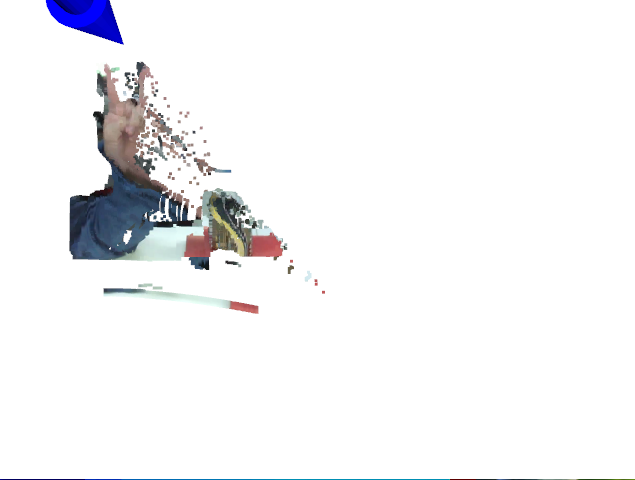
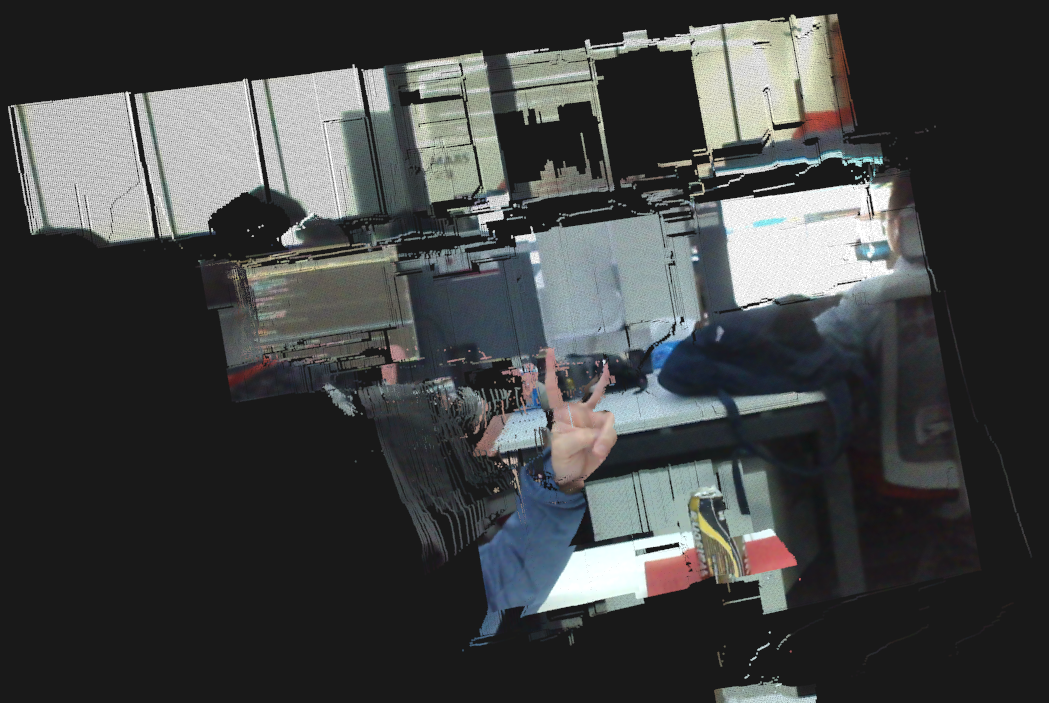
6.3D点云显示
恢复三维坐标后,就可以使用python-pcl和Open3D库显示点云图
PCL Python版比较难安装,如果安装不了,那可以采用Open3D勉强凑合使用吧
如下图所示,你可以用鼠标旋转坐标轴,放大点云
| 2D-RGB | Open3D点云显示 | PCL点云显示 |
 |  |  |
def show_3dcloud_for_open3d(self, frameL, frameR, points_3d):"""使用open3d显示点云:param frameL::param frameR::param points_3d::return:"""if self.use_open3d:x, y, depth = cv2.split(points_3d) # depth = points_3d[:, :, 2]self.open3d_viewer.show(color_image=frameL, depth_image=depth)def show_3dcloud_for_pcl(self, frameL, frameR, points_3d):"""使用PCL显示点云:param frameL::param frameR::param points_3d::return:"""if self.use_pcl:self.pcl_viewer.add_3dpoints(points_3d, frameL)self.pcl_viewer.show()7.示例代码Demo
示例代码如下, 项目配套了双目摄像头的校准参数文件,以及左右摄像的视频文件,可以作为Demo直接测试和使用
python demo.py# -*-coding: utf-8 -*-
"""@Author : pan-author@E-mail : 390737991@qq.com@Date : 2020-04-10 20:24:06
"""import os
import cv2
import argparse
import numpy as np
from core.utils import image_utils, file_utils
from core import camera_params, stereo_matcherclass StereoDepth(object):"""双目测距"""def __init__(self, stereo_file, width=640, height=480, filter=True, use_open3d=True, use_pcl=False):""":param stereo_file: 双目相机内外参数配置文件:param width: 相机分辨率width:param height:相机分辨率height:param filter: 是否使用WLS滤波器对视差图进行滤波:param use_open3d: 是否使用open3d显示点云:param use_pcl: 是否使用PCL显示点云"""self.count = 0self.filter = filterself.camera_config = camera_params.get_stereo_coefficients(stereo_file)self.use_pcl = use_pclself.use_open3d = use_open3d# 初始化3D点云if self.use_pcl:# 使用open3d显示点云from core.utils_pcl import pcl_toolsself.pcl_viewer = pcl_tools.PCLCloudViewer()if self.use_open3d:# 使用PCL显示点云from core.utils_3d import open3d_visualself.open3d_viewer = open3d_visual.Open3DVisual(camera_intrinsic=self.camera_config["K1"],depth_width=width,depth_height=height)self.open3d_viewer.show_image_pcd(True)self.open3d_viewer.show_origin_pcd(True)self.open3d_viewer.show_image_pcd(True)assert (width, height) == self.camera_config["size"], Exception("Error:{}".format(self.camera_config["size"]))def test_pair_image_file(self, left_file, right_file):"""测试一对左右图像:param left_file: 左路图像文件:param right_file: 右路图像文件:return:"""frameR = cv2.imread(left_file)frameL = cv2.imread(right_file)self.task(frameR, frameL, waitKey=0)def capture1(self, video):"""用于采集单USB连接线的双目摄像头(左右摄像头被拼接在同一个视频中显示):param video:int or str,视频路径或者摄像头ID:param save_dir: str,保存左右图片的路径"""cap = image_utils.get_video_capture(video)width, height, numFrames, fps = image_utils.get_video_info(cap)self.count = 0while True:success, frame = cap.read()if not success:print("No more frames")breakframeL = frame[:, :int(width / 2), :]frameR = frame[:, int(width / 2):, :]self.count += 1self.task(frameL, frameR, waitKey=5)if cv2.waitKey(1) & 0xFF == ord('q'): # Get key to stop stream. Press q for exitbreakcap.release()cv2.destroyAllWindows()def capture2(self, left_video, right_video):"""用于采集双USB连接线的双目摄像头:param left_video:int or str,左路视频路径或者摄像头ID:param right_video:int or str,右视频路径或者摄像头ID:return:"""capL = image_utils.get_video_capture(left_video)capR = image_utils.get_video_capture(right_video)width, height, numFrames, fps = image_utils.get_video_info(capL)width, height, numFrames, fps = image_utils.get_video_info(capR)self.count = 0while True:successL, frameL = capL.read()successR, frameR = capR.read()if not (successL and successR):print("No more frames")breakself.count += 1self.task(frameL, frameR, waitKey=30)if cv2.waitKey(1) & 0xFF == ord('q'): # Get key to stop stream. Press q for exitbreakcapL.release()capR.release()cv2.destroyAllWindows()def get_3dpoints(self, disparity, Q, scale=1.0):"""计算像素点的3D坐标(左相机坐标系下)reprojectImageTo3D(disparity, Q),输入的Q,单位必须是毫米(mm):param disparity: 视差图:param Q: 重投影矩阵Q=[[1, 0, 0, -cx][0, 1, 0, -cy][0, 0, 0, f][1, 0, -1/Tx, (cx-cx`)/Tx]]其中f为焦距,Tx相当于平移向量T的第一个参数:param scale: 单位变换尺度,默认scale=1.0,单位为毫米:return points_3d:ndarray(np.float32),返回三维坐标points_3d,三个通道分布表示(X,Y,Z)其中Z是深度图depth, 即距离,单位是毫米(mm)"""# 返回三维坐标points_3d,三个通道分布表示(X,Y,Z)# depth = stereo_matcher.get_depth(disparity, Q, scale=1.0)points_3d = cv2.reprojectImageTo3D(disparity, Q)# x, y, depth = cv2.split(points_3d)# baseline = abs(camera_config["T"][0])# baseline = 1 / Q[3, 2] # 基线也可以由T[0]计算# fx = abs(Q[2, 3])# depth = (fx * baseline) / disparitypoints_3d = points_3d * scalepoints_3d = np.asarray(points_3d, dtype=np.float32)return points_3ddef get_disparity(self, imgL, imgR, use_wls=True):""":param imgL: 畸变校正和立体校正后的左视图:param imgR:畸变校正和立体校正后的右视图:param use_wls:是否使用WLS滤波器对视差图进行滤波:return dispL:ndarray(np.float32),返回视差图"""dispL = stereo_matcher.get_filter_disparity(imgL, imgR, use_wls=use_wls)# dispL = disparity.get_simple_disparity(imgL, imgR)return dispLdef get_rectify_image(self, imgL, imgR):"""畸变校正和立体校正根据更正map对图片进行重构获取用于畸变校正和立体校正的映射矩阵以及用于计算像素空间坐标的重投影矩阵:param imgL::param imgR::return:"""# camera_params.get_rectify_transform(K1, D1, K2, D2, R, T, image_size)left_map_x, left_map_y = self.camera_config["left_map_x"], self.camera_config["left_map_y"]right_map_x, right_map_y = self.camera_config["right_map_x"], self.camera_config["right_map_y"]rectifiedL = cv2.remap(imgL, left_map_x, left_map_y, cv2.INTER_LINEAR, borderValue=cv2.BORDER_CONSTANT)rectifiedR = cv2.remap(imgR, right_map_x, right_map_y, cv2.INTER_LINEAR, borderValue=cv2.BORDER_CONSTANT)return rectifiedL, rectifiedRdef task(self, frameL, frameR, waitKey=5):""":param frameL: 左路视频帧图像(BGR):param frameR: 右路视频帧图像(BGR)"""# 畸变校正和立体校正rectifiedL, rectifiedR = self.get_rectify_image(imgL=frameL, imgR=frameR)# 绘制等间距平行线,检查立体校正的效果# calibrate_tools.draw_line_rectify_image(rectifiedL, rectifiedR)# We need grayscale for disparity map.grayL = cv2.cvtColor(rectifiedL, cv2.COLOR_BGR2GRAY)grayR = cv2.cvtColor(rectifiedR, cv2.COLOR_BGR2GRAY)# Get the disparity mapdispL = self.get_disparity(grayL, grayR, self.filter)points_3d = self.get_3dpoints(disparity=dispL, Q=self.camera_config["Q"])self.show_3dcloud_for_open3d(frameL, frameR, points_3d)self.show_3dcloud_for_pcl(frameL, frameR, points_3d)self.show_2dimage(frameL, frameR, points_3d, dispL, waitKey=waitKey)def show_3dcloud_for_open3d(self, frameL, frameR, points_3d):"""使用open3d显示点云:param frameL::param frameR::param points_3d::return:"""if self.use_open3d:x, y, depth = cv2.split(points_3d) # depth = points_3d[:, :, 2]self.open3d_viewer.show(color_image=frameL, depth_image=depth)def show_3dcloud_for_pcl(self, frameL, frameR, points_3d):"""使用PCL显示点云:param frameL::param frameR::param points_3d::return:"""if self.use_pcl:self.pcl_viewer.add_3dpoints(points_3d/1000, frameL)self.pcl_viewer.show()def show_2dimage(self, frameL, frameR, points_3d, dispL, waitKey=0):""":param frameL::param frameR::param dispL::param points_3d::return:"""x, y, depth = cv2.split(points_3d) # depth = points_3d[:, :, 2]xyz_coord = points_3d # depth = points_3d[:, :, 2]depth_colormap = stereo_matcher.get_visual_depth(depth)dispL_colormap = stereo_matcher.get_visual_disparity(dispL)image_utils.addMouseCallback("left", xyz_coord, info="world coords=(x,y,depth)={}mm")image_utils.addMouseCallback("right", xyz_coord, info="world coords=(x,y,depth)={}mm")image_utils.addMouseCallback("disparity-color", xyz_coord, info="world coords=(x,y,depth)={}mm")image_utils.addMouseCallback("depth-color", xyz_coord, info="world coords=(x,y,depth)={}mm")result = {"frameL": frameL, "frameR": frameR, "disparity": dispL_colormap, "depth": depth_colormap}cv2.imshow('left', frameL)cv2.imshow('right', frameR)cv2.imshow('disparity-color', dispL_colormap)cv2.imshow('depth-color', depth_colormap)key = cv2.waitKey(waitKey)self.save_images(result, self.count, key)if self.count <= 1:cv2.moveWindow("left", 700, 0)cv2.moveWindow("right", 1400, 0)cv2.moveWindow("disparity-color", 700, 700)cv2.moveWindow("depth-color", 1400, 700)cv2.waitKey(0)def save_images(self, result, count, key, save_dir="./data/temp"):""":param result::param count::param key::param save_dir::return:"""if key == ord('q'):exit(0)elif key == ord('c') or key == ord('s'):file_utils.create_dir(save_dir)print("save image:{:0=4d}".format(count))cv2.imwrite(os.path.join(save_dir, "left_{:0=4d}.png".format(count)), result["frameL"])cv2.imwrite(os.path.join(save_dir, "right_{:0=4d}.png".format(count)), result["frameR"])cv2.imwrite(os.path.join(save_dir, "disparity_{:0=4d}.png".format(count)), result["disparity"])cv2.imwrite(os.path.join(save_dir, "depth_{:0=4d}.png".format(count)), result["depth"])def str2bool(v):return v.lower() in ('yes', 'true', 't', 'y', '1')def get_parser():stereo_file = "configs/lenacv-camera/stereo_cam.yml"# stereo_file = "configs/lenacv-camera/stereo_matlab.yml"left_video = Noneright_video = Noneleft_video = "data/lenacv-video/left_video.avi"right_video = "data/lenacv-video/right_video.avi"left_file = "docs/left.png"right_file = "docs/right.png"parser = argparse.ArgumentParser(description='Camera calibration')parser.add_argument('--stereo_file', type=str, default=stereo_file, help='stereo calibration file')parser.add_argument('--left_video', default=left_video, help='left video file or camera ID')parser.add_argument('--right_video', default=right_video, help='right video file or camera ID')parser.add_argument('--left_file', type=str, default=left_file, help='left image file')parser.add_argument('--right_file', type=str, default=right_file, help='right image file')parser.add_argument('--filter', type=str2bool, nargs='?', default=True, help='use disparity filter')return parserif __name__ == '__main__':args = get_parser().parse_args()print("args={}".format(args))stereo = StereoDepth(args.stereo_file, filter=args.filter)if args.left_video is not None and args.right_video is not None:# 双USB连接线的双目摄像头stereo.capture2(left_video=args.left_video, right_video=args.right_video)elif args.left_video is not None:# 单USB连接线的双目摄像头(左右摄像头被拼接在同一个视频中显示)stereo.capture1(video=args.left_video)elif args.right_video is not None:# 单USB连接线的双目摄像头(左右摄像头被拼接在同一个视频中显示)stereo.capture1(video=args.right_video)if args.left_file and args.right_file:# 测试一对左右图像stereo.test_pair_image_file(args.left_file, args.right_file)
8.双目三维重建项目代码(Python版本)
【完整的项目代码】双目三维重建系统(双目标定+立体校正+双目测距+点云显示)Python源码
Python版本项目代码包含:
- 支持双USB连接线的双目摄像头
- 支持单USB连接线的双目摄像头(左右摄像头被拼接在同一个视频中显示)
- 采集标定板的左右视图:get_stereo_images.py
- 支持单目相机标定:mono_camera_calibration.py ,无需Matlab标定
- 支持双目相机标定:stereo_camera_calibration.py,无需Matlab标定
- 支持使用WLS滤波器对视差图进行滤波
- 支持双目测距,误差在1cm内(鼠标点击图像即可获得其深度距离)
- 支持Open3D和PCL点云显示
- 源码支持Windows和Ubuntu系统
项目代码结构:
.
├── config       # 相机参数文件
├── core         # 相机核心算法包
├── data         # 相机采集的数据
├── demo         # demo文件
├── libs         # 第三方依赖包
├── scripts      # 脚本
│   ├── mono_camera_calibration.sh     # 单目相机校准Linux脚本
│   ├── mono_camera_calibration.bat    # 单目相机校准Windows脚本
│   ├── stereo_camera_calibration.sh   # 双目相机校准Linux脚本
│   └── stereo_camera_calibration.bat  # 双目相机校准Windows脚本
├── get_stereo_images.py                      # 采集标定文件
├── mono_camera_calibration.py                # 单目相机标定
├── stereo_camera_calibration.py              # 双目相机标定
└── README.md【完整的项目代码】双目三维重建系统(双目标定+立体校正+双目测距+点云显示)Python源码
9.双目三维重建项目代码(C++版本)
目前已经实现了OpenCV C++版本的双目测距,与Python版本效果几乎一致,
详细请查看鄙人另一篇博客《OpenCV C++双目摄像头实现双目测距》:https://blog.csdn.net/guyuealian/article/details/127446435